
Arrangement of a gate for a well. Materials and step-by-step instructions for making a classic fixture. Procedures that extend its life. A well gate is an ancient device for manually raising water from a spring. Nowadays, it is often used as a backup device replacing an electric pump during its forced shutdown. All the basic information on how to make a gate for a well with your own hands can be taken from this article.
Features of the gate design

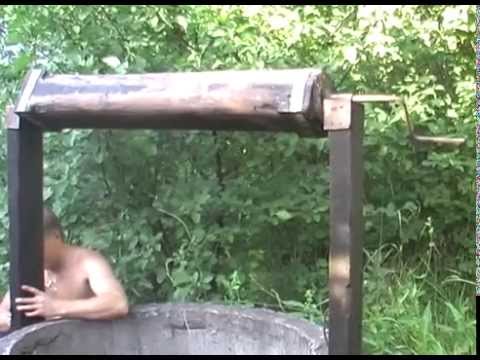
The gate is a wooden or metal cylinder with a chain and a bucket, fixed on racks above the source shaft. It is manually driven through a lever that generates torque to lift the container of water.
A similar mechanism has been used in krinitsa for a long time, its design has practically not changed over many centuries. Today, the product is used in areas where there are no electrical networks nearby, or as a backup option in case of breakdown of water supply units.
The main part of the product is often made from a log with a diameter of 150-250 mm, into the ends of which pins with a diameter of 30-35 mm are driven in to fix it in the supports. One of the axles is long and curved and is used as a handle for turning the structure. There is a place on the log itself for attaching a chain or rope.
The product is installed with axles in specially prepared places. The supports have different designs, each with its own advantages and disadvantages. The information given in the table will help to assess their quality:
| Support type | Dignity | disadvantages |
| Rack holes | Ease of manufacture; does not require special accuracy in the diameter and location of the holes; no additional costs. | Material production appears; the axle must be constantly lubricated. |
| Plastic bushings on the axles | They have a long service life; do not corrode; the material is harmless to people; have high wear resistance; the gate rotates smoothly and silently; axle lubrication is not required. | Precision is required in making holes in the racks and their location in the same axis; the rods must be sanded. |
| Bearing unit | The design makes it much easier to lift water, the rotation becomes especially easy. | The cost of manufacturing parts of the support assembly with high accuracy is added; moisture protection and constant lubrication of the bearings are required. |
A gate for a well can be made from a piece of pipe with plugged ends. The axles are welded to the end caps. Instead of a pipe, a wheel rim is often used, through which a metal axle is threaded. Sometimes the cylinder is a rack-and-pinion structure in which the bars rest on wooden discs cut from the log.
The handle for rotation does not have to be curved; it can be designed in a non-standard way, for example, by attaching a marine steering wheel or a shut-off valve flywheel to the cylindrical part using a key. Another option: in the log, perpendicular to the axis, evenly around the circumference, four holes are made into which levers are inserted - pins, tubes, etc. This design is called a four-finger collar.
The effectiveness of the device depends on the following characteristics:
- Cylinder diameter … Affects the number of revolutions required to lift the bucket to the surface. The larger it is, the less rotations.
- Handle radius … Affects the force applied to lift the bucket of water. The long lever makes it easy to turn the tool.
To manufacture a product, it is recommended to arrange all requirements in the form of a drawing of a gate for a well.
How to make a gate for a well
Consider the technology for creating the simplest wooden fixture. To get a good result, it is enough to adhere to the recommendations given in our article.
Installation of gate posts

Before making a gate for a well, consider a method of attaching it above the shaft. If there is a canopy or a house, additional racks are not required for this, the structure will rely on finished parts. In the absence of superstructures, you will need beams with a section of 20x20 cm or metal channels. The length of the blanks should allow them to be dug into the ground by at least 1 m, while the gate should rotate freely, and the bucket should be easily removed from the mine.
The convenience of lifting the bucket above the mine depends on the protrusion of the head above the ground. Its height must be at least 70 cm. Otherwise, you will have to bend over behind the bucket, which is inconvenient in operation. Bury the pillars near the well in diametrically opposite places, having previously treated the underground part with moisture protection agents.
To extend the life of the uprights, it is recommended to attach them to the above-ground part of the well. To do this, make holes in the rings to fix the beams with bolts and nuts. It is advisable, together with the racks, to build a house for the krinitsa, which protects the mechanism from various natural phenomena.
Manufacturing of the cylindrical part of the gate

The option of creating a gate for a well with your own hands from a log is considered the most economical and easiest to implement. The work is carried out as follows:
- Prepare a log with a diameter of 150-250 mm, cut a piece from it, the length of which is less than the distance between the posts by 100-150 mm.
- Peel the bark off the workpiece.
- Level the surface of the log with an ax and planer.
- Sand the surface with an abrasive sandpaper.
- Treat the log with special agents to protect it from moisture and decay.
- Make metal clamps 6-8 cm wide and fasten them along the edges of the cut. They will not allow the product to crack. Instead of clamps, you can use a pipe, the inner diameter of which is equal to the outer diameter of the log or 1-2 mm less. Cut off two rings from a pipe 6-8 cm wide with a grinder and hammer into the ends of the gate.
- Determine the length of the short and long rods on which the log will rotate. The size of the short axis should take into account the depth of its driving into the end of the log (if such a method of fastening is provided), the distance between the log and the stand, the thickness of the support. The long pin is used not only to fix the gate in the horizontal plane, but also to turn it. The rod will need to be bent twice so that the axis of the gate and the handle for turning it appear.
- Squeeze one edge of each rod so that they easily clog. Also, the flat shape will not allow him to turn in the log. Usually, a rod with a length of 120 cm and a diameter of 30-35 mm is used for the axles. It is cut into 2 parts: 20 cm for the axle, 100 cm for the handle.
- Make holes 12-15 cm deep at the ends of the deck.
- Measure the diameter of the ends of the log. Draw on a 2 mm thick metal sheet two circles, the diameters of which are equal to the measured value, and cut out 2 discs. Better to use stainless steel.
- Drill holes in the center 1-2 mm larger than the diameter of the rod.
- Along the edges of the discs, make holes for screws or nails to attach to the deck. In the absence of blanks for cutting discs, you can use any flat metal shape you have that is smaller than the diameter of the log, for example, finished rectangular parts or a washer.
- Fasten the discs to the ends of the log with self-tapping screws, aligning the fastening holes in the pancakes and the collar.
- Drive the short axle into the hole in the deck. Do not install a long pin at this stage, it will not allow you to place a gate with pivots between the posts.
- Weld the short pin to the disc.
- Secure it to the log with self-tapping screws.
Fastening the gate to the posts in supports without bearings

To fix the product above the well, prepare special places in the racks. The simplest option is considered to be horizontal holes in vertical posts.
Perform the work as follows:
- Make holes in both posts. Their diameter should be 2-3 mm larger than the dimensions of the bar. Make the openings on one horizontal line passing through the center of the shaft ring.
- Place the gate between the supports and insert the short axle into one hole.
- Align the axes of the openings in the log and the rack on the other side of the well and fix the structure in this position with a technological stand placed underneath.
- Install the long axle through the hole in the post and roughly determine how to bend it in the form of a handle.
- Remove the long pin and bend it twice at a 90 degree angle. You should get a shape that resembles the letter "Z", only with the sides located at right angles to each other.
- If you are using a pipe as a blank for the handle, fill it with sand before bending so that the bend does not flatten. Heat the metal to facilitate the procedure.
- Reinstall the bent rod into the hole and make sure that the handle is comfortable for people of different heights. Its length is considered normal if at its highest point it is not taller than a person of average height.
- Drive the lever into the log and weld to the disc at the end. Secure the pancake to the log with self-tapping screws.
- Remove the support from under the gate. Place the log in the middle of the well and secure on both sides with split bushings installed on the axle.
Metal-to-wood contact is the simplest pair to rotate. Refill with grease to reduce friction and extend socket life. Its presence in the support nodes must be constantly monitored. Turning the log without lubrication will lead to backlash in the joints and impede the rotation of the product.
To prevent the production of material during the rotation of the gate, caprolon bushings are often used, which are worn on the axles.
Install them in the following sequence:
- Choose products for which the inner diameter matches the diameter of the axis.
- Measure the outer diameter of the bushing and make the same holes in the posts, decreasing it by 1 mm.
- When making holes, check their position in the horizontal plane.
- Press the sleeve into the holes.
Install the gate in the supports in the same way as in the previous case. In this case, it is not necessary to lubricate the axles. Caprolon bushings have a minimum coefficient of friction with metal, so they have a long service life even without oil.
After attaching the gate to the posts, do the following:
- Fasten the chain or rope to the log with a shackle. You can also drill through the log and thread a chain through the hole and then rivet it. To make it easier to lift the water, attach the cable to the middle of the deck.
- Coat the metal parts of the well with anti-corrosion agents and then waterproof paint.
- Soak all wooden elements with antiseptic compounds.
- Make a hook for an empty bucket and attach it to a shaft or wood structure.
- To protect the source, it is recommended to build a shed or a house over the mine.
Fixing the gate on bearing supports

The most difficult and expensive option for a support assembly is considered to be the use of ball bearings.
The work is done as follows:
- Carefully sand the places on the axis and handle of the gate where the bearings will be installed. Grind them if possible.
- Select bearings with an inner diameter equal to the axis of the gate. Make sure they fit lightly over the pins.
- Select or manufacture metal hubs with a bearing seat and a flange for attachment to the stanchions. The inner diameter of the glasses must be such that the bearings can be pressed into them. Make 4-6 holes with a diameter of 11 mm in the flanges, evenly spaced around the circumference to fasten the parts to the uprights.
- Press the outer bearing race into the hubs. To do this, heat the glass to a temperature of 150-200 degrees and install the products in them. After cooling down, the bearing will be securely fixed.
- Make holes in the struts, the diameter of which should correspond to the outer diameter of the hub.
- Install a glass with a bearing on the short shaft.
- Mount the door with bearings on the posts in the same sequence as in the previous section.
- Screw self-tapping screws into the holes of the hub with a diameter of 11 mm and fix them to the uprights.
For bearings to function for a long time, lubricate them with grease and reliably protect them from water.
How to make a gate for a well - watch the video:
The gate is a mandatory attribute of the well, even with a pump, which becomes useless in the event of a power outage. The simplest classical design is easy to make and assemble on your own in a short time.


