
On the painted surface, the smallest flaws and defects are visible at a glance. Therefore, before painting, you should putty the ceiling for painting. In order to perform this difficult task with high quality, it is necessary to deal with all its subtleties and nuances. Ceiling putty for painting is a common type of repair work. Cracks and irregularities, potholes and grooves - all these overlap errors require special visual masking. Let's figure out how to competently prepare a defective ceiling base for subsequent painting with putty compounds.
The choice of putty for the ceiling

The choice of putty directly depends on the type and condition of the surface to be treated. In our case, we are talking about the ceiling, so let's take a closer look at what kind of plaster for the ceiling to be painted is used for repair and finishing work.
Depending on the component composition, functional properties and intended purpose, all putty mixtures are divided into rough (starting) and finishing:
- Starter putty … It is used to eliminate gross defects and flaws on the base base - leveling significant drops, sealing large cracks and splits, filling large voids. Due to the binding properties of the starting mixture, the rough coating is smooth and resistant to deformation and shrinkage cracks.
- Finishing putty … It is intended for fixing the rough layer and correcting small errors on the starting putty coating. These can be the borders of cross-strokes, shallow chips and notches, thin furrows from small debris. With the correct use of the finishing fine mixture, the ceiling becomes flawlessly smooth and even.
On sale there are putties of two consistencies - pasty and powdery. Most finishing specialists recommend opting for the latter, since, as a rule, bulk mixes are cheaper and more economical.
Puttying the ceiling for painting with your own hands
The technology of plastering the ceiling for painting consists of several stages. All of them are interconnected, therefore they must be performed in a certain order.
Preparatory work before plastering the ceiling for painting

At the initial stage of work, the base surface should be prepared as carefully as possible for the subsequent filling, for this:
- The ceiling is cleaned of the remnants of the old finish - wallpaper, traces of glue mixtures, whitewash and paintwork.
- Noticeable protrusions and sagging on the concrete base are knocked down with a perforator, hammer or trojan.
- Cracks with a depth of more than 5-6 mm are embroidered and sealed with coarse plaster.
- Mold spots are scraped off with a spatula or a metal brush, special impregnation-antiseptics are applied to the areas cleared of lesions.
Next, the prepared base is treated with a deep penetration primer solution. This intermediate coat provides a strong and uniform adhesion between the base surface and the rough putty and prevents the reoccurrence of fungal infection.
It is necessary to apply a primer to the ceiling in 2-3 layers with an interval of 30-40 minutes. The most convenient way to do this work is with a paintbrush or a terry roller. Narrow brushes can be used to process joints and corners.
Preparation of a putty mixture for the ceiling

It is most convenient to dilute powdered mixtures for ceiling putty with the help of an improvised power tool. This can be a construction mixer or a universal drill with a stirrer attachment.
The putty is kneaded according to the following scheme:
- First of all, the prescribed amount of warm water is poured into a clean container, then a portion of the powder mixture is added.
- Knead the putty at low speed. The recommended tool speed is within 500-600 rpm. When mixing the components at higher speeds, the solution is oversaturated with oxygen, gives noticeable shrinkage after drying and becomes covered with microcracks.
- After the initial mixing, the mixture should be infused for 7-10 minutes. Then a control batch is performed. A properly diluted putty will have a uniform, viscous consistency.
When manually mixing, the components for the ceiling putty for painting are connected in the reverse order:
- First, the required amount of powder is poured into a dry container, then warm water is gradually added there.
- In the process of kneading, the putty mass is vigorously kneaded until a homogeneous plastic solution is formed.
- The finished putty is given a little "rest" and thoroughly mixed again.
Tips for working with dry putty mixtures:
- When determining the proportions of water and dry powder for the preparation of putty, proceed from the manufacturer's recommendations.
- It is better to mix the putty mixture in small portions. Ideally, one batch should be enough for half an hour of work. Dried putty loses its elasticity and becomes unusable for subsequent use.
- After each mixing, thoroughly clean the working equipment from traces of the putty mass. The preparation of a new portion of the putty should be carried out in a clean container using a clean tool.
Rough plastering of the ceiling before painting

Then you can proceed to the main stage of work - applying the starting putty. To complete this process, you will need two spatulas - with a wide and narrow blade. The first is considered the main tool, it is used for filling the central part of the ceiling surface, the second is an auxiliary one, it is used for processing corner and other hard-to-reach areas.
Let's take a closer look at how to putty the ceiling for painting:
- To begin to putty the ceiling should be from one of the corners of the room.
- First, a small amount of the prepared solution is collected with a narrow spatula and evenly applied to a wide canvas.
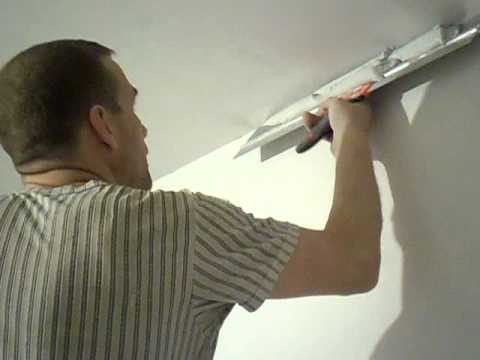
- Next, the main spatula is placed at an angle of 15-20 degrees to the working surface and the collected putty is smoothly distributed over it. The permissible thickness of the first starting layer is no more than 5-6 mm.
- All strokes must be crossed and made under the same pressure on the working instrument. Thus, the entire ceiling area is covered with the putty mixture.
- The dried putty surface must be treated with a hand grinder or emery cloth (for convenience, the latter can be attached to a wooden bar).
- If necessary, it is allowed to reapply the starting putty over the sanded first rough coat. Moreover, each subsequent layer should be thinner than the previous one.
Note! It is important that the starting filler mixture is compatible with the "native" material of the ceiling slab: for example, the mixture for leveling the concrete surface is not recommended for filling plasterboard sheets, etc.
Finishing plaster of the ceiling for painting

As practice shows, the finishing putty must be carried out without fail. If the task of the rough layer is to hide the visible errors of the working base, then the "finish" is intended to give it perfect smoothness and prepare it for the final finish.
The subtleties of the finishing plaster of the ceiling for painting:
- You can start applying the finish only after the final drying of the rough (starting) coating.
- It is recommended to apply the finishing putty in a continuous layer, while the permissible variable thickness of the latter ranges from 1-3 mm.
- As with starter mortar, use two types of paint spatulas - wide and narrow.
- In the process of work, be sure to change the direction of applying the putty mixture relative to the previous layer.
- It is important to apply the leveling solution to the ceiling as quickly and accurately as possible, then the finish coat will turn out to be thin and even.
Sanding the ceiling before applying paint

After the last layer of putty has completely dried, thoroughly sand the ceiling. To do this, it is alternately polished with medium and fine emery cloths. This procedure will help remove the smallest roughness and scratches from the finishing putty.
At the end of the work, the ceiling is cleaned of dust deposits with a household vacuum cleaner and impregnated with a primer. It will strengthen and prepare the substrate for subsequent paint application.
Note! The sanding process is inevitably accompanied by the formation of a large amount of dust. That is why all grinding work should be performed in special equipment - goggles and a gauze respirator mask.
Plasterboard ceiling plaster for painting

Plasterboard suspended ceilings are also subject to mandatory preparation before painting. In general, plasterboard ceiling plaster for painting is carried out according to standard technology. The only thing is that the layer of solution can and should be made as thin as possible, since this type of surface does not need serious leveling.
The procedure for plastering a plasterboard ceiling is as follows:
- First of all, you should check how well the screws are fixed in the drywall. The protruding "caps" of weakened fasteners will cling to the spatula and interfere with puttying.
- Then you need to carefully deepen the interleaf seams. To do this, the docking end edges of the gypsum board are cut with a sharp painting knife to 1/2 the depth of the sheet. Tool tilt angle - 45 degrees.
- Further, the entire area of the suspended ceiling structure, including the inter-sheet seams and the attachment points of the self-tapping screws, is covered with a primer impregnation for drywall using a thick-bristled brush.
- Then proceed to the direct puttying procedure. All expansion gaps between the sheets are filled with a starting solution, a reinforcing bandage tape is fixed on top of the putty layer. For reliability, the latter is covered with another layer of putty mixture. The “caps” of the mounts are masked with cross strokes.
- After drying, the putty loose areas are smoothed to smoothness with a grinder or graters of various grain sizes and again covered with a primer. The final touch of the work is the application of a thin layer of finishing putty over the entire area of the gypsum board.
Note! When filling plasterboard ceilings, it is important to prevent the formation of transitions and "steps" between the treated and untreated sections of the structure. In this case, the consumption of the solution and the thickness of the adjustment layers should be minimal. How to putty the ceiling before painting - watch the video:
Do-it-yourself ceiling putty for painting is a scrupulous process that requires accuracy, care and knowledge of some nuances. To achieve the desired result, use high-quality materials during work and strictly follow the above-described puttying technology.


