
You can make kayaks and canoes with your own hands from twigs and film, and a raft from plastic bottles and scotch tape. Also a master class on creating a ship from sweets. Fans of outdoor activities on the water know how difficult it is sometimes to deliver a floating device there. It takes up a lot of space, quite heavy if carried in your hands. You can solve this problem if you make it yourself. Plus, a DIY kayak will cost you almost nothing.
How to make kayaks and canoes from twigs and film?

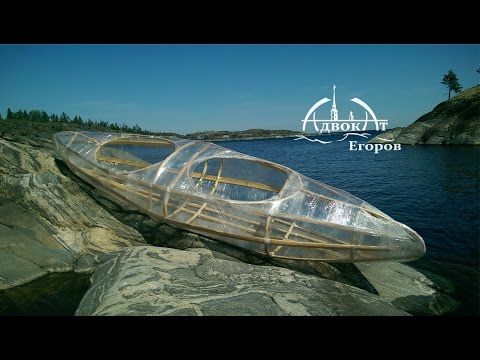
This is how your floating vehicle will turn out. When you plow the expanses of water on it, due to the transparency of the bottom, you will be able to see river, lake or sea inhabitants. To make such a kayak, take:
- branches;
- Scotch;
- stretch film in a roll;
- hatchet;
- knife.
The construction of such a kayak and canoe begins with the creation of a base from branches. To do this, you can use different trees, for example, willow, spruce.
If you decide to use willow twigs, then roll an oval out of each, make two turns with this material. Large ribs in diameter will be 70 cm, average 40 cm, angular a little less - 33 cm. To make a canoe for 2 people, it is enough to install two large oval ribs in the center, then, on both sides there are two medium ribs, 2 small ribs complete this design oval. They need to be connected to the side stringers.

Various materials can be used to join wooden parts: tape, nylon cable ties, wire wrapped. But the last two devices are best for a canvas canoe, and the first for a film canoe.

The length of the kayak is approximately 3.5 meters. After you attach all the sidewalls, you will have a similar design.

- If willow does not grow in your area or there is no way to get its twigs, then cut the spruce branches. Using a knife, you need to remove the bark and small processes with needles.
- Then the branches are wrapped around the trunk of the tree, and for blanks with wider diameter, a log is also attached to it. In this position, the branches need to dry out so that the structure becomes oval.
- Next, for the kayak and canoe, you need to make a cover. You can use tarps, but stretch wrap is better.
- It is easier to wrap around 2-3 people. Two will hold the frame, the third will wind the film. But if you find yourself in the forest alone, then you need to hang the kayak by the bow and stern on two trees, with the help of a rope, do the work yourself.
- Stretch the film well. It is enough to wind 3 layers of film at each place, but at the same time it is necessary to overlap its edges. You can additionally secure the structure with tape.
- When this stage of work is completed, cut slots on both sides of the kayak to make room for 1 and 2 people.
If you use a tarpaulin instead of a film, then cover it so that the edges of the material are at the top, not at the bottom, secure it with clamps.

Such a kayak is built in just 4 hours, you can use available materials for it in order to save money, it is easy to move to another place.

Now you will think whether you need to buy a kayak or you can make it yourself. The following diagram will be a good addition to the above.

How to make a raft from plastic bottles - 5 ideas
This junk material will allow you to make floats quickly. Of course, if you wish, a lot of containers, you can also make a boat.

If you need to quickly make a tool to swim to the other side of the reservoir or just lie on the water, then you need to make a raft.

To make one, take:
- plastic bottles with a volume of 2 or 2, 5 liters;
- waterproof tape;
- scissors.
To keep the container in the water better, place the bottles in the refrigerator, then close them with lids and expose them to the sun. If you are making a swimming facility near a pond, then simply place the bottles with closed caps in the sun beforehand.
It is better to lay them not in one, but in two rows and not immediately fasten the entire structure with tape, but first 4 pieces each. And only then connect these components with tape.
Make sure that all the bottles are facing the same direction. Additionally, strengthen the structure by wrapping it with tape.

Here is the second version of such a device. Take:
- large plastic bottles or cans;
- wooden slats;
- wire in the winding;
- Scotch;
- knife.
Make a crate from wooden slats, fastening them with wire. Attach the interconnected bottles here, wrap them with waterproof tape.

Another option is to place the bottles vertically instead of horizontally, here's how to make this type of raft. It is necessary to fix the bottles element by element, but not down, but up with the neck. These parts are then joined together to form a sturdy structure for the float. You can put linoleum or a mat here to comfortably accommodate several people.
If you have a similar metal frame, then use it, fix the bottles not only at the bottom, but also on the sides of the raft. You can twist one out of thick wire in the winding.

Even very small bottles will be used. The fourth idea will suggest several options.
If you have a sturdy large nylon net, place them here, tie tightly, and the pilaf is ready. Of course, children cannot be left unattended on such a structure and they need to swim not at depth, but in shallow water.
To implement the next option, you will need:
- small plastic bottles;
- polypropylene bags;
- rope;
- knife;
- plywood base;
- slats;
- screws or nails.
Stuff the bags with bottles and tie them securely with string or wire. Make a crate from the slats, attach bags with bottles to it evenly from below, stuff a plywood base on the slats from above.

Watch a detailed workshop on how to make a raft from twigs and small bottles. Young trees can be used by cutting them down, for example, along or along ditches. You need to get rid of such overgrowth in these places. Therefore, you will simultaneously do two good deeds. From this material or thick branches, assemble the frame of a raft, the length of which is 3 and the width is one and a half meters. If this is overgrowth, then chop off excess branches and twigs with an ax.

Tie the top of the bags with nylon cable ties, tape, or wire. Additionally tie each bag with a rope to keep the structure strong. Attach these prepared elements to this frame.

Also make an oar from a slab. After flattening the bottle, put its neck on this straight thick stick, attach well with a rope. And you can go on a pleasant water journey.
If an old cot is available, it will form the basis of the next flotation device.

Take:
- 4 plastic beer crates;
- 80 empty plastic bottles with a volume of 1.5 liters;
- wire;
- rope;
- wide board;
- the aluminum base of the old clamshell.
Place 20 plastic bottles in each box with the necks down. Secure them with string or tape. Unfold the cot. Tie the part on which the pillow is placed with wire to the base. Also, using a wire, attach the boxes to the corners of this device, put the board in the center, fix it in the same way.

How to make a ship out of candies with your own hands?
After such righteous labors, it's time to refresh yourself. But the treat will be devoted to the same topic. Make such a ship to present to your loved one, a child. Everyone will be happy with such an unusual present.

To do it, you need:
- penoplex sheet;
- cardboard;
- corrugated paper;
- PVA glue;
- silver beads;
- toothpicks;
- candies in a shiny wrapper;
- red cloth;
- black gouache;
- silver thread;
- floral green mesh;
- pencil;
- scissors;
- compass.
Cut out the template of the ship from cardboard, transfer it to penoplex, cut out two parts from this material.

Put one workpiece on the second, glue them with PVA, fix these parts with toothpicks. Now redraw the template for the side of the ship, cut the deck along it.

Attach the ship template to its back as well as the sidewall. Cut off all the excess foam, the stern of the ship, on the contrary, needs to be built on, use a piece of foam or foam rubber for this.

Here's what you get at this stage.

And here's how to make the ship further with your own hands. Decorate the body with corrugated paper, starting from the bottom, glue it over with sweets. Sometimes attach golden ones between the black ones, and glue candies on the top only of this color, but in a flat shape.

But how to make a mast on a ship is clearly shown in photographs. Glue a few toothpicks together in a specific way and you have these flotation elements.

The following parts do not need to be crafted, but if you want the ship elements to be authentic, then it is better to make them. To make the Mars - the platform for stretching the ropes, you need to draw a small and large circle with a compass on cardboard. Cut a large one in the form of a ring, a small one in the form of a circle. Fasten them together using toothpick trimmings.

Glue the tops to the masts.

Having laid two toothpicks almost parallel, but with a slight slope, you need to glue 4 more perpendicularly on them. Pre-cut the corners of these elements. Glue the received cables in the place where shown in the photo.

Now you need to attach threads to the masts, beads are used as stops.

In conclusion, our candy ship should get a sail. Cut it out of red fabric, paint with black paint using a stencil.

Glue the sail to the yarn, then mount it on the mast.

Using the same technology, make a few more sails, attach them to their places. If you want, make a stand by decorating it with blue corrugated paper, flower net, so that these materials turn into sea waves.

Here's how to make a craft out of candy with your own hands.
Now you know what to give to your son, husband, nephew. Such a sweet present would be a great way out. If you want to see the intricacies of such a process, then watch a specially selected plot.

The following video shows the process of making a kayak from twigs and film, which was described earlier.
Looking through the third, you will understand how to make a raft from bottles.


