
Plasticinography allows you to make amazing pictures from this available material. Find out what it is, what techniques you can use, how to make flowers and volumetric paintings from plasticine.
This is a relatively new type of creativity that uses plasticine. Plasticinography contributes to the development of the child. Children love to sculpt from this soft material, create interesting works. Such classes will help children develop fine motor skills and creative skills.
Plasticineography for children - what is it?

Depending on how old the children are, it is recommended to use certain techniques of plasticineography.
Experts believe that already from the age of three, a child can be taught plasticineography, first show simple modeling techniques.
Here's what you can teach toddlers:
- smearing;
- stretching and flattening;
- rolling out.
Follow the instructions below:
- To use smudging, you first need to heat the clay in warm water, then smudge it with your fingers on a smooth surface.
- You can roll it out with your palms or by taking a plastic or silicone rolling pin. This technique requires certain skills and strength.
- With the help of flattening and stretching, the guys can make a sausage, pancake, cylinder and other shapes from plasticine, which can then be used to create paintings.
Babies need to be given time to rest so that they like the type of activity, and then they want to continue creativity.
These techniques are recommended for children from 3 to 5 years old. And from 5 to 7 years old, they can already use more complex techniques. It:
- topping;
- smoothing;
- pressure;
- pressing down, smearing;
- mixing.
Let's dwell in more detail:
- Anti-aliasing will help create the background of the future painting. The child will wet his fingers in water, take some plasticine and smear it on the surface. To connect the elements of the picture with each other, you can use the technique of pressing and applying.
- With the help of pinching, the child will make details for the picture and various decorative elements for it. After the plasticine is applied to the picture, the child will pinch it with his fingers in some places where the artistic intent requires it.
- By mixing, plasticine of an interesting color is obtained. If you take light and dark shades, just wrinkle it slightly in your hands, you get the effect of marble.
- As a result of the pressure, the child will attach parts of the image.
- Here are how many possibilities plasticineography gives. For children, you can advise to apply different types of work. See what types of plasticinography are used in this case.
- Stained glass plasticine involves attaching plasticine to the wrong side of the base. Moreover, it will be transparent. So, you can take plexiglass or plastic. First, you need to depict the drawing with a marker, and then, on the other hand, cover its parts with plasticine of a certain color.
- Another method of plasticinography is called mosaic. Invite your child to roll several plasticine balls of different colors. Then the children will fill the pre-created space with these elements. The finished work resembles the mosaic technique.
- Modular modeling involves the use of various elements. These can be cakes, braids, balls, sausages, cylinders and other plasticine figures.
- Show your child what contour modeling is. As the name implies, some part of the drawing needs to be sculpted along the contour. First, the kid will apply a drawing with a marker. Then he will roll thin strands and place them on these contours. To do this, you can use a syringe without a needle. First, it is placed in warm water. When the mass becomes soft, it will be possible to squeeze it out of the syringe onto the contours.
- Textured plasticinography allows you to get voluminous work. Thus, you can create a bas-relief, counter-relief, high relief.
Now check out the hands-on lab to help you practice some of the techniques.
Read also about drawing with plasticine stamps
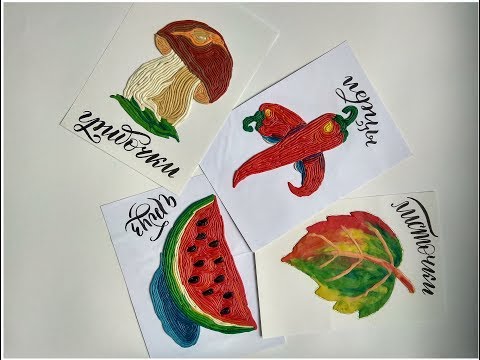
Plasticineography for children - a step-by-step master class and photo

There are three flowers here. The first was made using the mosaic technique, for the second, the contouring technique was used, for the third, mixing was used. See how children created such a beautiful picture. You can use ready-made templates for plasticineography. Parents will print such blanks by choosing a drawing they like on the Internet. Now let the child divide the plasticine into small pieces and roll balls from these blanks. Thus, the guys will develop their tactile sensations and fine motor skills. Now let the child lay out balls of the same color on the first petal, filling it all in this way.

Then you can move on to the next petal. In this way, the child will decorate the whole flower. Decorating the second flower, you need to start with making a sausage, and then fill it with its petals, drawn in the form of hearts. The flagellum is located clockwise.

If the length of the plasticine flagellum is not enough, then the child will do the same, fasten the ends of these two sausages and continue his work.

For the next flower, you need to mix plasticine of various colors and attach it without going beyond the contour. You can first make the background of the flower using plasticine, then attach a lot of other flowers here, smearing it. The child will make sausages from green plasticine and fill the flower leaves with them.
Plasticine for children - plasticine flowers
Check out another step-by-step photo workshop to help recreate these enchanting natural creatures. It is best to take wax plasticine. It is softer, more pliable, it will be easier for children to sculpt from it.

To make a beautiful lily of the valley, provide the children with:
- wax plasticine;
- plastic knife;
- a sheet of cardboard;
- a soft cloth to dry your hands;
- printed drawing file.
You can print the provided template or draw by hand.

To get even contours, let the child first roll flagella from green plasticine, then attach them to the borders of the leaves. Then the work will turn out neat, and the elements will be clear. Then you need to take some green plasticine and start rubbing it with your finger into the place where the leaf will be.
Such plasticineography can be in the older group of kindergarten, since it is too difficult for kids to do such physical work.

Now take yellow plasticine, some green and mix. You get the mass of the desired shade. Let the child roll a ball out of it, then turn it into a drop and flatten it. Now you need to put the blank on the bottom of the leaf. Then, working your way up, start rubbing it in here. Do the same with the second sheet.

The turn came to work with a plastic knife. With it, the child will make the texture of the leaves. But if you have a plastic stack, it's better to use it.

The master class with step by step photos continues its work. It's time to make the stem. You need to get a light green plasticine by mixing green with yellow. It is necessary to make small balls, attach them in place of the flowers. The child will make the carved part of the buds with a stack or a plastic knife. Then on top of each you need to attach a small piece of white mass and smear with your finger. After that, the ends are again serrated. It remains to put a little blue plasticine on each flower and do the same. In this case, the contour near the notches of their ends will consist of 3 layers.

Show your child how, using a plastic knife, to give relief not only to the leaves, but also to the flowers of the lily of the valley.

Let the baby show imagination, make a butterfly out of the available materials. To do this, first a four-petal figure is made from blue plasticine, then you need to decorate it with white mass from above. After that, it remains to work with a stack and attach the body and antennae of the insect here. If the child wants, he will paint the background of the picture so that the modeling of plasticineography will bring him creative pleasure.

In order to make a gerbera using the plasticine technique, you will need the same materials and tools as in the previous master class.

As you can see, you will first need to redraw or print the template, and then mix the clay to get 7 shades. Let the child roll up the green flagella and cover the contours of the lower petals with these blanks. He will fill these elements with plasticine of this color. The next pair of leaves consists of a lighter green color, and for the upper ones, more yellow was added to green.

It's time to use a plastic knife or a stack to make veins for the leaves. Show your child how to do this.

Make a stem out of green plasticine. See how to make gerbera leaves to make them look so beautiful.

First, take orange plasticine and mold the core of the first petal with it. Now, in the inner part of this petal, you need to put a little yellow mass and roll it over it. Then add strokes using a stack. The next petal has a pink tint. We decorate it with orange. Thus, alternating colors, make the whole gerbera. After that, let the child roll out of white and yellow, and also, mixing these colors, these are the stamens. With the help of a pencil, he will make a depression in each.

Here's how the plasticine technique can help you create wonderful artwork. This masterpiece can also be decorated with a butterfly and a background made with a pencil. The child will draw various twigs and flowers to get a wonderful picture.

The following works are also very interesting. Invite your child to decorate the mug with flowers. But all this will also be created from plasticine.

First you need to take a dark blue one, roll harnesses out of it and make edging. To do this, pre-templates for plasticineography can be printed. But you yourself can draw this table object. Then the child will arrange it along the contour in this way.

After that, you will need to fill the space with blue wax plasticine, rubbing it. Now let the baby roll circles out of the blue, attach them to the mug to make such small pancakes. He will make a heart out of pink plasticine and attach it to a mug as a decoration.

It remains to make flowers for decoration from plasticine. Look behind the stages of work.
First, it is necessary to roll such bundles from green, then attach them above the circles as stems. Let the child tear off the green pieces from the wax plasticine, roll them into ovals and turn them into a drop. Then these leaves need to be slightly flattened by hand.
See how the plasticine technique can help make roses. First, you need to roll circles and ovals of different sizes to create petals and flatten them, and then connect them to make a rose. Take a green blank, glue it from below.

Make several of these flowers out of plasticine, then glue them over the stems. Do not forget to attach the leaves. See what a wonderful picture from plasticine turned out.
Very interesting, at first glance, edible objects can be made using the same type of creativity.

But you will immediately need to warn the audience that this pizza is inedible. However, the child will learn how to make and decorate it by reading the next master class.
How to make plasticine pizza?
Take all you need is:
- a sheet of cardboard;
- plasticine of the right colors;
- a syringe without a needle;
- stacks for modeling.
Have your child draw a circle on a piece of cardboard. These will be the outlines of the future pizza. Now he will make the background with a reddish brown color. This is ketchup. You can also use a dark red color for it. Make pizza boards, the base is ready.

Then you need to make mushrooms from white plasticine. To do this, the child will tear off two pieces from the mass, turn them into two ovals, then give the desired shape and flatten them. Each mushroom consists of a cap and a stem.

The next pizza is decorated with sausage. To do this, you first need to sculpt circles from pink plasticine, then make bundles out of it and frame these blanks with them. The child will make circles of different sizes from white plasticine and glue them on this impromptu sausage.

The next decoration of this work in the technique of plasticinography is greenery. Make the leaves from plasticine of the appropriate color, add veins to them using a stack.

For the next part of the work, a piece from Lego Duplo will come in handy, with the help of it you will make a hole in the cheese. And his child will create from yellow plasticine, which needs to be rolled into a layer or will do it with his fingers.

Also, this tool will help to make perfectly even dark olives, which are made from black plasticine.

How such plasticineography is created, the photo clearly demonstrates. Let the child make harnesses from red plasticine, then roll them up in the form of snakes and glue these jets of ketchup in place. As you can see, the olives can be cut even inside to make holes.
But you can create not only food for dolls, but also to develop a sense of beauty. To do this, see how to complete various paintings using this interesting technique. It will be enough to buy wax clay to create such masterpieces.
To make the painting the most durable when it is ready, cover it with varnish on both sides and let it dry.
Read also how to sculpt clay figurines
Plasticineography for children on the theme "Spring"

Prepare everything you need, then it's time to get down to business. It is better to first mark with a simple pencil where everything will be located. Then you will show your child how to knead plasticine and make it look like melted snowdrifts. And from black, he will create protruding islands of earth.
Let it be seen how the melt water flows. The baby will transmit this with a strip of blue plasticine. From the same mass, he will create clouds. Then you need to tear off several pieces from the white plasticine, create a kind of buds from them. And the blossoming petals consist of three such blanks. It remains to make the sun and attach it to the top of the picture. It turned out to be a wonderful work in the technique of plasticineography.
If you and the children liked plasticineography, spring will be captured in an interesting way. Let the child create a three-dimensional picture, which will show that the buds are blooming, starlings are flying in. People build birdhouses for them. The sun shines brightly. Be sure to educate your children about these signs of spring coming. Toddlers should know about this.

To do this work, you first need to take a sheet of blue cardboard or paint white to make it that tone. But you can create a background with blue plasticine. Then, using flagella, the child will make an edging for the trunk and branches of a birch. He will cover this tree itself inside with a white mass for modeling. You need to apply a few strokes on it so that you can see that it is a birch. With the help of green plasticine, the child will depict blossoming leaves.
Using black wax plasticine, children will make starlings, and their beaks will be made from red. The yellow sun is round, and the rays for it need to be made of plasticine, which is rolled between the palms. It remains to attach the birdhouse, and the picture, made in the technique of plastinography, which is called "Spring", is ready. The following work is done in mixed media. But mostly mosaic is used here.

From small pieces of plasticine that need to be rolled between the palms, the child will create birches and the sky. Look, the different shades are used here and the work becomes extraordinarily attractive.
Show the children how to first draw the horizon line, which is wavy in this case. Now, below the child will make grass with the help of green plasticine, plant flowers here.

Then you will need to draw a contour with a plastic knife to indicate where the tree trunks will be located. Between these marks, children will stick balls of white plasticine, they will alternate them with a small amount of black. With the help of green, they will make a lush crown, and blue and blue will become a beautiful sky. But such work is more within the power of children of older groups in kindergarten or younger students. For very young children, you can advise the following picture using the plasticine technique. “Spring” is exactly what it is called.
First, help your baby to outline the outlines of the trees and flowers. Now give him wax crayons, let him use brown to make a trunk, and green to become a lush crown of a tree. From the same plasticine, he will create grass and stems for flowers, and the blossoming parts will be made from bright orange plasticine. All that remains is to make the clouds and the sun.
Help your child expand their vocabulary and teach them to think figuratively. This will be helped by the following work. In the process of its creation and after that, the child will be able to come up with various plots, pronounce them aloud.

- To make a tree trunk, the kid will roll the sausages out of brown plasticine and attach them here. Then he will also make the branches of the tree, but they are a little thinner. To make leaves, you need to tear off small pieces from green plasticine, roll them into balls and flatten them between your palms.
- To make the sun, have a child take a large ball of plasticine, make a circle out of it, then turn it into a pancake. He will stick the sun in the corner of the work, and then with a smear technique, he will begin to create rays. Such work will be simple against the background of blue plasticine. Since these two materials will help your finger slide better.
- In the same way, the child will make white clouds. For a butterfly, a mixing technique is used here, creating such delicate wings. To make flowers, you can glue glitter onto the plasticine background. The stems will be made from thin strips of this material. It remains to create a hardworking ant, a bee, the work is completed.
See what works you can recommend for children of a certain age. The younger the kids, the simpler the samples. But they still turn out to be very interesting.
Plasticinography for children of different ages
You can teach this art to children from 3 years old. See what kind of work children 3-4 years old are doing.

- Give your baby some soft plasticine. Have him roll a piece between his palms to make a sausage. Tell him the colors of the rainbow, let the child do it.
- The sun will help him remember the name of the flowers, the rays of which are made of plasticine of different colors. They are also made with a sausage, but it should be thinner on one side to resemble a cone.
- In this case, the sun has pigtails, so the child will make bows for them from circles of plasticine, which must be pressed with his fingers. It remains to mold a circle for the sun out of yellow plasticine, make eyes with pupils and a smiling mouth.
Another work on plasticineography is subject to children of this junior kindergarten age. Show them how to create tree trunks from a rope. The child will make branches from green sausages, which need to be flattened. Then he will make the texture with a plastic knife, attach these blanks in place. Also, using this knife, you will need to show that these branches have needles. To do this, the child chops the lower parts with a stack.
Help him make a green meadow, but the child will make mushrooms and flowers himself. To make a cloud, he will take a piece of white plasticine and begin to flatten it right on the prepared cardboard. The sun is created from a circle of yellow plasticine. It is difficult for a child of this age to make a bear. The parents will do it for him. They will also show children 5-6 years old how to make this forest character.

Speaking of kids in this age group, see what you can recommend for creativity. Introduce the children to the inhabitants of the seabed, show them how to make an octopus, fish, and sea plants using the plasticine technique. It is better to immediately create this work on blue cardboard, below the child will attach a yellow sculpting mass by smearing, and he will create sea stones from watermelon seeds and other fruits.

Also, children 5-6 years old will be able, under the guidance of adults, to make such a rosy picture.

On the prepared sheet of cardboard, you need to attach blanks in the form of a drop, which will become flowers. Figures made in the form of sausages will turn into stems and leaves. The same will help create grass and hedgehog thorns. The crown of the trees is made from loose cakes, and the circle for the sun is made from one such big one.
Children 6-7 years old will be able to complete more complex drawings. At this age, children have stronger fingers, so they are subject to the smearing technique. It is in this manner that this mysterious sea surface is created. To do this, you need to take pieces of blue or blue plasticine and flatten them and then smear them on the surface. Make this layer uneven so that you can see that these are waves.
Children will also make a goldfish using the smearing technique. To do this, first you need to stick orange plasticine on the base, then make a yellow edging. It remains to attach the scales. To do this, you need to take teardrop-shaped figures, apply them and smear them. This work begins with the tip of the tail and gradually moves to the head. Then the scales will overlap.

This is how much plasticinography technique gives. You can use ready-made ideas or come up with your own. And to give you inspiration, we have prepared interesting stories on this topic.
The first video tutorial is suitable for children from 4 to 8 years old. Having watched it with the whole family, you will teach children such needlework.
The following video will help you make beautiful flowers from plasticine.


