
The existing technologies for the construction of wooden floors guarantee an unobstructed outflow of water and a long service life of the bath. The article provides recommendations for arranging wooden floors with minimal costs. Content:
- Types of wood floors
- Selection of building materials
-
Sandy floor
- Underground
- Lags
- Floor arrangement
-
Clay floor
- Support pillars
- Backing bars
- Installation lag
- Rough and finish floor
When building a bath, builders always show an increased interest in the floor, because it is exposed to thermal effects and humidity. Competent floor arrangement ensures a long term use of the bath. Wooden floors look the most harmonious in the structure, creating a cozy atmosphere.
Types of wooden floors in the bath

Leaking wooden floor in the bath
is a structure with slots through which water flows down and out. It has a simple device, so it is easy to manufacture. Such a floor cannot be insulated, therefore it is common in the south of Russia, there is a warm winter.
Leakproof floor
formed from tightly attached boards. The floor surface is tilted towards the sewer pipe that removes water from the room. The floor can be insulated, waterproofed and vaporized.
The technology for manufacturing a wooden floor is relatively simple, if compared with the technology of pouring a floor with concrete, therefore it is more popular.
The choice of building materials for the floor in the bath

When buying lumber, adhere to the following guidelines:
- Buy larch, alder or oak planks for flooring.
- Larch is considered the best option, it is distinguished by wear resistance and increased hardness, as well as a high price.
- Elements are made of pine, which are installed below the final floor.
- For floors, it is advisable to purchase grooved boards.
- The lumber must be dry, otherwise it will begin to deform in a damp, hot room.
- The minimum board thickness is 25 mm, the recommended thickness is 40 mm. A board with a thickness of 25 mm deforms least of all, but requires additional supports so that it does not bend under weight.
How to make a floor in a bathhouse on sandy soil
The device of the floor in the bath depends on the type of soil on which it stands. On soils that are poorly permeable to water (sandy loam, clayey, loamy), it is necessary to provide for its drainage from under the floor so that the water does not stagnate. In other cases, forced water drainage is not provided.
Underground device

An underground is the place between the floor and the ground. Dig a pit at least 400 mm deep. Determine the exact depth from the condition that a gap of 300 mm remains between the finished base and the bottom surface of the floor board.
Make support posts for lags in the following sequence:
- Mark the position of the posts on the floor. They should be arranged in rows with a step of 1 m.
- Dig wells 400 mm deep and 400x400 mm in size.
- Pour crushed stone into the well (layer 150 mm) and compact it.
- Pour 150 mm of sand on top and compact as well.
- Produce wooden formwork with an internal dimension of 250x250 mm and a height sufficient for the installation of the joists. Install products in wells.
- Prepare concrete from cement, sand and fine gravel using a 1: 3: 5 ratio.
- Fill the formwork with concrete to the required height. Align each surface to the horizon. Make sure the top pads of all posts are in the horizon.
-
After the concrete has set (no more than 3 days), waterproof the posts by covering them with molten bitumen.
In the next step, fill the gaps in the soil around the posts with soil. Mix crushed stone with sand, pour it onto the bottom and compact (layer thickness - 250 mm or more).
Laying lag

For logs, thick beams are used, for example, with a section of 50x180 mm.
When working, adhere to the following sequence:
- Cut logs from blanks with a length equal to the size of the room.
- Lay the logs on the posts, check the location of the upper surfaces in the horizontal plane using a building level. The location of the lags between each other can be checked by laying a flat board across the bars. Level the surfaces as necessary by undercutting logs or adding shims of the required thickness.
- Measure the distance from the top of the beam to the prepared ground on the ground. The allowed size is 300 mm or more.
- Fasten the lags to the posts in any way. Mounting option - use of corners 60x60 mm. Fix the corners to the bar with self-tapping screws, to the concrete base - with 5x50 mm screws screwed into the hole with dowels. Place the corners on both sides of the bar.
- Waterproof the joists and all metal elements with liquid bitumen.
Floor arrangement

Cut the boards of the required length from the blanks. Examine the surfaces of the samples - there should be no unevenness in which water can accumulate. Lay the boards on the joists, provide a minimum of 5 mm gaps between the sawn timber. The gap should not close when the boards swell. Boards are not fastened to the logs with nails so that they can be dismantled and the place under the floor can be washed. For fixing the boards, bars are used, which are installed near the walls and fixed to the logs with self-tapping screws. They can be easily unscrewed, allowing you to dismantle the boards.
Making a floor for a bath on clay soils
The device of the floor involves the drainage of water for the building. Next to the bathhouse, make a square pit, coat the walls with clay. Pour crushed stone (thickness - 10 cm) on the ground under the future floor of the bath, clay on top (15 cm), tamp everything. Make a slope of the embankment towards the pit, water will flow down it. Instead of clay, the drain can be made of cement.
To make the floor in the bath-house leak-proof, it is necessary to make two floors - a rough and a final one. Backing beams are used in the construction of the floor. The extreme beams are installed on a strip foundation, the central one - on opposite surfaces of the foundation and on two supporting pillars. Water flows along such a floor to a drainage pipe, which should be laid even at the stage of foundation construction.
Support pillars manufacturing

The work on the manufacture of a leak-proof floor begins with the manufacture of support pillars and is carried out in the following order:
- Mark the positions of the support posts on the floor.
- Dig wells with a depth of 400 mm and horizontal dimensions of 400x400 mm.
- Pour sand on the bottom with a layer of 100 mm, tamp it. Pour crushed stone (150 mm) on top, also compact.
- Make the formwork 250x250 mm, the height should ensure the height of the post at the level of the strip foundation. Install the formwork in the wells, pave the inside with roofing material.
- Make a frame from a rod with a diameter of 10 mm, the dimensions should allow it to be installed in a well.
- Prepare concrete from cement, sand and fine gravel in a ratio of 1: 3: 5.
- Pour concrete into the wells with a layer of 50 mm, compact it. Install a metal frame in the wells. Fill the wells with concrete to the specified height, compact it with a vibrator.
- Align the top surfaces with the horizon. Make sure that the surfaces of the strip footing and pillars are at the same level. Perform control with the help of a building level. Let the concrete harden (a couple of days).
- Waterproof the sides, tops of the posts and the strip foundation with two layers of roofing material and liquid tar.
Installation of underlays

Before starting work, soak all wooden elements with an antiseptic, and then:
- Install shims on the strip foundations and on the support posts. Install the beams adjacent to the wall with gaps of 10 mm in the longitudinal direction and 20 mm each at the ends.
- Check the levelness of the bars with a level. Provide them with finishing the beams or with shims.
- Check with the building hydrostatic level the position of the upper surfaces of the beams, all surfaces of the beams must be at the same level.
- Drill 12 mm holes in the beams for the anchor bolts. Using the holes, mark the position of the fastening holes on the strip foundation.
- To the beam, which is located on the posts, attach 60x60 corners on both sides, mark the centers of the mounting holes on the surface of the posts.
- Dismantle the beams, make the holes according to the markings. Install the dowels into the holes.
- Install the bars to their regular places and secure with standard fasteners. Make sure the top surfaces of the bars are positioned correctly.
Installation lag

Install the lag as follows. The water on a non-leaking floor should drain towards the drain, so trim the logs so that an angle of 10 degrees to one side is formed. Mark the relative position of the lags on the floor. Fasten the cranial bars to the logs, which will hold the sub-floor boards. Place the outermost joists on the shims. The gaps between the joists and the walls should be 50 mm.
Expose the surfaces of the beams to the horizon. Place the rest of the beams in between. Stretch the cords between the extreme lags and align the surfaces of the internal elements along them. The cords should be at an angle of 10 degrees to the horizon. Fasten the logs to the beams with corners and self-tapping screws.
Laying the subfloor and finishing floor

A slab or other boards are used on the subfloor. You can use roughly cut lumber with irregularities up to 5 mm. Then do the following: clean the boards from the bark, treat with an antiseptic, lay the boards on the cranial bars and nail them down, check for a guaranteed gap of at least 150 mm between the subfloor and the ground.
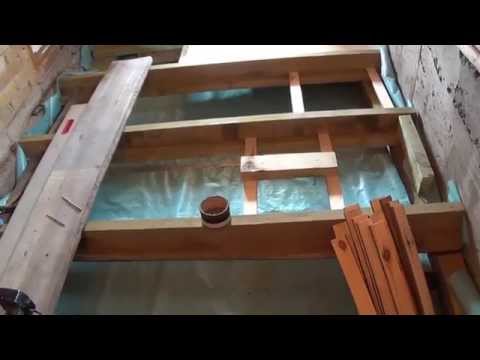
Lay a waterproofing membrane on the subfloor with an overlap of 20-30 cm on the walls. The membrane has a special design, it will not allow moisture from the outside, but will allow it to leave the insulation. Fix the membrane to the side surfaces with a lag stapler every 100-150 mm. Place basalt mats tightly on the membrane to insulate the floor. Gaps and gaps are not allowed. Cover the basalt mats on top with a waterproofing membrane and secure it. Make sure that there is a gap of 20-30 mm between the floor and the membrane.
When laying boards, adhere to the following guidelines:
- Water should drain across the boards.
- Install the first board at a distance of 20 mm from the wall and secure temporarily with self-tapping screws. The gap is necessary for ventilation of the space under the floor.
- Press the next board firmly against the first and temporarily secure it in the pressed position with self-tapping screws. The last board should also be fixed at a distance of 20 mm from the wall. In order to be able to dismantle the boards, for example, for drying, they are fastened with bars that are installed near the walls and fixed to the logs with self-tapping screws. Dismantle the temporary fasteners.
- The finished floor is not painted so that the boards dry faster. It is enough to cover with two layers of drying oil.
For a video on installing beams and floor insulation in a bath, see below:
The installation of the floor in the bath is carried out using various technologies and consumables. But all construction options are aimed at solving one problem - ensuring a free outflow of water and preventing the development of putrefactive forms in wooden structural elements.


