
How to make chair covers and sew a tablecloth to make the dining area chic and cozy. Learn how to create a play house for a child from a table. Home comfort is made up of details. If a tablecloth flaunts on the dining table, and covers to match on the chairs, then it will be pleasant to dine here in such a lovely setting. There is one more function for capes. They will help you transform old chairs into new ones. If leather or wood is covered in this way, it will be more comfortable and pleasant to sit on.
Making chair covers - choosing a style, creating a seat

For such needlework, you will need:
- thick fabric, such as muslin;
- threads;
- needle;
- elastic band (depends on the style).
The pattern will help to make the perfect-sized chair cover. We start by compiling it. Measure the width and length of the seat. If it is not rectangular, but rounded, then you need to attach tracing paper here and circle. The pattern will be perfect.

If you are going to sew a strict cover for a chair, without a "skirt", then you need to measure the sidewalls of the seat, mark its corners. On the pattern, and then on the fabric, they will need to be cut. Do not forget to leave seam allowances of 1, 3–1, 5 mm on all sides. Let's first consider the option of a cape without a "skirt". Attach the pattern to the fabric, cut the canvas along it. To prevent such a seat from slipping, cut 4 ribbons from fabric or dense braid, which must be pinned to the seat from the back side in order to tie it and fix it in this way. After that, you will tuck the edges of the canvas and sew them, at the same time sewing on these ties.

If the seat is rounded, then when drawing a pattern, do not forget to mark these curves. Make notches on the fabric seam allowances so that the cover fits well in these places.

When stitching corners, insert 4 pieces of elastic here (one for each corner), stretch each segment, and grind. Make one more seam that will be parallel to the first, moving them slightly towards the center to hide the elastic and make this place more durable.
Now let's consider the second option, when the cape for the chair is made in the form of a "skirt". Then you don't need to create the seat sidewalls. Having cut it out on the fabric, stitch on the tape, gathering it along the entire length, including at the corners or only on them.

See what other chair covers you can sew with or without a "skirt".

- In the first picture, this part is only on three sides of the seat, with the fourth there will be a one-piece back.
- On the second - you see a variant with a sidewall and a small "skirt".
- On the third - with a "skirt" of greater length. In the second and third photos, folds are laid in the corners of this part of the cape for a better fit. The bottom is edged with ruche.
- On the 4th photo, folds are laid on the lower part of the back seat.
- On the fifth - they are only in the corners of the seat.
Below photos include 5 more models. If you like them and your chairs are that shape, you can use these samples for personalization.
DIY back cover
We continue to sew the cape for the chair. If the back is rectangular, and the top is even, then put the fabric on it, as shown in the photo, baste from the sides. If it is semicircular, then sew at the top with a needle and thread.

Remove the workpiece from the backrest, pay attention to the fact that it can be done without effort.
Since many fabrics have shrinkage, iron the entire length of the fabric with a steamer prior to cutting. Then it will not change its size after washing. Cut the seams on all sides, leaving allowances of 1, 3 cm. Sew the back on a typewriter, stitch it to the seat, after which the chair cover is ready. You can leave it as it is or decorate with various elements.
How to make accessories?
You can decorate the covers with such buttons, sewing them on the back of the cape.

To make them you need:
- plastic rings;
- the cloth;
- needle;
- threads to match;
- yarn;
- ball pen.

Take a plastic ring and place it on the canvas. Outline this detail so that you can wrap the edges of the resulting circle inward, and they would meet in its center with a small margin.

Wrap the ring with a cloth, bring the edges to the center, sew them together with a needle and thread.

Insert fine yarn into the eye of a large needle and sew a decorative stitch along the edge of the button.

Cut out a circle from the fabric, the diameter of which is equal to the diameter of the ring. Sew on the back of the button. Put a ballpoint pen here, sew it in the center with thread.

Duplicate the resulting loop with dense transverse loops.

This is how you can make decorative buttons to decorate your chair cover. Use them or another accessory for decoration. Here's how to make a ribbon bow. Cut 4 equal segments out of it, and the fifth one is slightly smaller.
Connect the edges of each of the four ribbons, bend these elements into eights, sew in the middle.

Now fold the blanks in pairs as shown in the photo, tie in the center with a thread. Fold the fifth tape longitudinally, wrapping the edges inward.

Tie it in a nice knot in the center. Wrap the edges back, sew them, after which the bow, made with your own hands, is ready.

After you have made the cover for the chair, decorated it, there is one more important item left to sew, and then the dining area will be perfect for you.
How to sew a tablecloth with your own hands?

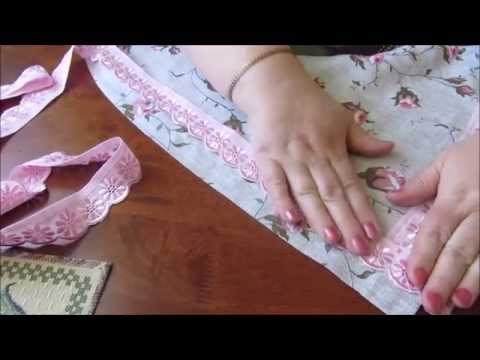
To make one, you need to cut a rectangle out of the fabric. It should be about 15 cm larger than the table top on all sides. Tuck the edges of the workpiece, sew them on a typewriter. To sew such tablecloths for the table further, cut a ribbon out of the canvas.
If the fabric for the tablecloth has, for example, a white background and green blotches, then cut out a ruff from a plain green one. In the same way, while observing the color scheme, cut out frills from other canvases. To make such an edging as in the photo, you first need to process it with an overlock on one and the other side of the tape. If you do not have such an overcast, then just fold the edges on both sides, stitch.
Read how to make a round tablecloth. After all, if you have a table of this shape, then just this is suitable.

Measure the diameter of your table, halve this figure to find the radius. Fold a wide fabric in half, then in half again. Measure the calculated radius diagonally from the central corner, add to it as many centimeters as you want the future product to hang from the sides.
Further, the round tablecloth is processed along the edge. If you have an overlock stitch, you can do it with it. If not, then take a slanting baita. Fold it with the right sides of the tablecloth to each other, sew on the wrong side. Iron the seam, turn the tape over your face, sew it on this side, turning the edge inward.
If you do not have a ready-made, purchased bias tape, make one yourself. To do this, cut the fabric diagonally into strips 2, 5–3 cm wide. They will stretch well, which is what is needed for such work. If you wish, your round tablecloth will be made a little differently. Place the cloth on a clean floor. Flip the table onto it. Circle the tabletop on the fabric, cut out, adding 1.5 cm seam allowance on all sides.
Cut the ruff out of the same or another fabric. Work this detail from the bottom, stitch along the edge of the tablecloth, making folds from this edging at the same distance. Or, first collect this part on a thread with a basting stitch, and then sew along the edge of the tablecloth.
You can make not one, but several of these frills.

In the same way, a tablecloth is created on an oval table, only it is made according to the shape of its table top. Those who know how to embroider can decorate it this way.

And a tablecloth on a rectangular table can be like this.

Then cut out a rectangle for the countertop according to its size, sew on the sides of the fabric cloth equal in length to the distance from the countertop to the floor. Usually, banquet and wedding tables are decorated this way.
In the latter case, such an idea for decoration is suitable.

On the sides, the tablecloth is edged with fabric with evenly laid folds and decorated with a rectangular piece of silk fabric.
Making houses for children
Surprisingly, but a tablecloth, sewn in a certain way, can turn a table into a playground. Probably many of you have noticed that kids love to crawl under the table, play there. You will not need to buy houses for children, as you can temporarily turn an ordinary table into such.
Here's what you need to do this:
- dense fabric;
- cardboard or paper;
- cellophane or transparent fabric;
- scissors;
- Velcro;
- thread, needle.

Here are the stages of work to create such a useful thing.
- We start sewing a tablecloth for children by cutting it out. Measure a rectangular tabletop, cut out a canvas of this size from the fabric, cut out by adding 1, 3 cm from all sides.
- Measure the distance from the table top to the floor. Remember it - this will be the height of the rest of the details. Measure their width by placing a tape measure or a measuring tape between the table legs. Cut out a large back side, and two smaller ones that you will position on the right and left sides.
- There will be 3 parts in front. Two are the same, on which you will make the windows and the third, which will become the door.
- To make the blanks look good from all sides, open out 2 identical parts. Then you will sew them inside out, turn them out. If you want to quickly sew a house for children with your own hands, then do it differently, taking a dense double-breasted fabric.
- Sew the long side of the back of the table with the short ones, stitching them at the top to the canvas of the table top.
- To make windows, lay the blank in front of you, place a square sheet of paper or cardboard on it. Using the same stencil, cut out a window from thick cellophane. You can use transparent fabric instead, but make these elements with a margin.
- Tape these makeshift windows crosswise. If you are making a tablecloth from two canvases, then put cellophane between them where the holes for the windows are cut, sew. If you are using a plain one, then put these "glasses" on top of it, turn over with braid or strips of fabric, tucking them up.
- Stitch these elements by sewing them on top to the fabric tabletop, and on the side, to the side blanks.
- The width of the door should be such that it goes over the window blanks by 5–10 cm on each side. Sew it to the top of the countertop, and then sew 2 fabric ribbons here. When necessary, the child will raise the door, fix it with the Velcro fasteners sewn onto these 2 ties.
Here's how to make a playhouse for kids. Check out other projects if you wish.

This is how you can sew a tablecloth for children and adults. If you want to see the stages of work, then check out the following stories:

See how to sew a picnic tablecloth that doubles as a stove bench. A quick master class is led by Olga Nikishecheva:


