
Pasting wallpaper on the ceiling is a widespread type of ceiling decoration, which has its own characteristics and requirements, advantages and disadvantages. The material below will help you figure out how to properly glue wallpaper to the ceiling. The technology of gluing wallpaper to the ceiling has certain stages: the choice of wallpaper, the preparation of the room and the surface, the preparation of wallpaper and glue, the gluing of the wallpaper itself. For finishing the ceiling, special types of wallpaper are used, the characteristics of which can simplify the laborious process. However, if wallpapering the walls is possible without anyone's help, then it is better to attract an assistant to work with the ceiling.
The choice of wallpaper for pasting the ceiling
An important step is the selection of wallpaper for the ceiling surface. It is necessary to choose the type of wallpaper, texture, color, correctly calculate the required number of rolls.
Tips for choosing wallpaper for the ceiling

A few recommendations before buying material:
- First, pay attention to the product labeling: the weight of wallpaper for the ceiling should not exceed 110 g / m2.
- If the room is small, choose a dim wallpaper without a large pattern or even a plain one.
- Wallpaper with large prints is best used in large rooms with high ceilings.
- If the ceiling surface is multi-level, experiment with wallpaper of different textures.
- If a room performs several functions, for example, it houses a living room and a kitchen or an office and a bedroom at the same time, then you can visually delimit the space using wallpaper of different colors and textures.
- Pay special attention to the calculations if you choose wallpaper with a pattern that must be selected when gluing adjacent strips. Consider the rapport indicated on the product.
- Ceiling wallpapers come in the usual half-meter width or meter. Gluing wide wallpaper significantly reduces the time required, but the complexity of the process increases.
Several types of wallpaper are used for pasting the ceiling: non-woven, vinyl, liquid and glass wallpaper. To choose the right type of wallpaper, take into account all the advantages and disadvantages of the material from which they are made.
Vinyl wallpaper for ceiling

Vinyl wallpapers have beautiful patterns, reliefs, a wide range of colors. Deficiencies and distortions on the ceiling are easily corrected during the gluing process. The increased strength of the material allows for wet processing. The surface of this type of wallpaper does not fade, it is resistant to scratches.
Vinyl wallpaper covering the ceiling is a great option for those who make repairs without anyone's help. It is quite easy to work with such a material due to the fact that the glue can be applied only to the surface to be glued, which greatly simplifies the gluing process. However, if the ceiling has not been pre-primed with liquid glue, apply the glue to the wallpaper to improve adhesion.
Vinyl wallpaper is not breathable, so the ceiling does not breathe, this can lead to condensation, and an increase in the level of humidity in the room provokes the development of mold and mildew. That is why special attention should be paid to antiseptic surface treatment before wallpapering.
Non-woven wallpaper on the ceiling

Non-woven fabrics allow you to hide small irregularities on the surface of the ceiling. The structure of these wallpapers is moisture resistant, so the material lends itself to dyeing and wet processing. They can be used to paste over the bathroom.
Gluing non-woven wallpaper on the ceiling is not much different from the process of pasting the surface with other panels. However, due to the presence of a dense base for non-woven wallpaper, it is not necessary to glue masking tape at the joints between the drywall sheets.
Fiberglass wallpaper for ceiling

The characteristics of fiberglass wallpaper are as follows:
- Can be painted over with water-based paints or latex paints. Up to 20 colors can be produced.
- They do not burn, thus do not contribute to the spread of fire in a fire.
- Thanks to the natural materials included in the composition (limestone, clay, quartz sand), they do not emit harmful substances.
- They have the highest possible durability, such characteristics allow extending the life of the wallpaper up to 30 years.
- Fiberglass is not electrified, so dust does not linger on its surface.
In addition to traditional roll wallpaper, there are also liquid ones. They have high adhesion and elasticity, antistatic effect, environmental friendliness, vapor permeability, sound insulation properties, resistance to fading, the ability to accumulate heat. If, during operation, damage appears in any area finished with liquid wallpaper, it can be replaced, while the traces of repair will be invisible.
Preparatory work before wallpapering the ceiling

Ceiling preparation is a crucial and integral stage in ceiling repair. In many ways, the result depends on the quality of the preparatory work. It is better to start preparing the room for wallpapering in advance, for example, a day in advance.
Free the room from unnecessary items, including ceiling lights, ventilation grilles, sockets, switches. Wrap bare wires from the lamp and sockets with electrical tape.
Create a favorable microclimate: close the windows tightly to prevent drafts during repair work, turn off the existing climatic equipment, humidify the air in the room by placing containers with water in the corners.
Sticking wallpaper on the ceiling with your own hands will be much easier if the structure on which the worker is moving is long enough so that in the process there is no need to be distracted by moving it around the room.
Features of leveling the ceiling under the wallpaper

Before gluing the wallpaper, it is imperative to level the surface so that at the end of the work any irregularities are not visible, which significantly worsen the appearance of the room as a whole. But first, clean the ceiling surface.
Choose the cleaning method taking into account the type of dirt and the original coating. To remove a thick layer of chalky or lime whitewash, use a spatula, rinse off the remains with warm soapy water. A layer of dispersion or oil paint should only be removed if the paint begins to separate from the ceiling.
To make the wallpaper-pasted ceiling pleasing to the eye, level its surface in advance. If the irregularities are small, then apply the "wet" method (using plaster, putty). If the differences in the level of the ceiling are quite noticeable (more than 4-5 cm), use the "dry" method (using drywall and profile). When leveling the ceiling, do not forget that the angle between it and the wall should be 90 degrees.
The "wet" method of leveling the ceiling is carried out using various materials, such as:
- Plaster - if the differences are from 1 to 4 cm;
- Starting putty - if the differences are from 0.5 to 1 cm;
- Finishing putty - if the errors are up to 0.5 cm.
In some cases, it is appropriate to use all of the listed materials, but only in the following order: plaster - starting putty - finishing composition. The finishing putty, in contrast to plaster and starting putty, has the smallest grain size, which makes it possible to create the most smooth surface with its help.
If the leveling of the ceiling was carried out using profiles and drywall, pay attention to special processing of the joints between the drywall sheets. Glue mounting tape along the entire length of the seam, which will prevent the formation of cracks in these areas, then putty. After the filler has dried, sand the ceiling to remove any small bumps.
Processing the ceiling with a primer before gluing the wallpaper

After the filler is completely dry, prime the entire surface. Primer compounds are designed to improve the adhesion of one building material to another, in this case it is a finishing putty and wallpaper.
The assortment of primers is wide enough. Concentrates, which must be diluted in accordance with the manufacturer's recommendations, are cheaper. There is also an antiseptic primer that fights fungus, mold, prevents their appearance, penetrating deeply into the material.
The primer can be applied with a roller, brush and spray gun. Some primers need to be applied several times. Read the instructions for use of the product carefully.
Observe precautions when treating the surface with an antiseptic primer. You may need a mask, gloves, protective suit. However, when gluing wallpaper in a residential area, it is not advisable to use compounds that can be harmful to health.
Ceiling and wallpaper markings before gluing

It is customary to glue wallpaper on the ceiling along the side walls. Otherwise, in the daytime, the joints will cast a shadow, because of this they will become very noticeable.
Mark the ceiling: measure from the side wall the width of the roll of wallpaper on both opposite sides of the room, draw a line with a simple pencil. Use a long ruler to keep the line straight.
In some cases, it is allowed to use paper masking tape at the joints of the wallpaper in order to avoid delamination during operation.
When marking wallpaper in a roll, take into account the allowances for both sides and the rapport, if the pattern needs to be selected. Cut the roll into blades using a well-sharpened knife. Number them and fold them in the correct order.
Sticking wallpaper on the ceiling with your own hands

Pasting the ceiling with wallpaper is a rather laborious process that requires patience and strength. At best, this type of work should be done together.
Dilute the adhesive in the required proportion, referring to the information on the package. Some adhesive solutions must be infused before use, others can be applied immediately. Non-woven wallpaper glue can have a pink tint that disappears when it dries completely. The glue must be thick enough or it will drip onto the floor.
When all the preparatory work is over, the ceiling is flat, clean and dry, you can start gluing wallpaper to the ceiling:
- Apply glue to the inside of the flattened wallpaper with a brush or roller. Fold the fabric with the edges in the middle along the length. Leave it for a few minutes to saturate with glue.
- In the meantime, apply adhesive solution to the part of the ceiling surface that is intended for the first sheet with a small margin. Thoroughly coat the corners and joints of the wallpaper.
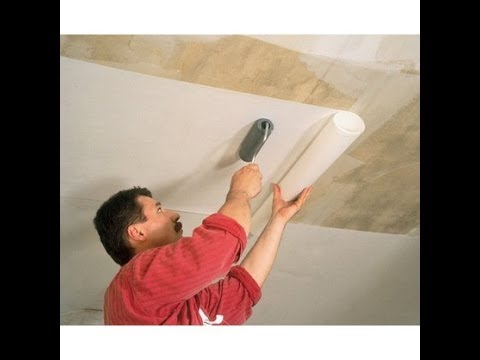
- Unfold the first sheet in the right direction, place its edge against the ceiling and gradually press down on it. Roller movements should go from the middle to the edges. Stick to the ceiling markings you made earlier. Wallpaper should be glued from the inside of the room towards the window.
- Use a soft cloth to wipe off excess adhesive gently. Carefully inspect the pasted sheet for air bubbles. Drive them out immediately. The result should be assessed from different angles, it is advisable to go down to the floor.
- Press the wallpaper to the corner with a spatula and cut off any irregularities and excess wallpaper along the wall with a thin utility knife. Gluing the first sheet is often the most difficult step.
- Proceed to the next sheet, pre-glue the area for the second sheet. If necessary, coat with glue under the edge of the previous sheet.
- In the place where the lamp is attached, make a cross-cut incision, thread the wires, firmly press the wallpaper to the ceiling.
- After finishing the work, leave the room until the wallpaper is completely dry.
Check the result of the work: if there are areas where the wallpaper is slightly behind the ceiling, coat it again with glue. If there are bubbles in the middle of the web, then glue can be injected into them with a syringe. How to glue wallpaper on the ceiling - watch the video:
In order for the efforts to paste the ceiling to give the best result, follow the step-by-step instructions and tips for the selection of wallpaper, surface preparation.


