
See how to make a panel from a variety of materials. For this, zippers, hair ties, buttons, shells, dried fruits, natural materials and even CD discs are useful.
The production of panels promotes self-expression. To create it, you can use a variety of materials, including junk materials. You can decorate your home with a ready-made panel or donate it.
Do-it-yourself beautiful panel made of natural materials

You can create such a wall decoration if you take:
- canvas on cardboard;
- palette knife;
- embossed paste;
- semi-matt acrylic varnish;
- acrylic paints: green, gold, brown, magenta;
- synthetic brush;
- various natural materials.

Lay out the cleaned, dried elements of the painting on the canvas.
So that you don't forget where that will be, take a picture of how you decomposed natural materials.

Free the canvas and apply the paste to it with a palette knife. Where large objects will then be located, put the paste thicker, in a layer of 0.5 cm. This composition will help you create the relief of the sky and water.

In order to further make a beautiful panel with your own hands, you need to put natural materials back in, looking at the photo created before. Make the horizon lines by putting thin twigs or other elements here. At the edge in the foreground, place larger twigs to create a forest out of them. Place the leaves at the top, and at the bottom, where the water will be, put flat stones.
All these elements need to be pressed into the embossed paste so that they are fixed.

To remove air from under the leaves, brush over each leaf with a wide brush from the middle to the edges.
Remove the panel until the next day to dry it out. Then paint the surface with ivory acrylic paint. After applying the first coat, wait a little, cover with a second coat. Let it dry as well. In the meantime, you will place in a glass, blue, brown paint and a cuff. Dilute with water. Stir and fill the groove and cracks in the relief with this composition to get volume.

Take a semi-dry brush and use it to apply accents with white paint. Now cover some of the work areas with gold paint.
Using sandpaper, go over the places where the sky and water are depicted to make the necessary strokes.

Now cover the work with acrylic varnish. After it dries, the beautiful panel is ready.

Rustic panel technique

To create such a miracle, take:
- wooden frame 10 by 15 or 10 by 10 cm;
- a flap of linen fabric;
- canvas for the background;
- decorative or dollware made of clay;
- round and flat ice cream sticks;
- beans;
- cereals;
- seeds;
- plastic fruits and vegetables;
- transparent glue Titanium or Moment or hot glue;
- thermoplastic;
- cardboard and photo frame.
Cover the frame with fabric, attach a sheet of cardboard on the back, on which the loops will be fixed, to hang your masterpiece.

Cut an 8 x 10 cm rectangle from the linen cloth, sew a bag for cereals. Make a second blank and fill them with white paper. You can also use cotton wool.

Take decorative wooden barrels and cut them in half. And cut the wicker basket in half. To keep this part in shape, glue a strip of cardboard on the back, and also attach them in the corners and one at the bottom.
If you do not have small decorative or dollware, cut the containers out of the egg tray. Then they will need to be painted to make them look like ceramic.

To achieve a rustic flavor when you use the panel techniques, paint the cardboard blank first with yellow and then brown on top, but so that the yellow shines through. Now take a round ice cream stick and saw off to make a piece of sufficient length. And glue it to the top of the composition to create a kind of shelf.

Take other ice cream sticks that look like spatulas, break off the tips of two using nippers, then you need to grind these blanks.

Using available glue, attach these parts in place.

Pour cereals and seeds into bags of paper on top. To prevent these elements from spilling out, fix them with glue. Put various containers, artificial fruits on the shelf, hang a garland of pepper on the side.

You can decorate the panel in a different way. To do this, you still need to make a thermoplastic pumpkin.

You can also make a tea set from this material. Glue its elements to the shelf. Create bagels, bread from plastic, and lace and napkins will also be an excellent decoration for a rustic panel.

You can cut off a few twigs, which will turn into cinnamon sticks after staining. Tie them with linen rope and glue them in place. This picture of rural life looks pacifying.

If you show even more imagination, then the panel techniques representing the rustic comfort can be like that.

Also use thick cardboard as a base, you can take a sheet of hardboard. Cut out the components of the bouquet from cardboard, glue them in place. Make an appetizing pie and cake out of plastic, place them on a table made of cardboard and covered with a tablecloth.
Choose curtains that match the color, also trim them with lace. The decor for cardboard stools is made in the same style. A twisted rope will become a broom. Complete the interior details for such cozy beauty.
A beautiful panel glorifying rural life can be created as follows.

The basis here is burlap, the stove is made of cardboard, decorated with pictures. You will glue these little pads to the top of the stove, where the bed is. Make a rooster, pumpkin, pot out of plastic. And turn the halves of small plastic jars into containers for bulk products, into which you pour legumes or cereals.
You can also make a panel by making significant parts from salted dough. From it you will create such a colorful couple, which can be the heroes of Gogol's work "Evenings on a Farm near Dikanka".
When the dough is dry, color in the elements of this racy pair. From the fabric you need to make clothes for them, glue it in place. Create windows from cardboard, decorating them with a canvas that looks like towels. Make dishes out of plastic, you can also create kitchen utensils from it.

We create panels from various materials
If you want to make a quick panel from what is at hand, then use the following ideas.
From lightning
If you have a few pieces that you ripped off from old things, then open the zippers and weave such a colored mesh out of them.

Hair scrunchies
They will also make amazing pictures. Perhaps your daughter has already grown up and she does not need these ornaments for her head. Take your hair ties and twist them several times. You can use not one, but several at once, creating colored beams. Then they need to be glued to the prepared surface.

From buttons
A variety of paintings can be created from this material. Attach the buttons to the base using Moment glue or a hot gun, you can attach them in any order.

And if you want, lay out patterns or create an image of a person or an animal.
Read also how to make art paintings and panels in 5 minutes
Panel composition
Make several framed pictures, hang them like in the photo.

Place a small clockwork device in the center. Now you, being at home, can always know what time it is. This idea will also help children learn the position of the hands and familiarize themselves with the clock. But for them, you can use children's drawings.
From figurines
You can take ready-made figures, for example, silicone spiders, paint them and lay them out to dry. In the meantime, you will weave a web.
To make it, cut 6 segments, fasten them in the center. Starting in the middle, twist in a spiral with the same white thread. You will make a frame if you cover the white sheets of paper with strokes of black paint. Glue artificial birch twigs onto this "birch bark".

In nautical style
If you have seashells at hand, beautiful pebbles, then create a panel from them. Make the frame out of blue sisal. If you do not have such material, then you just need to paint the cardboard frame blue or decorate with threads of this color. When the coating is dry, glue the prepared material here. You can also color some shells to make them brighter.

Modular picture
Panels consisting of several paintings are very fashionable now. Create some canvases by painting them. When you connect the elements of the picture, you get a single plot.

From fruit
If you want the apartment to be not only beautiful, but also a pleasant aroma, then cut the oranges into circles in advance, dry them. Use nuts, cinnamon sticks, coffee beans.


And if you know how to make flowers from satin ribbons, then make them and make such a panel from fabric.

From disks
If you wanted to make a beautiful composition right now, but there is no suitable material at hand, then take an old disc and a clock mechanism, for example, from an alarm clock. Attach the mechanism to the disc, glue this element to the base.

And to make it, you will need to cut a circle out of cardboard so that it is larger than the disc. Glue the printed notes and paper keyboard elements to the paper base.
In black and white
If you like such paints, then we suggest making a panel of such color. Such a decorative panel will fit into a room where minimalism reigns or where there are bright decorative elements.

If you know how to embroider and want to decorate a wall, then create a piece of work using this technique and hang it right in the bedroom. Even if you are unfamiliar with the embroidery technique, you will still be able to create such a homemade masterpiece.

Cut off several multi-colored threads, fold them into one bundle, give the desired shape, placing them on the canvas. Thread the needle and start sewing the thread arrangement to the warp. Fluff up the tail, here you need to glue it with transparent glue, cutting off the threads of different lengths.
You can create several of these compositions, they will look charming in the living room.

Leather
Beautiful wall paintings are also made from this material. If you have old leather items, cut out different types of geometric shapes from them, arrange them on the leather base. You can cut it in the shape of a rectangle, circle, or other geometric element. You can glue the individual pieces or sew them on with a leather cord. Fringe around the edges to create a work like this.

How to make a fabric panel?

To make such a beautiful bear-shaped thing, take:
- soft and hard felt;
- plywood;
- hot glue gun;
- scissors.
Cut out the bear template, attach it to the felt, and saw out with a jigsaw.

Cut squares out of felt, then, cutting in waves in a spiral, cut out flower blanks from them.

We need such elements of different sizes. Some leaves now need to be cut from hard felt and others from soft felt. But you can cut individual leaves with twigs. Cut the petals for lighter and darker colors.

Now cut 1 cm and 2 cm wide strips with soft felt scissors. They will be required in order to decorate the panel.

You can cut straight elements with scissors or with a roller knife.
Start rolling the roses. Take the workpiece in the form of a spiral and start twisting from the center to the edges. Glue the inside and outside with silicone hot glue.

Start creating. Make a large flower. To do this, take a wide strip, apply the glue inside and fold in half, securing it.

Now cut the strips from the back of the fold.

To further make a panel from fabric, begin to fold this blank, gluing the turns at the bottom.

You can make a rose from fabric using fleece not one, but two colors. Contrasting plants look great too.

Now start from the back side to glue leaves, twigs to such a flower.

Glue the created flowers onto the wooden template. See how best to arrange them.

Determine where you will stick large plants, and much smaller ones. Veil the remaining distance between two adjacent flowers by gluing leaves here.

This is such a wonderful job. What other panels you can create, pictures will show.
Read also how to make a beautiful soft vase, ball, cup and teapot out of fabric
Decoupage technique for creating a panel with your own hands
On the eve of winter, you can advise to make a picture on a plate, turning it into a frosty window.

Take:
- alabaster;
- a mold for casting plaster;
- water;
- capacity;
- acrylic paints;
- crystal paste;
- acrylic lacquer;
- PVA glue;
- glitters and outlines.
In this case, a plate was cast from alabaster. To do this, you need to use a form. A cake lid or other container with hard sides is suitable for it.
First, see how to make a plaster cast. To do this, you will need to take a suitable container, such as a plastic mayonnaise bucket. Put some gypsum in here and add a little tap water. It should be warm. Stir to get a homogeneous sour cream consistency. Now you need to immediately pour it into the mold. If you will be making a similar blank, then use a regular plastic plate, pouring liquid gypsum here. Then you will need to wait until the workpiece is completely dry and remove it from the mold. Here's what happens.

These are the forms for the panel, but what kind of gypsum casting will turn out in them.

To make the liquid alabaster set faster, place the mold on a warm battery to dry. Then the casting will harden in half an hour. But this is if its thickness is about one and a half centimeters. But you cannot still use such a casting, you need to let it dry for a day.
Sand the back of the plaster plate with sandpaper.
Take the matched napkin, separate the top layer from it and glue the napkin on the PVA. To attach it and not tear it, use the file.

Now apply two or three more coats of varnish over the napkin. When it's dry, look for wrinkles. If present, sand them gently. Use fine sandpaper for this. Since part of the plate is not covered with a napkin, you can paint it in a suitable shade.

As you can see, a white tone has been applied around the circle. This creates the effect as if the viewer is looking out of a snow-covered window onto the street. But to make the snow even more reliable, it is necessary to apply crystal paste on the rims of such a panel. The pictures show what the effect will be. But first, dry the work for a day, then apply a little more "snow" with a white outline, and on the crystal paste draw some strokes with glitter.

Here is such an interesting panel on a plate. If you want to hang it on the wall, then carefully drill a hole at the top using a thin drill. Thread the thread here and tie it in a loop. You can just put such work upright on the shelf and admire.
This is how you can make a panel from various materials.
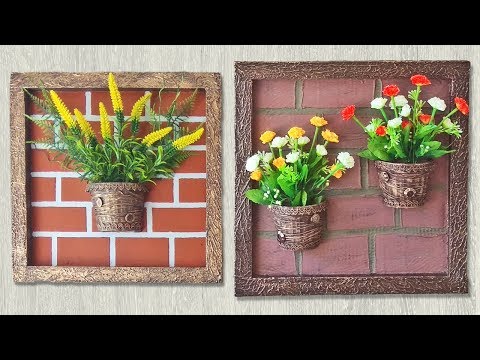
If you want to have a painting in the form of a brick wall and flowers in pots, then check out the next master class.
Even aluminum cans will help make panels. You will be convinced of this now.


