
We present step-by-step master classes with photos that will teach you how to make a church from a plastic bottle, plasticine, toothpicks, paper and even pasta.
If you know how to make a church, then you can make this craft from various materials. Not only cardboard, colored paper, but also matches, and even pasta will be used.
How to make a church out of paper?

To craft it, take:
- whatman;
- cardboard;
- acrylic paints;
- a plastic bottle with a domed top;
- acrylic paint of different colors, including gold and silver;
- scissors;
- glue;
- blue colored paper;
- marker;
- ruler;
- scanned on paper icons.
Before making a church, provide a pedestal for it. Make it from a sheet of thick cardboard, and cover it on top with paving stones printed on a color printer. Now let's start painting the details. To make the walls, you will need to cut four such blanks by connecting them.

Cut out rectangles from blue paper, using a ruler and a black marker, draw these future windows as follows.

Cut the door out of brown cardboard, on top of it you need to glue both rectangular and semicircular elements so that this part becomes more voluminous and it is clear that there are stones or bricks on it.

Cut two door handles from yellow cardboard. To make the steps for entering the church, you will need to cut semicircles of different sizes from cardboard, then glue them in order, starting with the smallest ones and ending with the large ones below.

To make a dome for a church, cut the top off of the matching bottle. All of it needs to be pasted over with plasticine, close the hole in the neck area and make this part more elongated. Then glue over the dome with pieces of newspaper, wetting them in PVA glue.

Prime the dome using real primer or white paint.

Here's how to make a church out of paper next. From yellow, you will need to cut two rectangles, fold them in a certain way, glue them to make a cross.

By this time, the primer has dried, now you can paint the dome with gold acrylic paint in two or three layers.

Glue the windows to the corresponding markings. Glue the dome on top.

See how you need to assemble and arrange the workpiece. After gluing the windows to the walls, attach a brown tape with small windows from below, then glue the model of the church to make it three-dimensional. Do not forget to glue the icons in the appropriate places. Glue the paper on top to become the roof.

Paint it with silver paint interspersed with brown. And with the same composition, designate the forged elements above the visor of the first door, and the other column should be painted with brown paint. Glue a silver cross to the dome, then glue the tower in the center of the composition.

Here's how to make a paper church. The process is very interesting, but you and your child will create such a significant thing from scrap materials. This is a model of the church called "Hodegetria of Jerusalem" and it is located in Taganrog.
The next master class will also be easy for the child if you help him.
DIY pasta church
It is from this material that the next church will be created.

These flour products will create walls, openwork pasta will become decorative elements. Here's what you need to take:
- pasta of different textures;
- scissors;
- pencil;
- ruler;
- long cover;
- foil;
- hot gun;
- cardboard.

Create a hexagon out of the cardboard so that you can then use it to make the walls of this shape. Cover it with pasta.

Attach flat noodles at the corners and top to complete the finish. And with openwork elements you need to steal the top of the walls and make columns by stacking these pasta in a pile.

Cut out a hexagon and a cone from a piece of cardboard. Glue the elements together. Use a hot gun to attach the flat pasta over the top. Decorate the junction of these two figures with semicircular pasta.

Make a dome from openwork vermicelli. To give it a shape, you can glue these flour products over the top of a plastic bottle, which is made in the form of a dome. Glue a cross made from flat pasta in the center. Attach this dome to the roof you created.

Cut out the porch of the following shape from cardboard, glue it on the outside with pasta.

Decorate the corners of this product with flat noodles, and use these pasta and horns to decorate the roof over the porch.

Cover the elongated lid with plasticine, and then glue this part with foil.

You now have a bell. Use a glue gun to stick it in place. Here's how to make a church with your own hands from pasta.

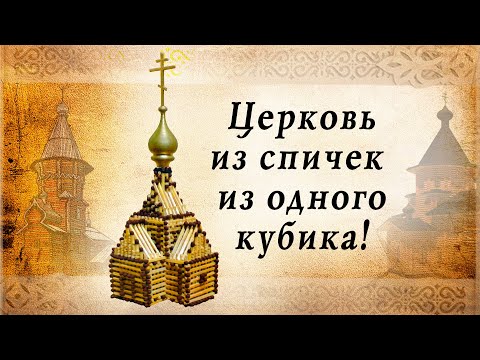
If an adult needs such a thing, then he can use matches as material. The work is more painstaking, but very interesting.
How to make a church out of matches - step by step instructions with a photo

To create this beauty, take:
- a box of chocolates;
- toothpicks or matches;
- PVA furniture glue;
- copper wire with a cross section of 0.33 mm;
- for the base - fiberboard, chipboard or plywood;
- flower candy foil;
- veneer.
Here are the tools you need:
- ruler;
- sharp knife;
- eraser pencil;
- curved or straight scissors;
- bar;
- tweezers;
- compass;
- clothespins;
- carnations 2 mm.

The Lazarevskaya church of the XIV century was taken as a basis.

The master used this photo, making markings here. Redraw or reprint this picture to know what dimensions will need to be considered when creating a church with your own hands. Calculations are in millimeters.
To make it easier to craft the temple, please note that you need to conditionally divide it into 3 parts. The central one is the church itself, the refectory is on the right, and the altar is on the left.
Here's how to make a church. To do this, take a thin cardboard and draw four walls, which are a square with sides of 5 cm.

As you can see, you need to draw windows in two walls, then cut them out with a thin knife or scalpel.
You can use matches, toothpicks, or a wooden stack to build walls.
The next step is to determine the length of the wooden blanks. If you took a long stack, you will need to saw off parts from it. If using toothpicks, trim off the sharp ends.

Now you can start making the temple. First, design the wall that has glass on it.
See how you need to position the wooden pieces by gluing them.

As you can see, these logs need to be moved through one - then to the left, then to the right. Now cut a 5 x 2 cm strip of cardboard. Fold it about in half in the middle.

Make 4 such corners, and with their help assemble the frame of the future structure. As you can see, these corners need to be positioned vertically and glued to two walls each.

Measure the width of the piece of wood so you know how much larger the wall has become. Initially, it is 5 cm, if the thickness of this wooden blank is 3 mm, then it turns out that now the wall is 53 mm. But since the "logs" protrude in both directions, it means that now the width of the wall is 56 mm. Therefore, you need to cut out two triangles of exactly this width for the pediment. If you have other calculations, then simply attach the wall to a sheet of cardboard and cut two triangles across its width.

Now you will need to glue these two triangles with wooden blanks.

Then attach these gables from both sides to the log cabins, glue them, until the glue dries completely, fix them in this position with clothespins.

Here's how to make a church from matches further. While the main building is drying up, you will be busy making the refectory. Also make four cardboard walls for it, mark the windows on three and the door on one. The windows must be cut out with a sharp knife, and the door must be cut through on three sides so that it can be opened.

Also, begin to glue matches, pieces of a wooden stack or toothpicks to this blank, moving them to the right and then to the left.

From this strip, make such a box, glue its two opposite walls to make a log house. For a while, also fix this place with a clothespin.

Then, as in the previous case, attach and glue the gables. Pay attention, one of them is fixed on the side of the door.

Make the third room in the same way, it should be slightly smaller than the first two.

Next, fix the structure with clothespins, wait until it is completely dry.

To make a roof, you need to measure the length of the refectory, altar, church. Add 4 mm.

Now, according to the marking of each building, cut out the roofs from the cardboard, bend these blanks in half.

Glue these roofs to each of your buildings. Now you need to cover them. To do this, cut the kind of planks from the veneer.

Here's how to make a church next. Cut 8 circles from cardboard, the diameter of which is 9 mm. Glue them together, and on top, glue a few of these boards.

Make a cutout on the central roof, glue this pipe here. Cut wider and longer veneer planks, glue them so that they cover the cardboard roofs.

To make a cross, you can use the following tool. On such a block, you need to fill 3 groups of nails from the back side. Now start wrapping them with copper wire from above.

Here's a cross.

To make a dome, cut into circles. The largest will be 19 mm in diameter, the next 17 mm, 15 mm, 13 mm, 11 mm, 9 mm. The smallest is 5 mm. Glue them together as follows.

Punch a hole in the center of the round blanks with a nail. Now take a strip of colored foil 10 cm long, put a dome on it, drop glue into the recess, put a cross inside.

Now roll up the foil to shape the dome like this.

Cut the foil at the bottom of the dome so that you can glue it later.

From fiberboard, plywood or chipboard, cut out the two layers for the church and glue them together. Glue this blank to make the surface look like masonry. Pour glue inside, put the church here and attach it.

It will remain on the made pedestal in the form of a pipe to glue the dome. Here's how to make a church with matches to make it look like the real thing.

Sometimes a week of Orthodox culture is held in schools, you need to bring handicrafts on this topic. If you make such a beautiful blue and white church with your child, he will surely take a prize.

Before you can make a church of this kind, you will need to prepare:
- plastic bottle;
- cardboard box cover;
- wire;
- rope;
- lace and braid;
- blue and white plasticine;
- cotton wool;
- a strip of rolled padding polyester;
- PVA glue;
- foamiran or colored cardboard;
- double sided tape;
- scissors;
- brush;
- white paint.
First, take the lid on which the craft will be located, paint it with white paint. While the drying process is in progress, you will cut strips of cardboard or foamiran. They will help you set up a fence around the temple.

Sharpen the top ends of these strips to make them look like a picket fence.

In the meantime, the white paint on the box has dried, so it's time to glue the boards to the exposed edges.

Let the glue dry, in the meantime, take the bottle, cut off the bottom.

You need to take a bottle with the upper part reminiscent of the dome of a church, for example, from under mineral water.
Also cut off the top of this container. But here the plastic is strong, so it is better to heat the knife and gradually cut off the excess part.

Now measure 2 cm from the edge of the bottle and cut this part into strips. Then such a trick will help fix the church on a horizontal surface.

Cover the top of the bottle with plasticine, making a pointed tip out of it here.

To make a cross, take the wire in the winding. Here she is blue. First, bend it in half, make a loop here, then bend two more loops on the right and left sides.

Stick the resulting cross into the plasticine dome cap.
Cover the bottom of the bottle with double-sided tape. Now start peeling off the top paper layer gradually. First, remove it from the bottom loop of the tape. Wrap in yarn of your chosen color here.

Thus, you need to arrange the entire lower part of the bottle. Now glue the lace strips here. They can be blue above and in the middle, and silvery below.

There is now more interesting work to be done that will also shed light on how to make a church. You need to decorate the dome. To do this, together with the child, roll up balls of blue and light blue and make cakes out of them. Start gluing them from below in a checkerboard pattern. The second row should be slightly shifted to the right and subsequent ones too.

Now attach double-sided tape to the bottom of the cut strips from the plastic bottle and glue it to the box.

You can line the horizontal surface of the box with grass, glue trees and flowers here made of rubber, plastic or other materials. But in this case, the composition is white and blue, so cotton drifts will be appropriate. Place them on the box, glued on. And in the center, place a strip of padding polyester. It also needs to be glued. Here's how to make a church so amazing.

If you are interested in learning how to make a church out of matches, then the following master class will help.
An interesting idea is to make a temple out of paper using the art of origami. In just 12 minutes you will acquire the skill and be able to make a church out of this material.


