
If a child has a birthday, learn how to make three-dimensional numbers and letters from cardboard to decorate them with flowers from napkins, paper, or threads. If you know how to make a volumetric figure, then the photo session in honor of the child's birthday will be unforgettable. Such numbers can also be used when registering a company, when the anniversary of the company is celebrated. They will also be an unsurpassed props for a wedding anniversary, if the birthday person has a round date.
How to turn cardboard into the basis of volumetric letters and numbers?

Volumetric figures are decorated with a variety of materials, using corrugated paper, threads, napkins for this. But the base is made of cardboard. If you want to make the number 1, then with your own hands you first need to make a blank for it.

The diagram below shows the recommended sizes for this number. You will need 2 of these parts - one for the front, the other for the back, cut them out of cardboard. Decide how thick the number will be, this width you need to cut a strip of cardboard.
It is better to make further manipulations together. Start at the top by first attaching a strip of sidewall to the face with masking tape.
Please note that where there is a bend in the number, the adhesive tape must be cut evenly so that it fits well in this place. After you attach the strip of cardboard to the front of the number, you also need to glue it to the second side of the given number, which will be the back.

It remains to glue one edge of the strip to the second at the top, after which you can tell yourself that you could make the number 1 with your own hands.

Let's see how to craft the base for the next number. To make the number 2 out of cardboard, transfer the presented template onto it with your own hands. To do this, you can use squared paper to then draw larger cells on the template, thus transferring the drawing.

You can also draw it by hand, repeating the lines and bends of this figure. As in the first case, to work you will need:
- digit pattern;
- cardboard;
- construction tape;
- scissors.
Cut out two blanks of number 2, glue them together with construction tape using a strip of cardboard. In this case, its width is 7 cm.

Now attach the other half of the number.

As you can see, for this it is not necessary to glue the adhesive tape over the entire surface, you can attach it in small pieces, fixing it perpendicular to the surface.
Surely, you have already understood the technology of how to make a volumetric figure out of cardboard. By the same principle, you will make all the other numbers, if the events to be marked require it. Now check out the different options for decorating such numbers.
How to make a fringe to decorate letters and numbers?
To do this, you can use various types of paper: corrugated, colored, we will take in silence. In another way, it is also called papyrus, wrapping. When you buy shoes, it is often in this thin translucent material that they are wrapped.
To make a volumetric figure according to this principle, you will need:
- tissue paper of different colors;
- scissors;
- PVA glue.
Take the paper out of the packaging, cut it into strips 4 cm wide.

The long edges of these blanks with scissors need to be cut with a fringe. To speed up this process, fold several strips at once or roll each to make 4-5 layers.

Apply numbers from PVA cardboard to the lower part, glue a strip of prepared paper here. Since it is very thin, it is better to glue two tapes at once. If you use colored paper or corrugated paper instead, then attach in one layer. The second goes a little higher, being located above the first.

Combine colors to make the number more effective.

After you completely decorate it, decorate the corner of the apartment in the same colors.

Paper for bulky letters and numbers
Look at interesting design options for numbers from it.

To embody such a masterpiece, take:
- colored paper;
- scissors;
- double-sided tape or glue gun;
- compass or round object.

- Using a compass or circular template, draw a circle on the back of the colored paper.
- Cut a small segment outside, as long as it will be, the petals of the flower will become that wide.
- Starting from here, cut this circle in a spiral, working from the edges to the center.
- When this part of the work is done, take the outer edge of the flower in your hand and begin to twist it.
- Fix the middle with a drop of glue, and attach a small circle to the back of the flower to this solution, so that the structure does not unwind.
- Glue these blanks on cardboard numbers, placing them rarely or often.
If you are going to make voluminous flowers out of paper, then you can use a flat number as a base.
- For this, you need to cut out only one blank from cardboard, then decorate it. To do this, cut the paper into strips 5–6 cm wide, glue the edges of the number with them in order to decorate the front and back sides at the same time.
- Now we begin to twist flowers from these strips. Fold the edge of the paper about 2 cm here to create a bulky edge.
- Bend the corner, make a turn, then bend the workpiece, make a turn again, bend the flower again, and so on.

See how to make paper roses, a master class will help you with this. Such a flower can be made not only to decorate volumetric figures, it is also suitable for other occasions. But then you will need to additionally create a stem.
To make corrugated paper roses, take:
- a sheet of cardboard;
- pencil;
- ruler;
- scissors;
- corrugated paper;
- a toothpick;
- glue stick.
Cut a strip of 19x58 cm from the corrugated paper. Fold it several times so that the width of the resulting blank is 7.5 cm. Redraw the presented schematic template onto a sheet of cardboard, cut it out first.
Then attach this cardboard assistant on top of the folded sheets of corrugated paper, cut along the contours.

Spread out the resulting part, starting from the left edge, screw it onto a toothpick with a cut sharp end. In this case, a wire is used for this, take this idea into service when you make a flower from paper with a stem. Tie with thread at the bottom.
When making a blank from corrugated paper, twist the inner petals tightly, and the outer ones more loosely. Having made several such blanks, decorate the cardboard numbers with flowers.

The master class will also help you to make other roses from corrugated paper.
- Cut a strip 6 cm wide from the paper. Fold it in an accordion manner.
- Use scissors to make the top edge rounded. Expand this detail. Start rolling it so that the wavy edges are on top.
- Tie the thread at the bottom of the rose.
- To make the petals look more picturesque, wind each one with a toothpick.

To make an openwork flower, take:
- corrugated paper;
- scissors;
- threads.
See how to make a big birthday figure using these materials. You need to cut a strip from the paper, arrange it in a certain way. First fold back a small corner near the small edge of this tape, then fold back again.

Thus, arrange the entire edge of the strip, such tucks are similar to those that you make on dumplings, holding their sides together.

Now twist this ribbon, giving it the shape of a blossoming bud. Tie with thread to secure.

Here is another option, it is very simple to implement.
If you want the corrugated paper flower to have a double color, then cut a strip of white, and the second, which will be wider, from a tape of a darker color.
Place two strips on top of each other so that the narrow one is on top. Roll them in accordion widths. Take this prepared canvas, starting from a narrow edge, and twist it into a flower shape.

The next idea will require the following materials and accessories:
- corrugated paper;
- cardboard;
- compass;
- scissors;
- glue.
Manufacturing instruction:
- Roll the cut paper strip across several times to immediately cut a certain number of identical petals.
- Draw a circle on the cardboard, cut it out. Step back a little from the edge of this blank, glue the petals, placing each subsequent one on the edge of the previous one.
- Having completed the first outer row in this way, make the second inner one, if you want, then close the middle of the flower with petals.

The last master class in this series will tell you how to make the number 1 using colored paper.
- You already know how to make a template. Now cover the cardboard with colored paper. You need to cut strips of paper, their width will be equal to the radius of the flower.
- Fold the first strip of paper, starting at the small edge, in an accordion manner. Now put some glue on this edge, attach the second small edge to it to turn the strip into a circle.
- Close its core with a small circle made of the same or another colored paper.
- You can make large and small flowers, arrange them on the number as in the photo.

It's time to switch to another type of material, maybe you are just now thinking how to make number 2 using yarn?
Knitting threads for decorating letters and numbers
They are used to decorate volumetric figures. You can use yarn of one or more colors. For such a decoration, you just need:
- preparation of a figure from cardboard;
- threads;
- PVA glue;
- brush.
Starting at the top or bottom of the number, apply glue here with a brush, then wind the threads. So that the cardboard base does not look through them, you need to wind in different directions, for example, first along, then across, diagonally.

When you're done with yarn of the same color, glue the loose tip to the cardboard. Next, attach the edge of the thread of the second ball. Decorate the volumetric figure in a different color. When the number is completely covered with yarn, you can admire the excellent results of your work.

In skillful hands, knitting threads will quickly turn into pompons. You can make them with a fork, cardboard semicircle or in another way.
Step by step photos will also help you make thread pom poms.

- As you can see, you first need to cut two identical rings out of cardboard. Put the thread inside.
- The yarn from the ball is wound around the rings, gradually filling them. Then cut along the outer circle, passing the scissors between the two cardboard blanks.
- Pull the string and the fluffy pompom is ready.
- Thus, make several different sizes using different yarns.
You will get such a wonderful number 1, which can be made voluminous or flat.

Decoration of volumetric letters and numbers with ribbons
This material will also help solve the question of how to make volumetric figures.

To format the number 2 in this way, take:
- red satin ribbon;
- white beads of various diameters;
- glue;
- scissors.
Everything is extremely simple. Starting at one small edge, wrap tape around the number. The turns must be overlapped so that the inner content of the number does not shine through them. Apply a little glue to opposite sides of the cardboard number, which will make it easier to attach the strips.
A glue gun will help fix the beads of different diameters. They can be sewn to fabric ribbons, but this work is more painstaking.
To implement the second variation, you need:
- braid of the same width, but different colors;
- scissors;
- glue.
Cut the lengths of the same size from the braid, tie each in the center to a knot. Glue the resulting bows to the cardboard base, placing them tightly together.

If you have enough free time, you have patience, then you can make roses from satin ribbons, decorate the whole number with them, or just separate fragments.

If you want, use the already well-known master class to make such flowers or make them according to a different principle.

As you can see, you need to periodically bend the corners of the tape, fix them with a basting seam. When it's done this way, twist it up to make it look like a rose. Secure the workpiece with a thread and a needle.
The zigzag braid is the ready-made base of the flower. It is enough to collect it on a thread, pull it, shape it into a circle, fix it with a thread.

You can make more than one circular row of such turns, but several. Each subsequent one will be slightly smaller than the previous one in diameter. Sew a button in the center and you can sew or glue the flower onto the number.

It can be not only flat, but also voluminous. To do this, you will need the same wavy braid. Cut two strips from it. Match them, as it was done in the photo, sew along to connect. Now you will twist this ribbon so that it turns into a round flower. How to combine these two stripes can be seen in the next photo.

Do-it-yourself roses and other flowers from napkins
For the next master class, you will need:
- napkins;
- circle pattern;
- stapler;
- scissors.

Lay several napkins, without unfolding, one on top of the other. Place a circle on top. Cut out your napkins using this pattern.

In the center, these blanks need to be fixed with a stapler. Lift the first layer, roll it up in the form of an inner still unblown rosebud. The second row of petals will be looser. Thus, decorate the entire rose.
Here's another idea. You need to take 8 napkins or papyrus paper, roll up like an accordion. For this method, thicker multi-layer napkins are suitable. You should have a solid rectangle. Cut off the ends to make them rounded. Now begin to straighten the blanks folded with an accordion, making them in the form of a flower.

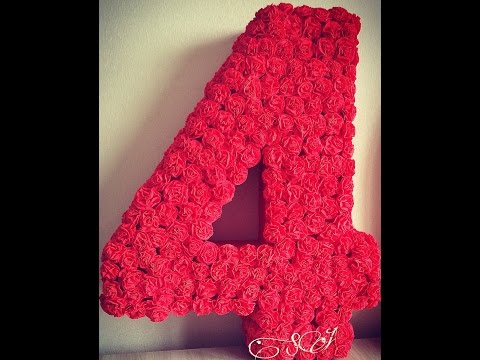
To make the number 1, you need to glue such roses over the entire surface. See how beautiful flowers of different sizes and colors look.

- The facing technique will also allow you to create blanks for decorating numbers. To do this, you need to cut the paper into squares, put a pencil in the center of each, twirl.
- Without removing this square from the pencil, attach the blank to the cardboard base of the number, having previously greased this area with glue.
- The trims must be glued close to each other in order to create the effect of a single volumetric surface. It will also be appropriate here to combine different paper colors.

You can use plasticine instead of glue. It is necessary to lubricate the surface of the cardboard blank with it, or roll a small ball out of plasticine, and wrap each trimming with a half of a toothpick, insert such blanks into plasticine balls. Then, attach to the cardboard base.
If you plan to hang the number on the wall, then you can make it out of polystyrene foam. In this case, the trims are attached to a toothpick, then stuck into the foam. If a sheet of this material is not very thin, then you can make volumetric figures and put them. They are more durable than thin foam.
How to make 3D letters?
You will create them according to the same principle. To do this, you need:
- cardboard;
- pencil;
- scissors;
- paper towel tube;
- White paper;
- hot melt glue.
First you need to make cardboard blanks. Look at the example of the letter M for how to make them. Cut out the two main blanks of this letter from cardboard.

Decide how wide the letter will be. Cut the rings from the paper towel tube this wide.

Stick them on one half of the letter, then glue the other on top, pressing it down a little.

Cut sheets of white paper into strips, glue them over the sides of the letter, and then all of it.

You can paint such a letter with acrylic paint or glue flowers from paper or napkins, or decorate them with satin ribbons or threads. See how to make letters on cardboard, declaring them in cloth. You already know how to make a dense base. Glue strips of fabric on it with PVA, and lace tape on the outer corners.

From these letters you can add a word to arrange a photo session on your wedding day.

If you are celebrating the anniversary of this event, then place one or two numbers next to the letters indicating how many years of marriage you are celebrating. You can paste over the letters with paper or wallpaper that was left over from the repair.

An original, at the same time touching decor will be the design of such a letter with family photographs.

If the birthday boy loves the forest or you want to decorate a room on this topic, then glue birch bark and moss or maple leaves onto the base.

If you want to make letters quickly, then wrap a bulky cardboard blank with thick yarn or jute rope.

You can make a wire base, wrap it with yarn.

The resulting videos will help you better understand how to make three-dimensional numbers and letters.
And the letters will not be simple, but elegant, with rhinestones.


