
Read to your kids Pushkin's works "A Green Oak Near the Lukomorye" and "The Tale of a Fisherman and a Goldfish" and make crafts on this topic. Pushkin is a famous Russian writer and poet. So that the guys from childhood know his work, read them fairy tales in verse, together make crafts on this topic. Show the little ones how you can make them from scrap materials.
DIY crafts on the theme "Near the lukomorye a green oak"
These lines begin the tale of Alexander Sergeevich Pushkin "The Tale of Tsar Saltan". The guys will better remember these lines if you together with them make crafts based on Pushkin's fairy tales.

To illustrate this story, you will need the following materials:
- thick cardboard measuring 24 by 35 cm;
- A4 sheet of white cardboard;
- paper towels;
- PVA glue;
- oak leaves;
- acorns;
- a paper bag that sells grill coals;
- acrylic lacquer;
- hot glue gun;
- acrylic paints;
- colorless silicone sealant;
- pebbles and shells;
- semolina;
- salt for bath;
- rectangle of artificial grass;
- chain of golden color;
- dough for modeling;
- rhinestones;
- surprise Kinder toys;
- small chest;
- kebab skewers;
- dried flowers;
- cardboard box.
When all this is in front of you, start the magical process of creativity. Spread oak leaves on newspaper or paper, cover it first with one coat of varnish, then with the second.
In order not to wait for the varnish layer on the back to dry, hang the leaves by the stalks on a rope using clothespins. Paint them in this position on both sides at once.
Use a hot gun to glue acorns to your caps. Using pliers, cut off pieces of wire of the desired size, fold them, twist them closer to the bottom, bending these segments here in the form of roots. At the top, twist several wires at the same time to make branches.
Turn the charcoal bag over to the back, or use another paper bag to put the trunk of a tree here. Twisting the bag, glue it to the lower frame of the tree in the form of a trunk. For the branches, you need to cut strips from this package, and also glue them to the tree branches.

Further, to create this craft by Pushkin, you need to attach acorns and leaves to hot silicone from a glue gun.

Now you need to think about where to put the craft. A large cardboard box is perfect for this. From the sides, glue paper towels dipped in PVA glue and water to it, which are taken and diluted in the same proportion.
To make a blank for the seashore, you need to cut a trapezoid out of white cardboard. Its smaller side is 6 cm, the larger one is 16, the base is the same as the width of the box. The right edge of this shape is at a 90 degree angle to the base, and the left is a curved shoreline.
Decide where it will end, where the sea is, cover this place with blue paint. Mix green and yellow bath salts with semolina and PVA glue. This mass must be applied to where the shore will be located on the cardboard. While the glue has not dried, press small pebbles and shells in here. Place this work near the heater to dry the glue.

When this happens, proceed to the next step. It's quite interesting. Show the children how to achieve a 3D sea effect. You already marked it with blue paint, now squeeze out the sealant here. Make waves out of it by shaping them with a teaspoon dipped in water. Where you want the waves to be foamy, place cotton wool underneath them using a toothpick.

Now it's time to put together the individual elements of this fairy tale-themed craft. Using hot glue, attach the base of the craft to the cardboard, while on the right there will be a blank of the sea and sandy shore. Glue an artificial grass mat, by the way, you can buy it at the Fix Price store.
You need to attach a tree to this artificial grass base. To do this, pierce it with wire roots, bend it on the back side, secure them. Hang a gold chain on the oak, glue the mermaid, the cat on the hot silicone on the tree. If there are no ready-made figures, make them from salted dough, paint.

This is such a wonderful and unusual work. While doing it, say the famous lines of the poem, then the child will quickly remember them.

If you want him to learn more, then make another Koschei by taking a suitable figure from a kinder surprise. Place a small chest next to it, fill it with coins.

To make a hut on chicken legs, make it out of wooden sticks or matches, attach a wire with paper in the form of chicken legs at the bottom. Decorate the building with dried flowers.

Crafts heroes of Pushkin's fairy tale "About Tsar Saltan"
After the child has memorized the introduction of this magical story, it is time to introduce him to the main characters, but first let him prepare the necessary decorations. The kingdom can be done using:
- burlap;
- scraps of tissue;
- glue stick;
- scissors;
- a needle.
Master Class:
- Help your child cut a rectangle out of the burlap. Decorate the edges with your baby. To do this, first, on one side, you need to remove the horizontal threads with a needle to form a beautiful fringe. This is done from all four sides.
- Now you need to cut out fragments of houses, roofs, windows, doors from the fabric. To make the elements even, it is better to first draw them on cardboard, then use these templates.
- The child will lay out the fabric elements on the burlap. If everything suits you, you need to glue them. If the work is small, then the burlap can be glued to a sheet of cardboard so that the base is dense.
If the work turned out to be large, then tuck the top of the panel, hem it here. Insert a wooden stick, tie a rope to it at both ends to hang the finished work by it.

To make ships on which guests sail in a fairy tale, take:
- Styrofoam;
- colored paper;
- wooden skewers or toothpicks;
- scissors.
From the foam, cut out blanks that resemble ships in shape. You need to make rectangular sails from colored paper, fix them on skewers. Stick their sharp ends into the foam to make such wonderful boats.

When spring comes, the child will be happy to let them go through the melting puddles and streams. For the bathroom, this is also great fun.
Repeat to the child the lines that the squirrel sings songs and gnaws nuts. The squirrel here is a soft toy; you will make nuts from foil, which needs to be given a round shape.

To make the main characters of a fairy tale, use ready-made dolls. It is enough for them to sew the appropriate dress, and now the king, Guidon, the beautiful swan, turned into a princess, appeared before our eyes.

You can make the scenery of Pushkin's fairy tale right on the table. It is enough to lay a tablecloth here, lay a transparent fabric in the form of a lake, place paper swans on it.

How to make a paper swan for "The Tale of Tsar Saltan"?
This skill will be useful for a child, in "The Tale of Tsar Saltan" this noble bird is one of the main characters. If you are crafting with young children, show them an easy way to make a swan.

- Draw the outlines of the bird on the cardboard, extend its body at the bottom so that a small strip forms here. It is needed in order to give stability to the swan.
- If the cardboard is white, leave the blank as it is, if it is gray, then let the child glue it on both sides with white paper. From it, you need to make a swan's tail. To do this, a rectangle is cut out of white paper, it must be folded with an accordion. From below, the loops fold in the form of a fan, glue them together, glue them on the bird so that it has such a beautiful tail.
- Let the child paint on the eyes and nose, now he knows how to make a swan out of paper.
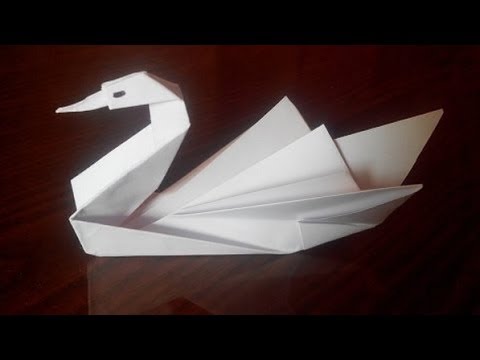
But this is an example for young children. If they are a little older, then show them how to make an origami paper swan. The following diagram will help with this.

As you can see, you need to take a square sheet, fold it first diagonally once, then along the second diagonal. Following the photo clue, turn this blank into a beautiful bird.
There is another great option. Having made such a swan, place it on a summer cottage, play out with the children a performance based on Pushkin's fairy tale.

Before making a swan, take:
- thick foam sheet;
- light bags;
- scissors;
- wooden skewer;
- 2 rods of fittings.
Cut out the outlines of the future bird from the foam. Cut the bags into squares with a side of 4–5 cm. Make punctures in the foam with a wooden skewer, wind a square from the bag onto it, thread it through the prepared hole.
Place the next trim as close as possible to this one. Thus, decorate the entire swan, paint its nose.
In the lower part of the bird, stick the fittings along the rod, stick their ends into the ground. But it is better to first lay a blue synthetic fabric or a substrate of this color on the soil, cut this material in the form of a lake. Then fix the swan and flowers from plastic bottles here.
If the child is older, show him how to make an origami paper swan. To do this, you first need to fold a lot of blanks as follows.

Each of these triangular elements has two pockets and two corners, so it will be easy to connect them together. The following step-by-step photos show how to make a swan to illustrate Pushkin's fairy tale.

Collect the origami modules, starting from the bottom, spread them here in a circle. After you make the bird's body, you need to make two wings, and then make the neck, head and beak.
You can make a swan using the facing technique.
For this, strips are cut from a white napkin, then shredded into squares with a side of 1 cm.
Each is wound on a pencil, glued to a swan drawn on cardboard. Previously, this base must be greased with glue. You can use plasticine to attach the end faces. It needs to be kneaded, smeared with a swan drawn on cardboard. If this is a picture, then folded squares of the desired colors are attached here using the facing technique to decorate the background.

If you have enough time, then the swan for Pushkin's fairy tale can acquire such gorgeous feathers, they are cut out of paper, glued to a prepared base. The bird's neck can be decorated with cotton pads.

The theme of Pushkin's fairy tale "About the Fisherman and the Fish"
Another story in the verses of Alexander Sergeevich Pushkin. Crafts based on this tale can be from the most unexpected material.

To make such a voluminous picture, take:
- bark;
- birch bark;
- cones;
- sticks;
- plasticine;
- yellow cardboard.
Master Class:
- Place a section of thick bark on a work surface, and dust it off with a cloth. Let the child put a piece of crushed plasticine here, place chaga on top.
- We make grandfather out of a big bump, which will become his body and a small one, it will turn into a head.
- With the help of plasticine, the child will attach sticks, they will turn into the arms and legs of the character. Waves are made from pieces of birch bark, which need to be twisted, fixed in this position on the bark with the help of plasticine.
- The child will cut a goldfish out of yellow cardboard, draw scales, eyes, and other elements with a felt-tip pen. Let him attach the fish to the wave with a piece of plasticine.
- Using natural materials such as acorns, the child will make a grandfather out of a fairy tale. Just let the adults drill holes in the acorns so that matches or toothpicks can be put here, which will become the arms, legs, and neck of the hero of Pushkin's fairy tale. The stick and rope will turn into his fishing rod.
- Put the old man on the moss, and cut the sea out of blue paper.

The theme of the fairy tale about a fisherman and a fish in crafts continues with the next master class. From it you will learn how to make a picture from threads. For such a craft, you need to take:
- a sheet of cardboard;
- glue;
- brush;
- threads of different colors;
- openwork braid;
- bead for the eye.
Manufacturing instruction:
- First, you need to weave pigtails from the threads. Now have a child draw the outlines of a fish on cardboard.
- Dip a thin brush into glue, circle them with this substance, then glue a pigtail of yellow thread along the contour. On the body of the fish will lay them out in the form of scales. Lips-bows are made from red pigtails, waves - from blue and blue.
- Here you can use a yarn braid or simply glue the threads. Border the work with them, completing a beautiful frame. Let the child glue an eye from a bead, make a tail from lace braid.

Here is such an interesting goldfish made of threads. It can be made from other materials as well.

To make such an inhabitant of the seas, take:
- Styrofoam egg;
- satin ribbon;
- beads;
- eyes for toys;
- colored stones;
- seashells;
- glue Titanium;
- white seeds;
- alabaster;
- wire;
- acrylic paints;
- sequins;
- polymer clay;
- patch;
- pallet;
- transparent nail enamel;
- pencil.
Draw with a pencil on one side of the styrofoam egg where the fish will have a face. Paste it over with yellow sequins, attach the eyes, the mouth with a red satin ribbon.
Weave the top and two bottom fins using wire and beads.

Instead of scales, glue the seeds, pointing them in one direction, so that the narrow tips are near the body. Begin to attach from the side of the tail, gradually moving towards the head. Limit the junction of the scales with the face with red beads, attach it here.

Gently apply glue to the tips of the seeds, sprinkle them with red and yellow glitter. Decorate the face of the sea dweller in the same way, using only yellow glitter. Secure it all with clear varnish on top.

Here's how to make a fish next. Twist a loop from a thick wire, wrap it with plaster. Pour the diluted alabaster on the pallet, stick the lower part of the wire here. Wrap another piece of wire with blue tape, here you attach the fish. Also put it in this solution. Paint the wave and hardened alabaster with blue acrylic paint.

To make a beautiful tail for a goldfish, string beads of different colors on a wire and bend this blank in the form of a tail, glue it to a sea inhabitant.

It remains to decorate the volumetric work with algae made of polymer clay, shells, pebbles. And here is the final result.

Now you can show children how to make crafts based on Pushkin's fairy tales. If you want them to see how you can make a goldfish, play them the following story.

It is suitable for very young children. If you need to learn how to make a swan for older children, a video tutorial will help you.
If you are interested in the origami swan, check out the third video to understand the intricacies of the process.


