
Surely schoolchildren and their parents are interested in what to give for Teacher's Day? See how many presentations you can make with your own hands for teachers. Having learned what gift for Teacher's Day can be given to the teacher, parents and children will make a pen, a school desk from sweets or a commemorative card.
When and how is the professional holiday of teachers celebrated?
You need to know this in order to make gifts in advance and deliver them on the appointed day. This holiday was established by the Soviet Government in 1965. It was from this time that Teacher's Day became official. But then, and until 1994, it was celebrated on the first Sunday in October. From the indicated year to the present, Teacher's Day is celebrated on October 5.
This is in Russia, Estonia, Azerbaijan, Armenia. And in Ukraine, Belarus, Moldova, Latvia, Kyrgyzstan, it is celebrated in this way - on the first Sunday in October. In Uzbekistan, this day is a day off - an official state holiday, which falls on October 1.
According to established traditions, students congratulate their teachers, give them flowers and gifts, draw wall newspapers, and arrange concerts. Some schools have a self-government day.
In order not to overlook the attention of kindergarten workers, it should be said that they also have a professional holiday, which is called "Day of the teacher and all preschool workers." It is celebrated on September 27th.
Having learned what gift to make for a teacher with their own hands, children and parents will be able to make pleasant gifts for teachers, nannies and other kindergarten workers.
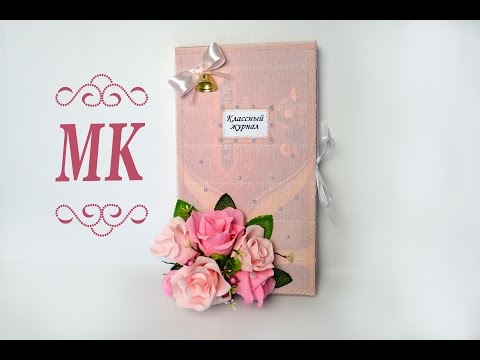
Cool magazine made of sweets: gift option number 1
Of course, the gift should remind the teacher of his professional activity and at the same time be useful and original.

For this you need:
- cardboard;
- box of sweets;
- thick paper or wallpaper;
- photo of the class;
- glue "Titan" or PVA;
- satin ribbon.
Measure the height, width, and thickness of the candy box. 3 blanks need to be cut out of cardboard. Two are the same, the size of each such sheet is the height and length of the candy box. The third part is the central one, which will connect 2 given sheets, its dimensions are the height and width of the box of chocolates. Lay out these details sequentially on thick paper or wallpaper - this is a magazine cover.

To fold it, cut the corners of the paper at a 45 ° angle, leaving 3mm to the cardboard.

To further make a gift to the teacher, fold the cover paper onto the cardboard with your own hands, carefully gluing the edges.

On the left, on the wrong side of the cover, glue the form from the magazine, you can download and print it on a printer.

On top of the candy box, put a file with a photograph of the students in the class, bend its edge under the box, glue it to the bottom.

And glue the box itself on the right side of the magazine.

On white paper, write the name of the magazine, and from which class you are giving it. Paste this plate. Tie the gift with a ribbon and you can hand it to the teacher.

Master class from sweets: gift option number 2
You can make a cool candy magazine in another way.

For this were used:
- candies;
- Styrofoam;
- a box of chocolates to open like a book;
- glue "Moment";
- colored paper, cardboard, corrugated paper;
- toothpicks;
- Scotch;
- scissors;
- a thread;
- artificial flowers;
- small self-adhesive decorations.
Take measurements, as in the first MK, cut out 3 cardboard blanks. Attach self-adhesive decorations to the front part, and a corrugated rectangle in the center.

Glue 3 sheets of cardboard on thick dark paper, on the corrugation - the name of the magazine, on the binding - congratulations.

To make the book voluminous, cut a parallelepiped with a beveled top from a sheet of foam, paste over its side with a strip of corrugated paper, glue this blank in the middle of the magazine.

To make flowers from sweets, for each we cut out 4 blanks from corrugated paper: three of them are 6x11 cm in size, and one is 6x12 cm.
Blanks for one flower must match in color. For example, for blue, you can take lilac paper, for pink blossoming buds - red or burgundy. Fold each rectangle with an accordion 5 times and cut the edge with scissors, rounding it.

Now each petal needs to be twisted onto a toothpick.

Wrap the candy first in the first, then in the second and third rectangles. The dark one, the fourth, comes last. Wrap the "tail" with a thread, thus securing the flower.
From light green corrugated paper, cut an acute-angled blank, which will soon become a sepal.

Insert a toothpick into the flower, wrap the junction first with a sepal, and then with a strip of dark green corrugated paper.

To make a bud, round the top of the two strips of crepe paper with scissors. Wrap the candy in them, secure the toothpick with green tape or paper of the same color.

Use the same technique to make other paper and candy flowers using different colors.

To complete a cool candy magazine, secure the flowers on the side in Styrofoam by poking through it with a toothpick.

These are the masters of the bouquets of candies that you were able to turn into a magazine decoration. The teacher will certainly appreciate such a gift, like other do-it-yourself gifts.
Original gifts for teachers day
Continuing the "sweet" theme, we will tell you what to give a teacher to a man. It will be pleasant to receive such a desk for both the teacher and the teacher. Watch a detailed master class (MK).

To create it take:
- cardboard;
- scissors;
- ruler;
- glue;
- gold-colored paper;
- Roshen chocolates.
Cut out the following blanks from cardboard:
- table cover (16.5x18 cm);
- his legs (height 11 cm);
- top of the bench;
- her legs.

Glue all cardboard blanks with gold paper.

Assemble the desk and bench by gluing together the elements of these items.

Now glue the chocolates to the desk and bench. This can be done with glue or double-sided tape.

For a teacher's woman, you can make a gift from light chocolates and decorate them by gluing a bouquet of paper to the desk.

And here is another original gift for a male teacher.

To make a pen like this, take:
- Roshen chocolates;
- cardboard;
- gold paper;
- shiny braid;
- elements for decoration;
- glue or double-sided tape.
Such a pen can be donated both on Teacher's Day and on September 1. It is done very simply.
- Cut a rectangle out of cardboard, roll it into a tube, glue the edges. You now have the base of the handle.
- Cut 2 identical small rectangles out of cardboard and gold paper. Roll the cardboard into a cone, cover with a blank of gold paper.
- Insert this tip of the pen into its body, glue it. Cover the joint with gold tape.
- Glue the chocolates to the body, placing them close to each other.
- Decorate the back of the handle with shiny braid.
- Cut a rectangle out of cardboard, glue it over with gold paper. Glue a candy handle to it, after which a gift to the teacher is made with your own hands.
For a drawing teacher, you can make just such a palette. To do this, cut it out of cardboard, glue it with colored paper, attach round candies to the edge. On the other hand, you need to glue a bouquet of paper to the palette.

The next sweet original gift for a teacher is for a music teacher. To make a piano, take:
- "Roshen" chocolates in a light shell - 7 pcs.;
- 5 portions of Inspiration chocolate;
- cardboard;
- corrugated paper;
- glue;
- satin ribbon;
- flowers made of paper.
Cover the cardboard rectangle with pink corrugation. If the teacher is a man, then with dark paper. Glue the Roshen chocolates on top - 7 pieces - this is just an octave. Between the first, second, second and third white keys, place the darker ones. Glue the other three, as in the photo.

Fold the black paper in a fan, making 3 folds, fix with a stipener, glue it on the back, let it be the wall of the piano. It remains to glue the flowers, and the gift for the teacher's day is ready.
Such a sweet dumbbell will certainly appeal to a physical education teacher.

A sweet bell can be presented to a teacher of any discipline, including on September 1.

For him you need:
- plastic bottle;
- wooden stick;
- Styrofoam;
- corrugated paper;
- flowers made of paper and sweets.
To make a bell-shaped bouquet, cut off the bottom of the bottle. Place it on the styrofoam, outline it, cut it out, stick it into the bottom of the cut container.
The wooden stick should be of such volume that it fits the neck of the bottle.

Place the stick in the bottle, wrap the blank with corrugated paper. Stick paper and candy flowers into the styrofoam. To do this, their stems must be made from sharp wooden skewers.

Do-it-yourself card for teacher
You can thank the teacher for his work, you can write your wishes on a handmade postcard.
It can be made from the most unexpected materials.

To make such a postcard, take:
- colored cardboard;
- colored paper;
- glue;
- scissors;
- buttons;
- felt-tip pen.
Manufacturing instruction:
- Fold a piece of cardboard in half, like a postcard. Cut a rectangle out of paper so that it is 1 cm less than half a sheet of cardboard on all sides. Then you get a beautiful frame.
- Draw a tree of knowledge on this rectangular piece of paper. Use small scissors to cut out its trunk, branches, leaves.
- Stick the sheet onto the cardboard. Attach the buttons with glue.
- For a congratulatory inscription, cut out a rectangle from cardboard, and a little less from colored paper. Write on it "Happy Teacher's Day!" Glue on the bottom left of the postcard.
Since the holiday takes place in the fall, the postcard for the teacher can be made in the form of a leaf of a tree. Decorate it with paper flowers. You can glue the petals made using the quilling technique and decorate the card with them.

Continuing the theme of creating a postcard to congratulate on Teacher's Day, let us dwell on the next one.

For this you will need:
- colored cardboard of various colors;
- scissors;
- braid;
- colored paper;
- scraps of tissue;
- glue.
We adhere to the following algorithm:
- Glue a colored one on a plain sheet of cardboard.
- Cut out 2 circles (large and small), a heart from scraps of fabric of different colors. Glue everything, compositing, to the postcard.
- To make flowers out of paper, cut a strip out of it, fold it like an accordion. Decorate the upper edges with scissors with a zigzag, unfold the workpiece. Spread out the strip, making a round flower out of it. Glue a heart in its center, decorate with a second button.
- Glue the tape at the junction of the two pieces of cardboard.
- On paper, using a printer, print a congratulation or write it by hand. Stick it on the postcard.
You can also make a wall newspaper or decorate the wall with congratulations on the holiday.

For a more visual perception of information, see how to make a cool magazine with your own hands.
This workshop will show you in detail how to make a candy pen for a teacher.


