
Making a greenhouse from a profile, choosing a place, its design and installation features, advantages and disadvantages of the design. A profile greenhouse is an economical and reliable construction designed for plant life in an artificial microclimate. How to make and install it correctly will be discussed in this article.
Features of installation of greenhouses from a profile

Before making a greenhouse from a profile, it is important to know that there are several types of such rolled metal that are suitable for this purpose:
- A metal pipe with a circular cross-section, the diameter of which is 20-25 mm. For the racks of the greenhouse frame, products with a diameter of 50 mm can be used. All elements of the structure are fastened to each other by welding through reinforced metal corners.
- Profile metal pipe of rectangular section 20x20, 20x40, 20x60 mm with wall thickness from one and a half to three millimeters.
- Aluminum profile. To connect the elements of the greenhouse made from it, special bolts are used. Despite the fact that the cost of all such products "bites", aluminum profile greenhouses are in great demand, especially if their side parts are made up of sliding systems. This helps to ensure proper ventilation.
- Galvanized profile, the main purpose of which is the installation of plasterboard structures. Products made from it are quite affordable, easily cut with metal scissors and fixed to each other using self-tapping screws and standard fasteners. With skillful design, a reliable and practical greenhouse can be made from such a profile.
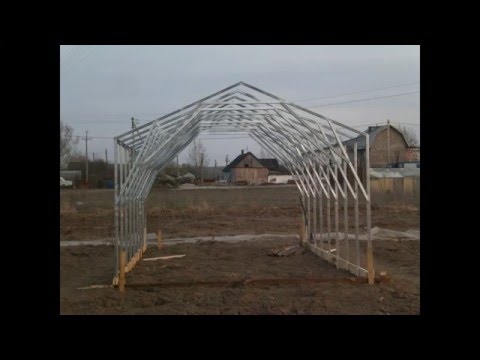
A greenhouse made of a profile can stand alone or serve as an extension to a garage or house. Single buildings made of aluminum or galvanized profiles are equipped with gable roofs, annexes - with single-pitched roofs. The frames of such roofs are easy to make from a straight metal profile. Arched greenhouses are usually built from a round or shaped pipe.
The use of special joints for fixing the frame elements makes it possible to make a collapsible structure out of it, which can be disassembled, transferred and assembled in a new place.
Advice! In order for the greenhouse to serve for a long time, it is recommended to choose galvanized construction parts. They cost more than conventional profiles, however, thanks to the protective layer, such products do not rust.
Advantages and disadvantages of metal greenhouses

Before choosing a greenhouse for your site, you should realize all the advantages of a self-assembled profile design:
- freedom of choice … Using a metal profile for the frame, you can independently decide on the size and type of the greenhouse. Here, fantasy is limited only by the requirements for the reliability of the structure and the budget for its construction.
- Saving … The cost of the profile is quite affordable, the price of sheathing the frame made of film or polycarbonate is also low. In addition, the very substantial mark-up from the greenhouse seller is not added to the total construction cost. As a result, a structure that is absolutely equivalent in quality and occupied space can cost almost half the price of a purchased one.
- Life time … Zinc coated metal profiles are resistant to moisture and rust. The usual ones, although they require anti-corrosion protection, are very durable due to their thick walls. With the correct installation of the frame of these elements, the greenhouse can last at least 10 years.
- Mobility … The frame and its sheathing are lightweight. Therefore, it is easy to transfer such a structure to a new place, even without disassembling it. But if dismantling is required, reassembling the structure will not take much time.
- Ease of assembly … Making a greenhouse from a metal profile does not require any special skills, just basic skills of working with ordinary tools, which should be present in any home, are quite enough. And those who have experience in installing plasterboard ceilings will do this work even faster.
In addition to knowing the advantages of metal greenhouses, the disadvantages of such structures should be taken into account before their construction. In fact, it is one, but significant: in winter, under the snow load, the fixings of the greenhouse frame may not withstand, which will lead to the fall of the structure.
But this problem can be solved in two ways:
- The first is to strengthen the greenhouse frame. To do this, it is necessary to reduce the step between the trusses or arches of the structure, to install additional racks to support the roof of the structure.
- The second way to get rid of this problem is to make the roof of the greenhouse removable. This is applicable for structures that are used only from spring to autumn. She is removed for the winter. As a result, the frame is safe, and in the spring you can put everything in place.
Important! Residents of southern latitudes should not worry about the snow load. It is quite enough to remove snow from the greenhouse after each rainfall.
Metal greenhouse installation technology
Any greenhouse consists of three main parts: the foundation, the frame and the outer cladding. But the material of the frame and the manufacturability of its assembly is of decisive importance. Consider the step-by-step installation of a greenhouse with your own hands from a profile.
Greenhouse calculation rules

After choosing the shape of the future building, you should start making a drawing of a greenhouse from a profile. If you have experience with a computer, this can be done in one of the 3D modeling programs, for example, Google SketcUp.
Regardless of the planned size of the structure? when designing it, it is important to take into account the dimensions of the sheets of the outer coating. The most demanded material for him is polycarbonate. The width of its sheet is 2 m, the length is 6 m, so all posts and crossbars must be placed, taking into account the coincidence of the edges of the sheets with the middle of the profiles.
For private use, it will be rational to build a greenhouse with a width of 2-3 m. Its length can be 4, 6, 8 and 10 m. The height of an arched-type greenhouse is usually up to 2 m, and for a tent structure there are no such restrictions, it is important to observe a slope for slopes 25 -30 degrees.
When designing a greenhouse, do not forget about the doorway. You should consider its size so that it is convenient to use the door. It is necessary to correctly position the transoms, this is especially true for a large greenhouse, since the plants will need a ventilated space.
After drawing on paper all the frame joints and designating the size of the greenhouse from the profile, it is required to calculate the amount of fasteners and basic material for the purchase, taking into account a stock of 10-15%.
Of the main materials required: a metal profile, connectors, metal screws and polycarbonate. The set of tools for work should include: a tape measure, a building level, locksmith's scissors, an electric jigsaw and a screwdriver.
Selecting a location for a greenhouse from a profile

When choosing a place for building a greenhouse, it is necessary to take into account the illumination of the site, its relief and the prevailing direction of the winds.
For a structure that is only needed from spring to autumn, natural light should be most intense in the morning. In the afternoon, it is desirable that the building is in the shade.
For a winter greenhouse, a place must be chosen in an open space so that buildings and trees do not interfere with the penetration of sunlight into it throughout the day.
In winter, cold winds can contribute to heat loss in the planned structure. Therefore, it must be placed in a place as protected from blowing as possible. This can be easily realized if the greenhouse is made in the form of an extension to the house.
The site should be as level as possible. In any case, it should be prepared for construction: remove debris and remove the vegetation layer that will interfere with the work process. It is very problematic to look for a fallen nut or connector in dense grass.
Erection of the foundation

For temporary greenhouses, it is not necessary to make a foundation. However, you should not forget that the metal rusts from the dampness emanating from the soil. Therefore, a waterproofing substrate can be used as a base for a light temporary greenhouse.
To do this, the site needs to be leveled, a layer-by-layer bedding of sand and gravel should be made, and then a strip of roofing material should be laid along the perimeter of the future greenhouse in two layers. It is not recommended to use PET film for this purpose: due to the fact that it does not "breathe", the appearance of condensation will moisten the base under the greenhouse with all the ensuing consequences.
For a capital greenhouse, there are several options for foundations:
- Pour the concrete foundation strip;
- Install a number of blocks and connect them with a cement compound;
- Lay out the foundation made of clay brick or stone;
- Make a base of a wooden beam 100x100 mm, wrapped with roofing felt, the wood must first be impregnated with a mixture of waste oil and bitumen;
- Make a base from a metal channel.
The strip foundation for the greenhouse can be made shallow or shallow. In the first case, only the vegetative soil layer of 300-500 mm is removed, in the second, a trench is dug to a depth of 700-800 mm.
After the end of the marking and excavation work, crushed stone and sand with a layer thickness of 100-200 mm must be laid on the bottom of the trench. Each layer should be tamped down carefully.
Then the trench must be covered with roofing material and a reinforcing frame made of corrugated horizontal rods with a diameter of 8-12 mm, connected vertically with smooth reinforcement 6-8 mm, must be installed in it. All connections should be made with knitting wire.
When the reinforcement is finished, you can put the formwork. Wooden shields are suitable for this purpose. When installing them, it is necessary to take into account that the height of the concrete tape must exceed its width. The base of the greenhouse, which rises above the ground level within the range of 300-500 mm, will protect the bottom of the greenhouse rack-mount profiles from rust.
The finished formwork must be poured with M400 concrete and its surface must be leveled horizontally. After 28 days, the shields can be removed, the side walls of the foundation can be waterproofed with roofing material, and then the sinuses of the structure can be covered with soil.
If the site is damp, it will be correct to install the structure on a columnar foundation. It is made of concrete, asbestos or metal pipes, or is laid out from clay bricks. With non-recessed pillars, a roofing material should be placed on the cement-crushed stone pillow, and a regular block on top of it. Bricks are also suitable for a small greenhouse.
Frame fabrication

As an example, consider the assembly of a tent-type greenhouse. Although it is possible to make arched structures from a profile, but on your own, especially without proper experience, it will be easier to make a gable greenhouse.
For installation, you can use a 100 mm wide partition profile, which is widely used in plasterboard systems.
The order of assembly of the frame is as follows:
- Fix the supporting profile on the plane of the upper part of the foundation along the perimeter of the structure.
- Install the main rack profiles on it vertically in the corners.
- Between them, with a step of 700-800 mm, fix the intermediate posts, not forgetting about the doorway.
- Perform the upper horizontal strapping along the racks, repeating the perimeter of the bearing profile fixed to the foundation.
- To increase the rigidity of the metal structure, connect two long frame walls with a bearing profile and fix it horizontally at the top.
- In the middle of the profile connecting the walls, install the posts, the length of which corresponds to the planned roof height. The distance between them should be equal to the intervals between the side posts.
- Connect the roof pillars horizontally with the supporting profile to obtain the roof ridge.
- From the ridge profile, lower the rafters to the upper lines of the walls and secure them.
- Make doors and vents from a profile.
Profile greenhouse cover

Finishing a metal greenhouse with polycarbonate is the most successful solution. The material bends easily, for this reason it can be used for covering all types of greenhouses. A clerical knife or band saw is suitable for cutting sheets. After cutting, the cells must be immediately blown out, removing dust, and then glue the ends with adhesive tape.
Polycarbonate sheets can be attached to the frame using sealant or screws with rubber washers. In this case, the cells of the sheets should be located vertically. If condensation accumulates in them, in this case it will flow down. If you do not cover the bottom edge of the cover with tape, water will easily drain into the ground.
Polycarbonate should be overlapped on the frame of the greenhouse and the sheets should be installed with the front side out. This will be correct, since on this side a layer is applied to the material, which serves as a protection against ultraviolet rays.
It is recommended to glue all joints of the coating with tape, since the plants do not like drafts. If you plan to make a pair of vents opposite each other, it is better to place them at different levels. In this case, the ventilation of the greenhouse will be organized by replacing the air flows.
How to make a greenhouse from a profile - watch the video:
That's all. We hope that we helped you understand the issues of assembling a greenhouse from a profile and find out why it is worth using this material to create its frame. It remains to apply this knowledge in practice.


