
Step-by-step instructions and a master class will help you quickly learn how to draw with plasticine, salt, leaves, fruits and vegetables. Drawing has a beneficial effect on the development of the child. Psychologists have proven that this process helps the baby later to more easily master technical and natural sciences. Drawing harmonizes the development of a child as a person, helps him to grow up as a creative person, and it is precisely such people, according to sociologists and psychologists, who achieve significant success in life. In addition, drawing develops fine motor skills, memory, attention.
How to draw Santa Claus?
On the eve of and during the New Year holidays, Christmas is an auspicious period to teach your beloved child to draw Santa Claus and his foreign brother Santa Claus. During the long New Year's holidays, parents will have time for such an exciting and rewarding pastime.
Before you get creative, prepare:
- 2 sheets of paper;
- simple and colored pencils;
- eraser;
- ruler.
It is better if you sit down next to the child, reproduce the details of the drawing on your sheet, and the children do the same on the canvas. There is no need to rush. In order for the child to understand how to do it, we draw with the children in stages.
- Place a sheet of paper in front of you vertically. Use a ruler and pencil to split it in half vertically with the dotted line.
- Line it horizontally into four parts, drawing 4 dotted longitudinal segments.
- Draw the head of Santa Claus under the second horizontal stripe. Draw the bottom of the fur coat symmetrically between stripes 2 and 3, do not forget about the frill.
- Next, you need to depict the sleeves and mittens.
- Draw the outlines of his head, place a beard at the bottom of it, and a frill of a hat on top.
- Draw the face in stages, do not forget about the mustache and eyebrows. The tip of the cap is on the right, draw a round pompom here. Santa Claus has warm shoes and pants on his feet.
- When the full-length portrait is ready, erase the auxiliary dashed lines.
- Show your child how to paint the character's mittens and shoes in dark blue, and his pants and sheepskin coat in red. Leave the beard, mustache, pompom, ruffles on clothes white, like the snow on which the hero of the canvas stands.
- To add contrast to the drawing, have your child paint over the background with a blue pencil.
How to draw a beautiful Santa Claus?
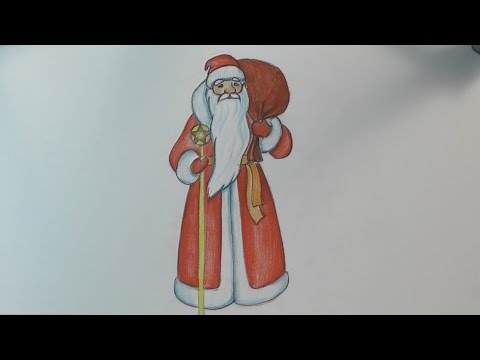
As a result of phased creativity, you will get it realistic and charming. He will clearly show how to draw Santa Claus video at the end of the article. Now you can, looking at the photo, portray your favorite character and invite your child to do it with you.

As you can see, the photo indicates 5 stages, reaching the last one, you will successfully complete the work.
The first photo shows that the scheme of Santa Claus is being created first. Here it consists of three figures. By drawing them, children will get their first ideas about geometry.
Draw a small circle at the top of the sheet. To make the face that will fit in it, be symmetrical, draw a vertical stripe in this figure. A rectangle with beveled corners passes through the bottom of the circle. Soon it will become the body of Santa Claus. Its lower part is crossed by a semi-oval with a beveled bottom.
Talking about how to draw Santa Claus for children and together with them, it should be noted that the lesson should be exciting so that the children do not get bored. In the process of joint portrayal, you can tell the kids exciting New Year stories, in which you will play the main role of the character being portrayed. You can say that grandfather's eyes need to be painted with kind, he is so - positive and fair. Draw on the facial features based on the hint of the second drawing. Looking at it, you will understand how to draw the base:
- beards;
- right and left hand;
- felt boots.
Based on the tips of 4 photos, depict his hat, bag with gifts, magic staff, make the portrait more realistic. Now you know how to draw Santa Claus with a pencil. Usually children are very fond of coloring, so let them give color to the hero of the canvas, his clothes and accessories.
If the child is small and he still cannot draw Santa Claus, then he can easily paint him. It's not scary if the strokes of a colored pencil or crayon go beyond the boundaries of the contours. Be sure to praise the little artist so that he has a desire to continue his creative work.
It will be interesting for such kids to create a work in the technique of typing with palms or tree leaves.
Leaves painting technique
This exciting activity will surely please your child.
Be sure to prepare wet wipes so that at any time he can dry his hands and at the same time learn to be neat. Lay on the table a film, lay a sheet of paper, gouache, paintbrush and leaves of various trees.
How to paint with watercolors using this technique, you will look at the presented video or photo.

Here are some tips to get the crispest leaf prints and the best drawing:
- It is better to pluck the leaves directly from the trees when they are still growing, while choosing the most embossed with protruding veins for creativity. But you can also take fallen ones, then before starting work they must be soaked for 30-50 minutes in water, then slightly dried.
- For a crisp leaf print, paint on the side where the streaks are. Try to use less water to keep the paint thick. Pay particular attention to the edges when applying it.
- When you or your child presses the sheet against the canvas, place baking paper or film on top, and then lightly press with your fingers or iron with a rolling pin or roller.
- To prevent the print from smearing, the leaf must be removed with an upward movement, holding its handle. Then here are some interesting artworks.

If you want to try out non-traditional painting techniques, then check out the next one. It does not require special tools, and kitchen seasoning will be the ideal material for creating an original picture.
Drawing with salt
For creativity, in addition to her, you will need:
- thick sheet of paper or cardboard;
- glue;
- brush.

If the child is not yet able to independently create the contours of the drawing, do it yourself. The landscape can be anything. For the winter, it is better to draw Santa Claus and the Snow Maiden, a forest, snowdrifts.
If you want the planets in space or a starry night to be depicted on the canvas, then take blue or black cardboard or thick paper for the base. The salt painting technique begins by dipping the brush into the glue. They need to mark the details of the picture on paper. In this case, do not regret the glue.
Even a baby can perform the next stage, but under the supervision of adults. Let him scoop up a handful of salt and sprinkle it over the drawing. For snowflakes, it is better to take fine salt, and coarse for snowdrifts. When the entire canvas is covered with it, you need to carefully tilt the picture and pour excess salt. As a result, it will remain only where it was intended, and will indicate the details of the drawing.

You can leave it like this or dilute the paint in water and use a pipette to make blue drops in the picture. Wait a little, then you will see how spectacular the drawing has become.

Such drawing techniques for children are very popular not only for them, but also for adults, who can first mix salt with food dyes, and then create three-dimensional paintings like this one. Shown here is an autumn forest with a picturesque waterfall.

There are other interesting techniques for transferring an image to the canvas.
Crumpled paper drawing

Such pictures are created in two ways:
- A napkin or sheet is crumpled, dipped into the paint and with the help of such a simple device prints are applied to the canvas.
- A sheet of paper is moistened with paint diluted in water. While the liquid has not dried, the canvas is blotted with a napkin, which leaves interesting outlines on it.

With what enthusiasm adults apply colorful stamps using soft paper, then turn into a drawing, you can see in the photo.

Therefore, this type of creativity can be done by the whole family, involving not only children, but also grandfathers, grandmothers, acquaintances.
The following ideas will also help you spend your leisure time in an interesting and fun way.
Drawing with stamps
They can be made from anything, from:
- plasticine;
- thread;
- fruits and vegetables.
To draw with threads, you will need:
- wool yarn;
- dye;
- brush;
- rectangular base;
- jar for water;
- paper.
First you need to wind the thread onto the base, for example, on a rectangular block of wood. When this is done, thickly paint the yarn, then print on the paper to get the intended image.
You can make such horizontal or vertical stripes, as in the photo, or arrange them diagonally to the right and left sides symmetrically, then you get a herringbone.

To perform drawing with plasticine, in addition to it, you will need:
- dye;
- brush;
- sponge;
- pencil;
- paper.

Let the child knead the plasticine in his hands, give it the desired shape, for example, round, triangular or rectangular. Before you start drawing with plasticine, you need to apply a drawing, a pattern on the resulting stamps by pressing on the underside with a pencil, a toothpick, or use a plastic knife.
Then a thick paint is applied to the corrugated surface with a sponge and a drawing is applied with the help of stamps to a sheet of paper.
The print that uses fruits and vegetables for kids will also bring a lot of fun to kids.

As you can see in the first photo, half an apple is used. Thick ink is applied to the cut, then the print is made. You can get beautiful patterns with a piece of pepper. To do this, a core with seeds is removed from the vegetable, then, it is cut across.
Now you can start drawing with stamps by finalizing the prints. They can be easily turned into flowers, floating clouds. A child will be able to develop his imagination if such an unconventional drawing technique is used in kindergarten, at home.
Teach him two more interesting types of images.
Blotography
Previously, when writing with ink, blots were a real scourge for students. If there were any in the notebook, the student's grade was lowered and scolded. Now new drawing techniques have been invented, in which blots play a major role.
There are two varieties of this kind of creativity. For the first, the paint is diluted in a small amount of water, then blots are applied to a piece of paper with a brush. Further, this art is covered with a second sheet of paper, blotted and turned over to the front side. The child completes the blot with the necessary details to turn it into an animal, plant, or creates several mysterious landscapes.
For the second type of blotting technique, you need:
- brush;
- tubule;
- watercolor;
- paper.
With the help of paint, a blot is also made, and then it is necessary to blow on it from a tube. When the base is obtained, it remains to finish drawing the details.

There are other interesting ways of image: with cotton swabs, threads, by scratching out pastel paint on cardboard. All of them help the child to form as a creative person, to develop his imagination, perseverance, imagination.
Interesting drawing techniques are detailed in these videos:
[media = https://www.youtube.com/watch? v = BMnKjkHENMs]


