
Thermal insulation of house walls using clay mixtures, its features, preparatory stage and work technology. Wall insulation with clay is a way to minimize heat loss in the house. It still has not lost its relevance due to the properties of the materials used in the process of this thermal insulation. You will learn about the advantages of clay insulation and the technology of this process today from our article.
Features of thermal insulation of walls with clay

As a rule, clay is not used in its pure form for thermal insulation of a house. Mixtures of this material with straw, reeds or sawdust have good thermal insulation properties. One of the attractive properties of such insulation is the possibility of its use in any region: where the heat takes a significant part of the day, and in places where especially low temperatures are observed in winter.
In the winter season, clay insulation with a filler prevents heat leakage from the house, and in summer it helps to keep it cool. In addition to possessing remarkable heat-insulating properties, clay with sawdust is an environmentally friendly and at the same time durable material.
However, insulating walls with clay mixed with wood waste is far from the easiest method of thermal insulation. Its effectiveness is influenced by many factors. The main ones are the correct preparation of the working mixture and adherence to the technology of its application. If the ratio of clay and wood filler is violated, the finished mixture will not have sufficient strength after drying and will quickly sprinkle. Improper application to walls can lead to flaking of the coating or deterioration of its thermal insulation properties.
Clay mixtures can be used to insulate almost all building envelopes. In the case of thermal insulation of walls, it is recommended to use straw or reeds as filler. They perform much better reinforcing functions in the finished coating than small sawdust, increasing its strength. In addition, reeds, for example, are not fond of mice. Therefore, its presence in the clay mixture will make the future insulation inedible for them.
The correct choice of materials is of great importance for obtaining high-quality clay insulation. It also depends on how effective it will be to retain heat in the house. The main binding component of the working mixture is clay. When wet, it is very plastic and looks like children's play dough.
This quality is most clearly expressed in red clay. In addition, it is less saturated with water than others and hardens faster in the applied state. If it is not possible to use red clay as a binder, it can be replaced with white if necessary. The end result of the insulation will be the same, but the finished coating will require more careful maintenance.
When sawdust is included as a filler in a clay mixture, chopped oak wood is the best option. Such sawdust practically does not absorb moisture, and upon contact with it, they do not swell or rot. Spruce and pine sawdust wastes serve as a worthy substitute for oak sawdust. The resin wood of these conifers is rich in essential oils with pronounced antibacterial properties, which significantly reduce the risk of mold and fungus contamination of the insulation.
Advantages and disadvantages of wall insulation with clay

The main positive property of clay is its natural origin, due to which the thermal insulation made on the basis of this material is absolutely safe both during its application and during the further operation of the finished coating. Clay does not emit harmful vapors into the environment and does not cause allergic reactions when working with it.
In addition to the main advantage, thermal insulation with clay mixtures has many other remarkable properties that make it popular:
- Such wall insulation can be organized and brought to full completion on your own, without special building skills - clay mixtures are easy to prepare and apply too.
- The cost of thermal insulation made of clay with natural fillers is much less compared to the price of synthetic insulation.
- The reliability of such insulation and its high performance make it possible to use clay mixtures for covering walls, floors and ceilings.
- The clay insulation can be disposed of and reused by adding missing components after soaking.
- With internal insulation, such a wall covering maintains a comfortable microclimate in the room, absorbing excess moisture and harmful impurities present in the air.
- For wooden walls, clay thermal insulation is a natural preservative, due to which there is no need for additional processing to protect against wood pests.
The disadvantage of clay is that it is different in nature, and its properties are directly related to the quality of the insulation mixture. Unlike gypsum or sand, it has no constant chemical composition. The main indicator of clay is its "fat content", which determines the plasticity of the future mixture. Therefore, it is difficult to determine the exact amount of additives to clay, experience is required here. It can be obtained by independently studying the methods of preparing heat-insulating clay mixtures and applying them in practice.
Preparatory work

Before insulating walls with clay with sawdust or other filler, it is necessary to prepare their surface, stock up on the necessary tools, materials and knead an insulating solution of the desired consistency.
A properly prepared clay mixture has good adhesion to any wall material, but for reliability, it is recommended to make their surface rough. After all, clay is not gypsum, it has a rather large weight. It is possible to ensure adhesion to masonry by shallow cutting of its seams, they will serve as a good relief for the sticky clay mixture. If the walls are made of lumber, you can stuff shingles on them.
To make a clay mixture, its components must be properly prepared. The clay must be plastic, otherwise it will not work well. When dry, it may get cracked or simply will not hold on to the walls for a long time.
It is not difficult to check the plasticity of clay. To do this, you need to knead a small amount of it in water, and then roll a clay ball about 5 cm in diameter with your hands. Then it needs to be squeezed. If, at the same time, a flat miniature saucer is obtained from a flattened ball, it means that the plasticity of the clay is sufficient. Cracks and fractures at the edges of the sample indicate that it has a particle size larger than necessary for the formation of a strong film during the preparation of the mixture.
After determining the quality of the clay, fill it with water and leave it for several days. The material can absorb liquid for a long time. It depends on its condition, especially if the clay was originally dried to a solid state. Soaking lasts until it acquires the consistency of a thick porridge.
Sawdust for preparing a clay mixture also needs to be prepared. They must be well dried and treated with special substances - fire retardant to protect against fire and lime to protect against pests. Lime must be mixed with sawdust and taken at the rate of 10% of the total mass of the insulation mixture.
To prepare a clay mixture from the prepared components, you need to have a concrete mixer, water, clay and sawdust, a convenient mixing container, wooden boards, nails and a hammer, cardboard and glassine, a spatula and a construction stapler.
The clay mixture is used wet and dry. In the second case, slabs are produced from it, using special forms for their casting. The ratio of the components of the mixture in each of the options is different.
If the insulating mixture is planned to be used in a wet state, then 2/3 of the same bucket of sawdust is required for a bucket of clay. The clay, diluted to the desired state, must be placed in a concrete mixer and, as the solution is kneaded, sawdust must be added, thereby adjusting its density. The result of this procedure should be a homogeneous and easy-to-use clay mixture.
For the manufacture of thermal insulation boards, clay and sawdust are taken 1: 1. In this case, you should first prepare the molds into which you want to pour the clay mixture. Forms are a lattice with a mesh size of 500x500 mm and more. It is made from bars with a larger cross-sectional side of at least 150 mm. The finished lattice must be laid on a plywood sheet. This will allow you to conveniently pour a warming mixture into its cells. In addition, plywood will help form one flat side surface of the boards.
After pouring, the finished mixture of clay and filler must be smoothed over with a spatula and left to dry. Do not dry the panels in bright sunlight, as this may cause cracks on them. For natural drying of the material over the forms, you can build a canopy or simply throw grass over them, creating sufficient shade for the storage area.
Clay wall insulation technology
A mixture of clay with sawdust, straw or reeds is used for the exterior treatment of facades. To insulate the walls with clay from the inside, in addition to sawdust and water, crushed newsprint and cement are added to it, which give the future coating additional strength. The finished heat-insulating material can be applied to the walls in a wet state or they can be clad with plates made according to the above-described technology. Let's consider both of these options.
Thermal insulation of walls with a wet mixture

This insulation can be done in two ways. One of them is throwing the raw mixture onto the walls, the other is pouring it into the wooden formwork attached to the walls.
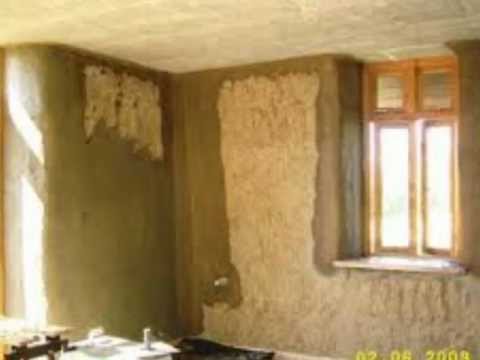
In the first case, the clay mixture should be applied to the surface to be insulated with a trowel or by hand, and then level it with the rule according to the pre-installed beacons. If the mortar is thrown onto wooden walls along shingles, you should know that it is impossible to lay a thick layer of insulation here. On such a relief, a layer of the mixture with a thickness of no more than 30 mm can be retained. After the clay-sawdust insulation has dried, its surface should be finally leveled with cement-sand plaster.
In the second case, you will need a formwork construction, which should be installed along the walls to be insulated. Shields for it with a height of 1 m can be made from boards. The fastening of the shields must be carried out parallel to the wall, departing from it 200-250 mm. If the walls are frame, the panels should be fastened on both sides of the racks. After installing the formwork, the sawdust-clay mixture should be placed in it, thoroughly tamped and left to dry. After the insulating layer has dried, the formwork must be removed, the shields must be raised higher and again fixed in the same way. The process of moving and filling the formwork should be continued up to the top of the wall. Due to the fact that between the wall and the ceiling there will be empty cavities that cannot be closed with a raw mass using this technology, it will be necessary to make slabs of the appropriate size and fix them on clay on top of the insulated sections of the structure.
Wall insulation with clay-sawdust plates and blocks

With the usual thermal insulation of load-bearing walls, it is necessary to fix a lathing made of a wooden bar with a cross-sectional size equal to the thickness of the slab, provided that it does not exceed 100 mm. There should be a distance between the vertically installed bars corresponding to the width of the board. It is convenient to fix the mounted slabs with slats that can be nailed to the crate.
If it is necessary to insulate walls where temperatures in winter can reach -30 degrees, instead of slabs, blocks with a thickness of 300-400 mm or more should be used. They must be installed on a clay-sand mixture, observing the principle of brickwork.
When insulating frame walls, it is necessary to plan the installation of 2 rows of timber with a cross section of at least 70-80 mm. When fixing two bars that determine the thickness of the main wall, the blocks must be placed between them. For tight joining of products with each other where the frame bars are installed, square cutouts should be made in the blocks in the corners, corresponding to the shape of the bar.
When insulating solid stone walls, masonry from clay blocks should be carried out at a distance of 70-100 cm from the enclosing structure. After raising the block insulation to a height of 80-100 cm, it is recommended to fill in expanded clay into the resulting cavity. Then the laying of the blocks must be raised by another 70-100 cm, the next backfill must be performed and this procedure must be repeated, moving up to the top of the wall. After thermal insulation, the wall must be plastered with mortar.
How to insulate walls with clay - watch the video:
Summing up all of the above, we can conclude: clay insulation with natural fillers perfectly performs its functions and is quite effective. If you follow the rules for its preparation and installation technology, you can not only improve the thermal insulation of the house, but also significantly save the family budget due to the availability and low cost of insulation components.


