
From the article, you will learn about the technology of wall insulation with foam plastic, the properties of the material and its choice, the preparation of surfaces for facing and the assembly of the object. Thermal insulation of the facade with foam is an easy and quick solution to problems associated with heat loss of a building. The use of this material as insulation allows to reduce the cost of heating premises in winter and air conditioning in summer. In the off-season, with temperature fluctuations in the outside air, such wall insulation also provides comfort and coziness at home. Today we will tell you how to insulate the facade with foam on your own.
Features of the choice of foam for the facade

Polyfoam has long established itself as an excellent insulation. It is not in short supply and is quite affordable. For these reasons, the material is widely used for thermal insulation of the walls of private houses and even apartments in multi-storey buildings.
Thermal insulation of the facade with foam from the outside is the most reasonable for many reasons. In contrast to the insulation of the interior, the volume of the room does not decrease at all, and the dew point is not present either in the room or inside the wall. And if so, then the freezing of the walls is completely excluded, and their destruction, due to the lack of moisture, will occur an order of magnitude slower.
The thermal inertia of the outer walls, insulated with foam, is able to stabilize the temperature in the room. Their warm mass will not allow the room air to cool quickly even without heating it in the event of night frosts.
Foam for insulation work can be foamed or extruded. The difference between them lies in the mode of production.
The material of the first type is made by swelling polystyrene granules from the action of the gas-forming components of the working mixture when it is heated. Outwardly, this foam plastic for the facade is a slab consisting of small granules sintered together.
The material of the second type is produced by the method of extrusion of polystyrene foam at a high temperature. This foam has a dense fine-mesh structure, greater strength and increased water resistance compared to its conventional counterpart.
Materials of both types are distinguished by good sound insulation properties, resistance to biological, chemical and low temperature influences. They are environmentally friendly and durable.
However, extruded foam is more often used to insulate underground parts of a house that come into contact with soil moisture: a foundation, basement or basement. When insulating facades, this material is used less often. This is due to its diffusion properties and the smooth surface of the slabs.
Due to the fact that extrusion foam (EPS) is vapor-tight, when facing the facade, it does not allow moisture to leave the room and contributes to its accumulation in the outer walls, thereby violating the temperature and humidity regime and sanitary and hygienic standards for the operation of the building. To use EPS for this purpose, a careful calculation of the thickness of the insulation is necessary, which should provide for a shift of the dew point as close as possible to the outer surface of the coating.
The smooth surface of the plates of such foam for good adhesion to the plaster requires additional measures: the use of a metal mesh or sanding the sheets before installation. All this increases the labor intensity and cost of work.
Therefore, when planning facade insulation, it is better to stop your choice on ordinary polystyrene foam. The density of the foam for the facade is 25 kg / m3… It is optimal for ensuring good thermal insulation and sufficient rigidity of the boards to be worked with. Facade insulation slabs of this density are marked PSB-S M-25F.
Currently, many manufacturers produce polystyrene, but not all of them comply with the GOST rules, producing the so-called "lightweight" version of the sheet. Therefore, when buying material, you should pay attention to the appearance of the end part of the product. Strong foam has dense, fine granules. If they are large, this indicates a loose structure of the insulation. It will crumble easily and quickly lose strength, and this is unacceptable in the conditions of the facade.
To insulate the outer walls of the building, you will need a solid amount of material. Therefore, at the stage of purchase, it will be reasonable to take the time to search for high-quality insulation. For such a case, you can even buy a few foam sheets as samples from different stores for comparison.
Retail price 1 m3 foam PSB-S M-25F is about 1900 rubles. So, if the area of the outer walls of the house is small, the event for the purchase of insulation will not become particularly ruinous. For facades, the thickness of the foam is taken depending on the climatic zone, but not less than 40-50 mm.
Before insulating the facade, you should calculate the required amount of material, acquire a suitable tool and prepare the surfaces.
Materials and tools for insulating the facade with foam

The amount of foam required is easy to calculate. To do this, you need to know the total area of the outer walls and the dimensions of the insulation sheet. The quotient of dividing the values of the areas of the walls and one product will give the desired number of foam sheets. For external insulation of residential buildings, insulation with a thickness of 24-45 mm is most often used.
For quick and high-quality work, it is worth taking care of the preparation of the necessary materials and tools in advance. So, it will require: PSB-S M-25F foam, a primer and polyurethane foam, glue, putty and reinforcing mesh, a metal support profile, a smooth and toothed spatula, disc dowels, a grater, a hammer and a perforator, a building level, a knife, etc. painting cord, container for glue, mixer or drill with attachment, paint roller and trowel.
Consumption of basic materials per 1 m2 facade insulation is: primer for primary processing will require 0.25 liters, adhesive composition - 10 kg, foam - 1 m2, dowels "fungus" - 10 pcs., reinforcing mesh - 1, 3 m2, primers with sand - 0.33 kg, plaster composition - 0.5 kg. In monetary terms, all this will cost about 600 rubles.
Preparing walls for foam insulation

The durability and functionality of the future thermal insulation largely depend on the high-quality preparation of the walls for the insulation of the facade of the house with polystyrene foam. This stage of work is considered one of the most time-consuming and painstaking processes, but it cannot be missed.
You should start by freeing the surface of the walls from all parts protruding above it: lighting fixtures, fan grilles and air conditioning units, storm gutters and window sills. If there are any communications on the wall, they should also be removed. Unfortunately, the same applies to the decorative elements that often adorn the facades of old buildings.
After that, it is necessary to check the strength of the exterior finish, if it is present on the walls. To do this, they should be tapped with a hammer. Using a cord or plumb line, you need to check the walls for the deviation of their surfaces from the vertical. If deviations are found, their locations should be noted.
Quite often, at this stage of wall preparation, weak areas of their old finish and large differences in surface level are found. If there are such problems, they should be eliminated: first, dismantle at least a weak layer of plaster.
Painted wall surfaces have poor hygroscopicity and adhesion, so it is recommended to clean off the paint layer from them. If mold, rust or mildew is found on the walls, they must be removed. Potholes and cracks found on walls should be primed using penetrating compounds.
After the primer has dried, they must be repaired with a mixture containing a large amount of cement. Cracks up to two millimeters wide can be left. Wall hollows can be leveled by gluing strips of wall insulation to them.
After removing the external parts from the facade, cleaning its surface, leveling or plastering and drying, you can proceed directly to the insulation of the walls.
Facade insulation technology with foam
The modern technology of facade insulation with foam plastic is not particularly difficult and includes the installation of the support profile, the installation of insulation sheets, the sealing of the seams between them, plastering and the application of a topcoat.
Installation of a starter profile for foam

To install the starting profile (stand), you need to determine the point corresponding to the lower boundary of the thermal insulation cladding of the facade. In projects, this mark is measured from the zero ground level. After that, it must be transferred to all external and internal corners outside the building using a hydraulic level.
The resulting points should be connected with a coated thread or cord into one starting line. On it, you can begin the installation of the support profile. It is necessary to fix the first row of foam sheets on the facade, since without such a profile, the cladding plates glued to the fresh composition will slide down.
The width of the starter bar should be equal to the thickness of the foam sheet. It should be fastened to the wall with a pitch of 250-300 mm using 6 mm dowels with washers. The corners of the profile can be joined with special connectors or using oblique cuts.
Between the parts of the support profiles, it is necessary to install plastic connecting elements, which will serve as compensators, damping the expansion of the metal during temperature changes. After finishing the installation of the support profile, you can start finishing the facade with foam.
Fixing foam to the facade

First, prepare an adhesive mixture that will be used immediately. The shelf life of the diluted composition is only two hours. Therefore, the glue should be prepared in the amount required for work at a particular moment.
You can use a bowl or wide plastic bucket to prepare the mixture. First, it is necessary to pour the amount of water into the container, which is indicated in the instructions for the material. After that, you need to slowly pour the dry mixture into the container, stirring it continuously with a special nozzle fixed in the drill. The rotations of the nozzle blades should be low; this will require a reversible drill. The resulting solution should be left for 5 minutes and then mixed again until a homogeneous consistency is obtained.
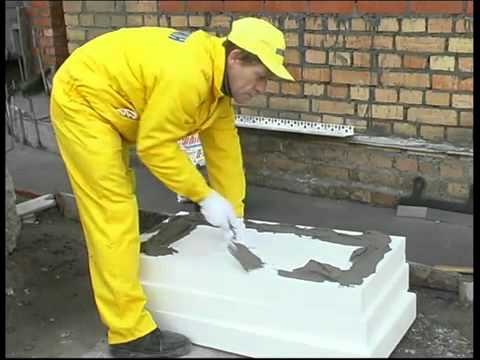
The application of glue to the foam sheet depends on the differences in the plane of the wall. If their size is up to 15 mm, then the glue should be applied along the perimeter of the sheet, retreating from its edges by 20 mm. The width of the glue strip should be about 20 mm, in the center of the board, 5-7 sections of glue with a diameter of 100 mm should also be applied.
If the height differences of the base are less than 10 mm, the adhesive mixture should be applied to the center of the board and along its perimeter. In this case, the width of the adhesive strip should be 24-45 mm. When installing the insulation on a flat wall plane with possible height differences up to 5 mm, the glue can be applied with a notched trowel in a continuous layer.
Within 20 minutes, the slab with the adhesive applied to it should be installed on the wall. The foam must be applied to the site with an offset of 25 mm, and then pressed against the adjacent slabs using a long trowel. If excess solution appears on the surface of the sheet, they should be removed immediately. The position of each sheet mounted on the glue must be checked with a building level.
Pressing the cladding sheets against each other should be tight. Only a small gap between them is allowed - 2 mm. If large gaps appear between the plates during the installation of foam on the facade, they should be sealed with insulation strips and polyurethane foam. The difference in height of the slabs at the joints should not exceed three millimeters.
The installation of foam sheets must begin from the bottom. Their first row should be based on the starting profile. The next row of slabs must be installed with the bandaging of the vertical seams. Their permissible displacement relative to the bottom row should not be less than 200 mm. The most effective is to install the sheets in a checkerboard pattern.
When gluing them, you need to ensure that the tiled joints near the openings are not in line with the vertical slopes. The slabs should be connected either under the opening or above it. L-shaped elements cut from the sheets can prevent cracks from occurring from the corner to the door or window.
If the wall has joints of dissimilar materials, for example, brick and wood, then the foam plates should never be joined there. It is necessary to displace the seam by at least 10 cm. The same applies to those areas in which the deepened and protruding parts of the facade are located under one cladding plane.
At the outer and inner corners of the building, a serrated connection of foam sheets should be made. When insulating window or door slopes, the foam must be docked with their boxes. An adjoining profile or a polyurethane tape can be used for this purpose.
Fastening foam on the facade with dowels

After three days, the glue under the insulation boards will completely harden. After that, you can attach the foam to the facade with dowels. They have wide caps made in the shape of an umbrella with perforations and hammer nails made of elastic and high-strength plastic.
The length of such fasteners is selected depending on the thickness of the foam and the characteristics of the base. The umbrella nail goes into a brick wall by 90 mm, into a cellular block - by 120 mm, and into a concrete panel - by 50 mm.
Usually, the plates are fastened with dowels at their corners and centers. 1 m2 cladding accounts for 6-8 fasteners. Additional "umbrellas" will need to be driven into the slabs in the basement area, near the door slopes, in the places of window openings and at the corners of the house. The dowels should be positioned 200 mm from the edge of the slab.
The installation of the dowels should be started with the preparation of the holes. They can be made using a hammer drill equipped with a drill. The depth of each hole should be 10-15 mm greater than the length of the fastener rod.
After making the hole, dust should be removed from it, then a dowel should be inserted there and hammered into it with a rubber hammer. The head of the fastener should be firmly pressed against the surface of the insulation slab.
Reinforcement of the facade with a reinforcing mesh

After fixing the insulation on the facade with glue and dowels, the resulting coating must be protected with a layer of reinforcing mesh. This will give it additional reliability. First you need to prepare reinforcing patches from it and glue the corners of window and door openings with them. The size of such patches is 200x300 mm. This procedure will prevent the occurrence of cracks, which often appear there.
After installing the patches, cover the first floor of the house with a layer of mesh. This layer will be optional. It is designed to protect the facade from mechanical damage. The height of the cladding with additional reinforcement must be at least two meters. After fixing and drying all the reinforcing elements, you can proceed to the main reinforcement of the facade covering.
A special facade mesh is used to protect and strengthen the thermal insulation of the walls. It is made of alkali-resistant low-stretch fiberglass, which is capable of withstanding about 1.25 kN of load per 50 mm of material width.
The adhesive mixture used for the installation of the mesh has a slightly different composition than that used when gluing the foam plates to the facade. But the solution itself is prepared according to the same principle.
Before gluing the mesh, the cladding boards should be sanded. For this purpose, you can use hand floats with an abrasive mesh or sandpaper attached to the working surface of the tool. The process of grinding the coating allows you to remove the differences that appear during installation at the joints of the slabs. After the end of this work, the surface of the insulation must be cleaned of the products of its processing: dust, small particles, etc. After making sure that this procedure was successful, you can proceed with the installation of the mesh.
First, it should be cut into strips of the same width. Then, on the surface of the insulation, you need to carefully apply a layer of no more than 2 mm glue mixture and attach the prepared strip of mesh to the wall along the entire length of the lining processed with glue.
The glued sheet should be smoothed, starting from its middle to the edges, using a float or a metal smooth spatula. All other strips of reinforcing material are attached to the insulation in the same way.
The next day after pasting should be devoted to sanding the reinforced coating with sandpaper. After three days, it will completely dry out. After that, the facade cladding must be treated with a soil mixture, which includes quartz sand. This layer will ensure high adhesion of the insulation with the finishing coating of the facade in the future. In addition, decorative plaster is much easier to apply to the surface treated in this way.
Useful tips for insulating the facade with foam

In order to properly insulate the facade of the house with foam plastic with your own hands, you should adhere to the recommendations below:
- All work on the facade insulation should be carried out at a positive temperature from +5 to +25 degrees, while the air humidity should not exceed 80%.
- The installation of scaffolding must be carried out at a distance of 0.2-0.3 m from the walls of the house.
- Before finishing, the working surfaces of the facade should be protected from the effects of precipitation, wind and sunlight with continuous curtains made of dense fine-mesh material.
- It is recommended to start insulation of the facade from the most inconspicuous wall. This will make it possible to hide work defects that often arise at its initial stage. In addition, you should not interrupt all work on one wall. As a last resort, all its "wet" processes should be brought to an end.
- The purchased insulation should not be stored in the sun; getting the material under rain or snow is also highly undesirable.
- After the exterior finish has dried, it is recommended to protect the façade surface by painting. A paint roller with a telescopic handle is suitable as a working tool for this purpose.
How to insulate the facade with foam - watch the video:
Having studied the details of the facade insulation technology and having all the necessary materials, it is quite possible to carry out such work independently. At the same time, you can get not only significant savings when paying for heating the house, but also save funds for carrying out insulation with the help of a construction organization, whose services are not cheap.


