
What is the process of installing cork insulation on walls and its main specificity, advantages and disadvantages of such insulation, how to properly prepare and level the surface, perform basic work, and finish. Installing cork insulation on walls is one of the most effective ways to maintain and maintain a comfortable temperature in commercial and domestic premises. High-grade thermal insulation is not achieved through special processing of these raw materials, but rather due to the specific internal structure of the material.
Features of work on the installation of cork insulation

Let us first consider what this heat insulator is. It contains crushed cork oak bark as well as some organic additives that have binding qualities. Inside the plug there are many miniature chambers that are hermetically sealed and filled with a gas mixture. It is this structure that provides high thermal insulation and, at the same time, elasticity. The material easily and in a short time restores its previous forms.
Cork insulation is most often produced in the form of mats, the dimensions of which are 0.5 x 1 m, and the thickness is from 2.5 to 5 cm. Another form of release can be thin tiles or rolls. Their width is different, and therefore it is necessary to carefully measure in order to avoid inappropriate waste of material.
The thermal insulation qualities are influenced by the density of the material. How he behaves during operation will depend on this. Densities up to 100 kg per 1 m3 enough to provide sound insulation, but for thermal insulation of country houses and cottages, this figure should be higher.
Various raw materials can be used in the manufacturing process. That is why this insulation is divided into several main types:
- Cork granules … They are used wherever it is necessary to fill voids under the floor and on the walls.
- Natural cork … It is used exclusively for decorative purposes in decoration.
- Panels based on cork agglomerate … One of the most popular ways to produce a heat insulator. Created on the basis of cork chips, which are connected with polymer adhesives.
Agglomerate can be found more often than other varieties when carrying out thermal insulation. It is used not only for wall insulation, external and internal. It has proven itself well in cases where it is necessary to protect underground or basements, floors, ceilings between floors, roofs and attics, sound and vibration insulation, filling voids and expansion joints. It can act as an independent decorative finish or be used as a substrate for laminate flooring.
For home insulation, clean cork agglomerate is often taken. It has a black color, which is obtained in the process of charring the wood fibers contained in the chips.
One of the important features of the use of cork insulation is the fact that its installation is extremely simple in comparison with many other modern heat-insulating materials. This insulation weighs very little and can be attached to walls with glue, nails or screws.
Advantages and disadvantages of cork wall insulation

Cork wall insulation owes its popularity to a number of positive qualities. Let's highlight the following ones:
- It is lightweight compared to a number of other thermal insulators.
- Resistant to mold, fungal growth and moisture decay.
- Possesses sufficient strength and hardness.
- It is a natural dielectric and therefore does not generate unpleasant static electricity.
- Unacceptable for rodents.
- Does not react with alkalis.
- It is considered a non-combustible material, and also does not emit harmful impurities during combustion.
- Even at high humidity, it does not change its volume and shape.
- Environmentally friendly, which is confirmed by practice.
- Impervious to ultraviolet rays.
- It is extremely simple and unpretentious in installation, does not require specific tools and long-term work skills.
A significant disadvantage of this material is its high price. If cork insulation is too expensive for you, it is better to pay attention to polystyrene or mineral wool varieties. But if the cost of the cork seems affordable, then it makes sense to choose it, because it guarantees high quality and a good temperature in the room even in severe frosts.
Technology for installing cork insulation on walls
Thermal insulation includes several stages. Walls must be leveled and prepared to avoid cork lag and heat loss.
Wall surface preparation

Before fixing cork insulation, you should make sure that the prepared surface is of the proper quality. Each wall on which the thermal insulator will be installed must be perfectly aligned. This is checked using a building level.
If it is found that the surface is not even enough, it is rid of any existing protrusions and drops. It is enough to stock up on a chisel and a hammer and carefully remove the protruding pieces.
If the remnants of old wallpaper are still preserved on the wall, they must be removed without fail, since they will not ensure a proper fit of the heat insulator: under the adhesive, they will get wet and fall off, which will lead to lagging of the cork insulation.
Then you can level the walls with plaster - this is a good way for irregularities that do not exceed 3-5 centimeters of deviation in the surface. Before starting plastering work, it must be primed. This is done in order to avoid peeling of the materials applied subsequently, as well as to increase moisture resistance. The so-called "milk" is used as working mixtures, which includes cement, water and refined sand.
Wet plastering is more often used, for which the installation of landmarks-beacons is necessary. They are flexible elements made of aluminum. They are fixed in the surface of the wall, and then alignment takes place along them. For example, when the skew of the wall is fixed at the top, then the beacon is attached at the bottom to eliminate unevenness.
The distance between adjacent beacons is selected based on the tool with which the solution will be thrown. Landmarks can be fixed using ordinary self-tapping screws - this will take a little more time, but will simplify the work in the future.
In order to assess the verticality of each such landmark, a plumb line is used. Having fastened the profiles, you can pull the cord, Observing the verticality of the lines in this case is much easier: just unscrew and re-tighten the self-tapping screw if necessary.
As soon as the fixing of the beacons is finished, you can start mixing the plaster solution. It is enough to dilute it in a volume of 10-15 liters, which will be applied in the interval between the landmarks. The mixture should not be overly liquid, otherwise it will simply flow down the wall. If it is too thick, then it will be difficult to work with it, so the desired consistency should be somewhere in the middle.
As soon as the plaster is applied to a specific section of the wall, we take the rule and press it against the beacons. Movements are made from bottom to top. If there is not enough solution in certain places, it is added and again leveled with a rule. Similar actions are carried out until, until it is possible to achieve a perfectly flat surface.
When the entire wall is dry, small roughness may appear on it. To remove them, we need a fine to medium grit sandpaper. After that, another finishing filler procedure may be required, and the wall is ready for thermal insulation.
The main advantage of such works is that they do not take up a lot of usable floor space, but you need to be prepared for a large volume of construction dust and debris. For preparatory, basic and finishing work, we may need the following materials: cement, sand, cork insulation, adhesive mortar, nails, screws, dry plaster, sandpaper, ground paint, water.
From tools: a hammer, a hacksaw or a sharp knife with a wide blade, building troughs, containers for preparing glue, building level, shovel, trowel or trowel, paint roller.
Instructions for attaching cork insulation

To fix the heat insulator on the wall surface, acrylic-based contact or adhesive mixtures are usually used. The former are considered more reliable, and they are applied not only to the material, but also to the wall. The main advantage of the latter is simplicity and ease of use.
The technology for installing cork insulation is as follows:
- The prepared wall is marked out with a level, tape measure and a pencil. For this, areas equal to the width of the heat insulator roll are marked.
- The cork is cut with a sharp knife to the required length. You can immediately make a canvas from floor to ceiling or harvest pieces that are smaller in length, but more convenient for work.
- The surface of the wall is coated with an adhesive, which is diluted in advance in accordance with the instructions. We take a paint roller, dip it in glue and saturate the wall, and then the canvas itself.
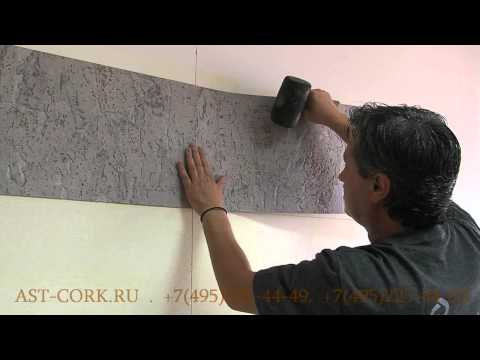
- The cork insulation is applied to the wall and pressed firmly for a few seconds. For an additional guarantee of fixation, you can nail it down with small self-tapping screws.
- Places under window openings and near doors require more careful fitting and trimming of the material. Adjacent panels should be joined together, not overlapped.
- It must be remembered that the glue sets very quickly, so the canvases must be well fitted to each other even at the moment they are applied. After that, it will be almost impossible to move them.
Rooms where insulation takes place must be thoroughly ventilated, because many types of adhesives are highly toxic and give off an unpleasant odor.
Note! In order for the cork roll insulation to adhere properly to the wall, you must carefully study and follow the instructions that are attached to the adhesive. This will ensure the integrity and strength of the coating during long-term use.
Finishing the walls

Quite often, the owners are interested in cork insulation for wallpaper, since this is one of the most common options for decorating a room. But first, it is necessary to carry out preparatory measures, which are usually associated not only with the dilution of glue, but also with marking, cutting, combining the pattern on the wallpaper. By the way, the choice of glue is an equally important point, because different types of canvases require their own mixture. Some coatings can be heavy and require special adhesives.
In the process of pasting, it is necessary that the doors and windows are closed, since any drafts can cause poor adhesion of the canvases. The optimum temperature is + 18 ° C, and the humidity is no more than 70%.
It is best to carry out the work with an assistant who will support the canvas and make sure that it lays down as flat as possible.
The pasting process starts from the wall on which the window is located. You can do this from the side of the doorway, if you have a vertical reference point and move in accordance with it.
If air bubbles appear (and this moment inevitably occurs), they are carefully pierced with a needle and air is released from under them, smoothing with a dry cloth. This should be done very carefully, since some types of wallpaper are quite delicate. Smoothing must be done from the center towards the edges.
During gluing, special attention is paid to the joints and joints. In this case, it is better to navigate by the sunlight falling from the window.
In the places where sockets and chandeliers are attached, it is necessary to cut an even round hole in the canvas. To do this, a cross is first cut, from which a circle is formed in the form of separate sectors.
It is a little harder to glue wallpaper in the corners, because the last canvas on the wall may be too much, and it will need to be cut to its full length. It is better to make measurements on the floor in advance, and then grease the sheet and fix it so that it overlaps the adjacent wall by no more than 0.2 cm. In such places, the wallpaper often lags behind, so glue must be applied with a margin. After the adjacent canvases are fixed, they are passed over them again with a dry cloth, achieving perfect smoothing of the sheet.
Once all the rolls are glued into place, you can start fixing decorative borders or skirting boards. For this, a separate glue is used, which is applied clearly along the seam of each skirting board. After work, you can immediately wet the floor, and then wipe the floors dry.
The room must remain closed for another day so that everything can dry out. Only after this time, furniture and other interior items are brought into the room. This completes the insulation with subsequent wallpapering.
Advice! If there is a pattern on the wallpaper, it must be picked up on the floor in advance. To make it easier to find, the place is marked with a pencil or a light cut in the canvas. How to fix cork insulation - watch the video:
Thus, installing cork as a wall insulation is an excellent way to reduce heat loss in the house. Despite the higher cost compared to materials of synthetic origin, this is the best option for those owners who value the natural atmosphere in their home.


