
For 6 years of the wedding, you can give various durable gifts, and if you have an unnecessary cast-iron bathtub, make a stove, furniture or a pond out of it. Master class and step by step photos to help you.
Not everyone knows which wedding is celebrated on the anniversary of 6 years and what is the gift? Our article will answer these and other questions.
Wedding anniversary 6 years - traditions, congratulations
Such a wedding is called a cast iron wedding. This metal is hard, but if handled carelessly, it can break. The same applies to family relationships.

Since the custom to call 6 years of a wedding this way has distant roots, a number of traditions have formed over the years.
- The wife had to clean all the cast-iron utensils to a shine the day before. The hostess' efforts will be appreciated by the invited guests. Indeed, on this day, she had to take out the dishes in such a cast-iron dish.
- The night before the celebration of 6 years of the wedding, the husband and wife had to put notes with wishes in a cast-iron dish. It is believed that these trends will come true.
- Another tradition is to serve on the festive table "Chugunok" - round-shaped meat pie and aromatic tea.
- It was customary to invite the mother-in-law to the house of the young, where she, wearing white gloves, would examine various places in the house. If there was no dirt and dust, the gloves remained snow-white, which means that the daughter-in-law is an excellent hostess.
- Rowan bunches are considered a symbol of the family hearth, they keep the fire of love. Therefore, 6 years of the wedding are also called mountain ash.
- In the Baltics, on this small anniversary, bunches of mountain ash are presented to the hero of the occasion. It is believed that then the couple will have a son.
- And the French present the heroes of the day with houses made of candy. Therefore, in this country, six years of the wedding is called candy.
What do you get for a cast-iron wedding?
Of course, it must be associated with the title of this event. Here's what guests can present to the young:
- vases;
- original locks;
- candlesticks;
- figurines;
- dishes;
- boxes;
- medals;
- souvenirs.
These items will be made of cast iron. The husband can give his wife:
- a mirror in a cast iron frame;
- fondyushnitsu from this material, in it the hostess will be able to cook sweet desserts, dishes with cheese;
- cast iron dishes;
- clothes hanger in the form of an animal.

But what gifts for 6 years of the wedding will certainly be appreciated by the spouse. This could be:
- kettlebell or dumbbells;
- brazier;
- if the husband is a fisherman, then he will imperceptibly appreciate the cast-iron pot in which you can cook the fish soup;
- set of tools;
- clamp;
- housekeeper;
- a chest in which you can store all sorts of little things;
- stand for newspapers and books;
- outdoor thermometer;
- souvenir sword.
Some gifts can be made by hand, as you will see now.
How to make a casket, imitation metal for an anniversary - a master class

To make such a box for a 6 year wedding anniversary, take:
- MDF box;
- construction putty;
- acrylic varnish;
- foam sponge;
- decoupage glue or construction PVA;
- acrylic paints;
- decoration elements;
- brushes.
Prime the box with PVA glue. Take a metal stencil. First, put a frame on the lid of the box, then place the stencil on top and apply the putty on the wood.

In this case, the color was used wenge. Then carefully remove the stencil with a smooth motion of your hand.

While the putty is still wet, place the medallion on it. Glue it with Moment glue.

Dipping a foam sponge into the putty, cover the bottom and sides of the box with this compound. Let the putty dry, then coat the box with brown acrylic paint. When it is dry, apply acrylic varnish to the product. Glue the selected pattern in the middle of the medallion. In this case, it is the lady in blue.

If a husband makes a 6-year wedding box for his wife, he can use her portrait. If a spouse makes crafts for her husband, she will take his photo. And if one of the guests decided to present such a gift made with their own hands, then they can put a photo of the married couple inside.

To help paint and varnish dry faster, you can dry these layers with a hairdryer.
When the surface will not stick to your hands, you can apply some turquoise acrylic paint on top using a foam sponge. Then you will achieve surface relief.

Take another foam sponge and use it to apply a few strokes of gold paint. If you want the box to look more like cast iron, then use black as the main tone, and apply only a little gold paint around the edges.

Even earrings can be made of cast iron. These look very extravagant and will certainly please the spouse.

If a husband and wife have a dacha or their own house, then the following would be great gifts:
- wooden bench with wrought iron elements;
- cast iron stove;
- a bench with an arch made of cast iron;
- Street lamp;
- sundial;
- decorative figures for the street.

A cast iron stove will be an excellent gift. It looks great and is very durable.

You can also present a teapot made of the same material, which will also be in perfect harmony with the stove.
For a cast-iron wedding, you can present such a cake, made in the form of a frying pan made of this material, and sweet mastic scrambled eggs in the shape of hearts.

But such a lock can be made to order or bought in a specialized gift store.

If the husband has the tools and skills to work with metal, then let him try to make a rose for his wife and give her for a cast-iron wedding. Check out the next master class with step-by-step photos that will teach you how to make such a long-lasting flower.
How to make a metallic rose for 6 years of wedding?
Take a sheet of iron 1 mm thick. From it, cut four squares with sides of 12 cm and 1 square with sides of 10 cm. In the center of each, drill a hole with a diameter of 6 mm and draw a flower consisting of 4 petals on each blank with a felt-tip pen.

Cut these blanks with a grinder. From the rest of the metal, cut about 7 triangular spikes.

Take a wire with a diameter of 6 mm and hammer it with a hammer on the anvil so that it takes on a stem-like shape. Weld the previously cut triangular spikes to it.

Transform the edge of this workpiece by cutting the thread m 6. Tighten the nut to the end, you can weld it on.
Remember, you still have one square of metal with sides of 10 cm? Draw a five-petalled flower on it, and then cut it out. This will be the sepal, you will place it under the flower.

It's time to collect the metal rose. First, put the sepal on the nut, then string the flowers in a checkerboard pattern. Tighten them with a nut from above.

Take the round nose pliers and bend the first petal with them first. As you can see, the center nut was pre-welded.

After you have bent 1 petal into a tube, using the same round-nose pliers, take the second petal from the opposite side and wrap the first one with it.

In this manner, shape the bud and then fold the top edges outward.

This is how a rose will turn out.

It remains to wrap the sepals down using round-nose pliers.

Here is such a wonderful gift for a cast-iron wedding. A similar rose can be presented to your wife on March 8. Such an item will be stored in the house for a long time, since this rose will not wither.
If you have an old cast iron pot, upgrade it to make a wonderful cast iron wedding gift.
Remember the skills of decoupage, and if you have forgotten them, the master class will help you fix it.
DIY gift for 6 years of wedding

Here is such a rare thing with an emblem for the 6th wedding anniversary.

To make an old rusty cast iron such a wonderful gift, you will need:
- old cast iron;
- white acrylic paint;
- varnish;
- sackcloth;
- colors;
- combed bast;
- MDF;
- rice card;
- glue Crystal Moment;
- PVA glue;
- jute rope;
- jigsaw;
- sandpaper;
- grinding attachment with a screwdriver;
- brush.

First, to make a gift for a cast iron wedding, you need to try to clean it from rust. This will help coarse sandpaper. But it will not be possible to get rid of all the rust, therefore, so that then rust does not appear, you need to varnish the cast iron at this stage.

When this layer is dry, cover the cast iron with two coats of white acrylic paint. Don't forget to cover it inside too. Cut the rice paper in half lengthwise.
Take a sheet of rice paper, glue it to the most protruding place of the container. Now make cuts at the top and bottom of a sheet of rice paper and glue them onto the top and bottom of the iron pot. For this, use PVA glue, which is pre-lubricated with the outer part of the cast iron.

Add to brown white paint. Dip a sponge into this mixture and apply the solution to the inside of the iron.

Now, with the same solution and a sponge, cover the bottom and bottom of the cast iron, as well as upward. Add a little green paint to brown, mix and now blot the same dark places with this swamp color.

To decorate the bottom of the cast iron, grease the bottom with glue. Attach a jute rope to this place, twisting it in a spiral.

Take a piece of burlap and cut it to form an octagon. Use a needle to loosen the edges of this shape a little.

Lubricate the outside of the bottom of the cast iron with Crystal glue and attach the cut burlap here. Tie it with a jute rope, glue the one so that it does not slip.

Weave a pigtail from jute rope, glue it to the top of the cast iron to make such a border. Use a lighter to lightly burn this part, as well as the burlap. Then a touch of antiquity will be visible.

Take a gold contour paint and use it to select some elements of the drawing on rice paper.

To write a congratulation for 6 years of a wedding, you need a piece of MDF. Cut it out like this, and make a hole with a screwdriver.

Sand this part, then use a torch to burn it on all sides. The art of pyrography will help burn out the inscription "6 years together" on this part. As you understood, this is wood burning. Use old letters.

Lightly select the letters with a gold outline. When it dries up, finish the work and tie the inscription to the cast iron with combed bast.

Here is such an original gift for 6 years of wedding will turn out.

If you are thinking of making a global gift, you have the tools and skills, then watch an exciting master class.
How to make a cast iron bath stove for a 6 year anniversary?

A cast iron stove made of such a material will turn out to be durable. A husband can make a similar product for his wife and his family, will present a surprise. Also, the friends of the young couple, if they have such an opportunity, will make such an invaluable gift.
Here's what you need:
- cast iron bath;
- a metal sheet;
- sheet metal, the thickness of which is not less than 0.5 cm;
- grate;
- bricks;
- sand and clay for mortar;
- heat-resistant glue-based mixture for attaching ceramic tiles;
- bolts with washers;
- heat-resistant sealant;
- metal mesh netting;
- ceramic tile;
- chimney pipe with a diameter of 11-12 cm;
- metal corner.
But what tools will be needed:
- grinder and circles for it, designed for working with metal;
- electric drill and drill to it;
- grinding wheels;
- spatula and trowel;
- building level;
- plumb line;
- construction gun;
- hammer.
Take care of your safety. Wear construction gloves, a respirator and goggles.
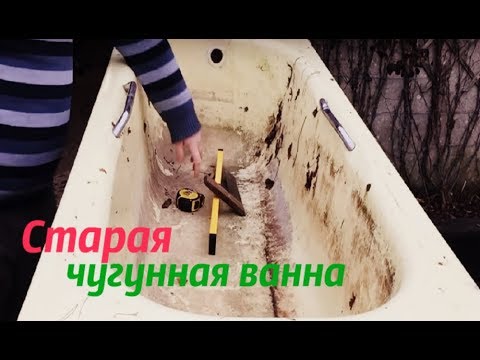
When everything is ready, you can start cutting the bath. In order for this stage of work to go as it should, approach it with all responsibility.
Since cast iron dust will fly when sawing, it is better to do this work outdoors, but if you decide to cut the bathtub indoors, then cover the pieces of furniture, the floor with plastic foil.
Now mark out to cut the tub in half.
Having dressed in protective clothing, begin to cut the bath in a circle according to this marking, first removing the enamel from these places.
Now, moving literally 10 cm, cut the cast iron itself. It is necessary to cut at a slight inclination, then the enamel will not peel off during the reverse course of the disc. If the grinder is too hot, turn off the tool to cool it down.
When you have sprayed about half of the bath, then you will need to put bricks under these parts to fix the bath in this position. And if you do this work on the street, immediately turn the bath upside down, it will be easier to work this way.

Now you can start making the oven. Since it will be heavy, it is necessary to create a foundation. It must be done in advance so that it has time to harden and gain the necessary strength.
The type of foundation you choose depends on the type of oven you want to see. If you have a small oven stand, you can make one without using additional supports. If it is high, then you need to make a blind area, it will give the concrete base an even shape.

As you can see, the foundation and the blind area are laid on a sand cushion, reinforcement will make the concrete base more durable.
When the foundation and the blind area are completely dry and strong, you can put a half of the bathroom on it, placing it upside down. This part is a firebox. On it, you can fix the corners that will support the grate. You need four or more of them. Now a metal cast iron sheet is laid on top. If not of such material, replace it with durable steel. In such sheets, you need to cut a hole for the pipe in advance. Remove irregularities with a file, then clean these places.

Insert the chimney into the resulting hole and fix it. Seal the gaps with a flame retardant sealant. Also, with this heat-resistant compound, coat the contours of the connected halves of the container and a metal sheet. The bottom of the oven is ready.
To attach the top here, you need the help of another strong man. But first you need to mark the hole for the pipe on this element and cut it out. Now you can slide the top of the bath onto the main structure. Then a collapsible pipe is attached. At the edges, fix the two halves of the bath and the metal sheet with each other using 10 mm bolts. Place them at a distance of 20 cm from each other.

It's time to install the grate. Ash will periodically accumulate on it, so it is better to attach a door to this part in order to remove the waste of combustion products as necessary. Attach the grate, also using the pre-fixed corners.
In order for this product to be securely fixed on the ground, look aesthetically pleasing and look like a stove, now you need to make masonry from bricks. Lay them out around the perimeter to cover the sides and backs. You can lay bricks in the front, but leave room for the door.

The blower must be mounted below the grate. You will fix the main door a little higher. To close the upper chamber, fix the metal shutter with the non-heating handle here. This product will be the same shape as the curves of the bathtub.
To keep the stove warm for a long time, you need to coat it with a thick clay-sand mortar. Add a little lime here so that there are no cracks. The following table will help you determine the ratio of these materials to each other.

The solution will adhere well to the slippery surface of the bath if you first cover this part with a fine-mesh mesh, for example, a chain-link. Apply this solution with a spatula in several steps. As a result, the thickness of all layers should be 6 cm.
Finally, you will need to finish the furnace using:
- ceramic tiles;
- tiles;
- natural or artificial stone.
The upper part of the oven can be simply whitewashed.

Here is such a wonderful gift for 6 years of wedding you can make. You can cut out the side of the bathtub, process it, paint the product and get such a stylish sofa for home or for the street.

And if you cut the bathtub in half, also process these elements, then you get two chairs.

If your spouse dreamed of a small pond at their summer cottage, surprise her. The next master class will show you how to do this.
How to make a cast iron bath pond for your wedding anniversary?

Such a pond can be decorated with stones, plants. Then you can hardly guess that this old cast-iron bath gave such scope for creativity. Here's what you will take for this:
- unnecessary cast iron bath;
- the container in which you will stir the solution;
- clay;
- sand and cement;
- shovel;
- Master OK;
- pebbles and rubble;
- facing stones;
- tin sheet;
- level;
- roulette;
- film or paint and a brush.
Prepare a place, install a bath here and use a peg to mark the groove. Dig it up. The depth of the hole should be equal to the height of the bathroom and plus 20 cm. They are needed in order to fill the bottom of the pit with sand. On top, you will install a cast iron container and align it with a corner. Cover the side hole in the bath with a cement mixture, let it dry. Then you can then pour water into this container and plant the plants.

Please note that in addition to the main pit, you need to dig a small hole where there will be a drain. This hole has dimensions 60 by 60 cm. A twisted sheet of tin must be inserted into it so that it is 25 cm higher than the main hole. This small hole must be covered with gravel, and then the metal sheet must be removed.
Wet sand should be placed between the bathroom and the ground on the side. You can drain the old water through the drain hole, then rinse the tub and fill in new water when needed. If you wish, paint the inside of the bath or put a blue film here so that the water surface is exactly that color.
If you do not want such a significant pit, then place the bathtub directly on the surface of the earth. But first, it is still better to put strong slabs or make a shallow foundation 25 cm high. This bath is then painted outside, water is poured and plants are planted.

The multi-tiered pond looks beautiful. To make it, first also install the bathtub in the chosen place, make markings on the ground. But the recess should be wider, for this, leave an additional half meter on each side. Select the soil here to a depth of 40 cm. Then, under the bath itself, you need to dig a pit along the outer contour and you need to dig in the fiberglass slate, and put on a corrugated sleeve on it. This area must be compacted with sand and cemented. When the concrete dries, the structure, together with the bath, is covered with a film, then water is poured.

Water lilies look great on such a surface, plant these flowers. If you have a one-level bathroom, then decorate the area next to it with stones, attaching them with waterproof glue. Cover the cracks between them with sand, sprinkling it directly on the glue.

Here are some other aquatic plants you can use for this:
- marigold;
- water lilies;
- duckweed.
Around the reservoir, a fern, a bathing suit, a buttercup will look and feel great. Small bushes will also find a place here.
Such a picturesque gift will certainly be appreciated by the spouse. You can do something more original by running fish in the bath. There will be such unpretentious ones as verkhovki, they are also called oatmeal. They grow up to 6 cm and keep in flocks. You can also settle here fishes, which are called silavkas.

In order for the fish to spend the winter, the bath is covered from above, for example, with snow. But it should be at least 50 cm. Experts advise placing empty plastic bottles in the bath for the winter so that it does not crack due to freezing of water. And if you drain the water for the winter, then cover the top of the bath with a sheet of iron.
These are wonderful gifts made of cast iron for 6 years of a wedding, you can do it yourself. If you are interested in the idea of a bathroom, then you can learn more about it by watching the video. Take a look at what can be made of this durable item.
And if you want to know what to give for a cast-iron wedding, then the second video will help you.


