
In the article you will find a description of the most common types of stained glass for the ceiling. In addition, methods of making them at home will be presented to your attention. Stained glass on the ceiling is a bold design option for the upper plane of the room. In combination with properly arranged lighting, it will bring sophistication to the interior, fill the room with new colors. A variety of manufacturing techniques allows you to choose an option for individual preferences. Moreover, the creation of a stained-glass window according to your own sketch will certainly add additional uniqueness to the dwelling. Currently, in addition to the classic look, there are other techniques. Let's take a closer look at the most common ones.
English film stained glass for ceiling
The simplest version of stained glass for the ceiling is film. The technology for creating this type of false stained glass has English roots. For some time, the developers of this simplified technique tried to keep it secret. However, the secret was quickly discovered and adopted by enterprising people from the United States, and then useful knowledge leaked to other developed countries of the world. At the moment, the popularity of English film stained-glass windows is justified by a number of advantages over other technologies for creating an artistic composition in the interior and especially on the ceiling.
Materials for film stained-glass windows on the ceiling

The main materials for creating film stained-glass windows are glass of the required size, stained glass film, lead tape. Let's consider them in more detail:
- Glass … To create a stained-glass window on the ceiling, you can use both silicate and acrylic glass. The second option, with the same dimensions, has less weight, is less fragile, so its use is safer. Glass thickness for English technology should be in the range from 4 to 6 mm. The surface is smooth.
- Stained glass film … The film for stained-glass windows is produced both in rolls and in sheets. There are many types of it: glossy or matte, smooth or textured, transparent or tinted, plain or multi-colored (the drawings have a wide variety of themes). Such a variety of materials, combined with human imagination, allows you to create unique masterpieces on glass ceilings. The stained glass film on one side has an adhesive component, which is absolutely invisible on the finished product, because is completely transparent. The pigments used in the production of high-quality stained glass tape are moisture resistant, perfectly retain their shape, and do not deform under the influence of moderate external factors.
- Lead tape … Its purpose is to create a contour of a pattern for a stained-glass window, which makes it possible to make a stained-glass window that looks very similar to the classic look without cutting the main material - glass. Lead tape can be of different widths and thicknesses, and also have different colors, for example, white, gold, silver, platinum, black, etc. The tape is almost 100% lead, while it has an adhesive base and is easily attached to the glass surface …
Some manufacturers use the technology of applying a pattern on both sides of the film so that the image can be clearly seen on both sides of the processed glass, but this option is more suitable for doors and windows; it makes no sense to use a double-sided film for false stained-glass ceiling.
Instructions for the manufacture of film stained glass for the ceiling

The English technology for creating a film stained glass window includes the following sequential steps:
- Create a sketch of the stained glass for the ceiling. Provide that the width of the outline should be the same as the lead tape. Various graphic computer programs come to the rescue, for example, CorelDRAW® Graphics Suite X5, GlassEye, Pattern Wizard. You can also create a drawing with your own hands. The dimensions of the layout should be of actual size, it is better if there is at least one copy of the drawing in stock in case of damage to the original. If the layout does not fit on one sheet, then arrange the individual parts exactly along the lines of the drawing, use thin transparent tape to connect.
- Prepare all the necessary materials and fixtures: a backlit table, glass, stained glass film, scissors, lead tape, a knife for it, rollers for smoothing film and tape, a marker, double-sided tape.
- Clean the glass from dirt and dust with a liquid cleaner that contains ammonia.
- Place the mock-up on the table with glass on top of it. Connect the paper and glass in several places with double-sided tape to avoid displacement of the pattern during work.
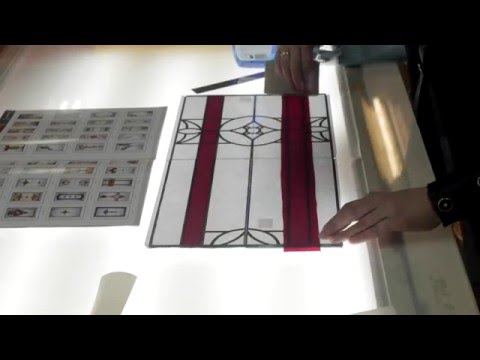
- Now you can start edging: carefully lay the lead tape along the contours of the image, smoothly bending it. Cut the tape carefully so as not to damage the glass. Lead is a soft ductile metal, so it is easy to work with. After the contour is "outlined", it is necessary to seal the tape, press it against the glass using a roller.
- Turn the glass over, placing it on the small cork spacers. This action is an insurance against damage to it when applying and smoothing the film on it, because the underside is no longer smooth, but has irregularities due to the lead tape. Peel off the paper layout carefully. Wipe the glass again.
- For cutting the stained-glass film, you can use a copy of the layout cut into elements. This is where a marker and scissors come in handy. In this case, it is quite easy to cut out the desired elements, but do not forget about a small allowance at the edges. Alternatively, cut a piece of film from the roll that is slightly larger than the element being processed.
- Next, glue the cut-out elements in the order prescribed by the layout. It is very easy to glue the tape. It is enough to attach it from one edge to the glass and move the roller in the direction of the other side of the element with a quick movement of the roller.
- Trim off excess tape along the centerline of the lead outline.
- At the final stage, it is necessary to duplicate the contour with lead tape on the side where the film is applied. This action is not necessary in the manufacture of a stained-glass structure intended for the ceiling, because such a stained-glass window is one-sided, i.e. one side will always be hidden. However, if the whole composition is transparent enough, then it is better to apply an outline so that under artificial lighting there is a clearer picture. English stained glass for the ceiling is ready.
If you process only one side of the glass, then you can slightly change the classic technology: creating a model, fastening the model to glass, applying a stained glass film, forming a border.
Faceted stained glass for ceiling
The beveled stained-glass window has original visual effects. A special technology for creating stained glass structures was developed in France. It is based on the use of specially cut glass. The name of this type of stained glass is associated precisely with the processing of pieces of glass: a decorative cut is made along all the edges of the glass element, which is called "facet".
Types of glass for the manufacture of faceted stained glass on the ceiling

Separate glass elements, along the edges of which facets are made, are called bevels. Their thickness can be different - from 5 to 15 mm. The material for creating bevels is transparent or tinted glass. Sizes and shapes are also varied.
There are such bevels:
- Straight beveled glass … This is a section of the correct form, which is most often an independent element and has rather large dimensions (up to 50x50 cm). Such bevels are not used in stained glass compositions. They are used only as a basis for a future stained glass window.
- Curly elements with facet … The glass is cut in the intended shape. It can be a drop, a leaf, or any other figure for decorating glass. This option is in addition to the general configuration of the stained-glass window.
- Faceted set … This variant is a collection of individual bevels that create a composition when they are combined in a certain order.
The value of the bevels lies in the creation of a chic stained-glass structure, which is characterized by multifaceted volume. The lighting effects created by the refraction of light rays as they pass through the stained glass add an extra impression, adding splendor to the entire interior.
How to make a beveled stained-glass window for the ceiling

Let's describe the process of creating a combined stained glass window for the ceiling (facet-film stained glass window):
- Develop a sketch for the future stained glass, taking into account the location of the bevels and stained glass film.
- Prepare the necessary materials and equipment: a table with lighting, glass base, self-adhesive film for stained glass, lead tape 6 mm thick, rollers for tape and film, bevels, glue for fixing the bevel, an ultraviolet lamp for hardening the glue, scissors, a sharp knife, marker.
- Clip the sketch to the base glass. Clean the glass and surface of the bevel. Leave to dry.
- Apply glue to the area where you want to glue the bevel. Attach the curly element. While gently pressing down on the linen, try to wipe off any excess glue immediately. Do not allow bubbles to form between the element and the glass. The decorative detail should be as accurately as possible defined in its "proper" place, because under the influence of an ultraviolet lamp, the glue hardens quite quickly - in about 15 seconds. After that, it will not be possible to remove it.
- After UV treatment, remove excess glue, wipe these areas with an aerosol spray to rid the surface of subtle adhesive residues.
- Then proceed with the application of the film elements.
- At the final stage, form an edging from the lead tape, carefully pressing all the joints. The beveled stained glass window is ready!
Sometimes, when creating a facet-film stained glass window, framed with a lead tape, the sequence and arrangement of elements relative to the front and back surfaces of the glass changes slightly. So, first, the film and tape are applied from the seamy side, and then the bevels are fixed on the other side of the base, on the front.
Filled stained glass for ceiling
As an alternative to expensive classical stained-glass windows, in the 14th century in Europe, they developed the technique of flooded stained glass, in which paints are actively used to create an image. Filled stained-glass windows, of course, can be ordered from a company specializing in their production, which has high-tech equipment. But it is much more interesting to create a do-it-yourself stained-glass window for the ceiling.
Selection and production of paint for stained glass ceiling

There are two types of stained glass paints:
- Unburned … These paints are based on a solvent. Their palette is a variety of bright and rich colors. No additional processing is required for complete hardening.
- Fired … This type provides for the heat treatment of the finished drawing in special ovens, so the fired paints are not used at home.
Stained glass paints can also be made at home. There are some simple options. To make glue-based paints, take BF-2 glue and acetone in equal proportions, mix them in a glass container. Add any paint that dissolves in alcohol to create the desired shade.
When making gelatin-based paints, dilute 6 g of gelatin in warm water (1 cup). Dissolve dry paints intended for dyeing natural fabrics in a separate glass container in a little water. Mix the ingredients in different proportions to achieve the desired shade. After complete drying, it is recommended to treat a stained glass product with such paints with a colorless nitro lacquer.
DIY handmade stained glass window

The technology for creating a painted stained glass window is quite simple. The difficulty of making do-it-yourself jellied art for the ceiling can be associated with a lack of skill, but painstakingly working on glass painting, the hand very quickly gets used to such work and achieves mastery.
The technique for creating a flooded stained glass window includes the following sequence of actions:
- Draw up a life-size image of the future stained glass on paper.
- Carefully treat the glass surface to remove all dirt - dust, grease stains.
- Clip the sketch to glass. The work surface should be strictly horizontal to avoid paint spreading. The sketch should be face up under the glass.
- Apply paint to the glass along the contours of the sketch. The edging should be continuous so that paints do not mix during application. This edging serves as a kind of barrier to separate the individual segments of the artistic composition.
- When the paint contour is completely dry, it's time to start directly filling the main elements with paints. When placing paint in the cell, distribute it evenly so that the surface is not excessively bumpy. Pay special attention to air bubbles - they can be removed with a brush or needle.
- Leave the filled composition to dry completely for 24 hours. Then you can treat the entire surface with a protective varnish.
In order not to overload the stained-glass window with paints, create a sketch with translucent colorless elements, the main highlight of which will be the contours and texture of the main elements. This option may look modest, but with the right lighting, it will add a touch of sophistication to the room.
Tiffany stained glass for ceiling
Creating a Tiffany stained glass ceiling is a painstaking and entertaining job. You can make such artistic glass panels yourself or buy ready-made headsets with all the necessary additional materials. Let's take a closer look at the process of creating glass elements of the composition and instructions for collecting a stained-glass window.
Preparatory work before making Tiffany stained glass on the ceiling

If the sketch is of your own creativity, then it is also better to cut out the elements with your own hands. To do this, follow the recommendations of experienced specialists:
- Use a liquid-lubricated glass cutter to cut the glass.
- Place the picture under glass on a backlit table.
- Passing the glass cutter along the contour of the pattern, carefully monitor the wheel in order to more accurately control the process.
- First cut out pieces of one color, then another, etc. This will save time on glass change manipulations.
- In order not to get confused, mark on the sketch those elements that have already been cut.
- To separate the cut element, break it off with your hands, do not use wire cutters.
- Guide the cutter without lifting it off the glass surface. Try to make the incision continuously. Repeated cutting with the glass cutter may damage the material.
- Tangent cuts are allowed for curved lines.
- To cut large pieces with curved edges, first cut a piece of glass tangent to the outer edges, then cut through the rest of the lines.
- Elements with long sharp corners begin to separate from the most refined side, first tapping the glass from the bottom along the seam.
- Put all the cut fragments on thick paper in accordance with the sketch. Adjust the elements if necessary.
Features of the manufacture of Tiffany stained glass for the ceiling

The following materials are required for Tiffany stained glass: multi-colored glass, copper tape (foil), transparent glue (silicate is not suitable), soldering flux, tin-lead solder, glass cutter, a soldering iron with a power of 80-100 watts, a sharpening bar for processing edges glass, patina.
Tiffany stained glass collection technology includes the following works:
- After adjusting all sections of the stained-glass window, each element must be wrapped with copper tape. To do this, attach the tape to the edge of the glass and, pressing it tightly, wrap it around the entire perimeter. Press down on the winding with a cotton swab. Cut off excess tape. The tape should be wider than the thickness of the glass, so that its edges can be wrapped on both planes of the element. These gates must be the same width.
- Lay out the pattern of the wrapped sections as tightly as possible to each other.
- Treat areas with copper foil with soldering flux. Do it well so that all elements are soldered without holes.
- Heat up the soldering iron. Use a soldering iron to apply solder to the fluxed contours. You should end up with continuous lines covering the copper tape.
- After completing the soldering process on one side, turn the product over and carry out all the soldering activities on the other side.
- Treat the finished composition with detergent, rinse it off.
- Finally, treat all contours with a patina of the desired color. Wash the stained glass again.
How to make wire framed stained glass

Another type of artistic glass processing that is easy to do at home is imitation of stained glass with wire.
Technological sequence of actions:
- Prepare the necessary materials: glass base, wire, for example, aluminum, PVA glue, applicators for applying glue and paints, stained glass paints.
- Draw a life-size sketch. Place it face up under the glass and secure with double-sided tape.
- The thin wire must be bent in accordance with the contours in the sketch. Try to do this as accurately as possible.
- Degrease the glass surface.
- Apply glue to the wire. It is worth handling the side of the wire frame that will be adjacent to the glass. Attach the frame and press it firmly with a glass-safe weight. Leave it on for 2-3 hours until the glue sets.
- After that, start applying paints. It is better to do this sequentially: first, apply one color to all the intended areas, then another, thoroughly washing the brushes when changing colors in order to prevent color distortion. Do not be afraid that paints may mix in adjacent cells if the wire was tightly glued along its entire length.
- Finish with a strong varnish over the entire surface to give the paint strength.
How to make a stained-glass ceiling - watch the video:
Making stained-glass windows for the ceiling with your own hands is not the easiest task, but it is quite doable with imagination and desire. In addition, as a result, a unique artistic masterpiece will be created, which will surely become a source of pride.


