
You can equip water heating in the bath yourself, starting from making a homemade boiler, laying out a wood-burning stove from bricks and ending with the installation of a "warm floor" system. The main thing is to clearly follow the technology at each of these stages. Content:
- Sauna fuels
- Water boiler for heating a bath
- Wood-burning stove for a bath
- Boiler installation and piping
- Water heat-insulated floor
The issue of heating the bath must be dealt with after the insulation work, before the interior decoration. In compact buildings, it is easiest to build a heater, the power of which is sufficient to warm up the steam room, washing compartment and dressing room. In large rooms, you need to install full-fledged heating using a pipeline.
Types of fuel for a bath with water heating

To simplify the task, you can bring water heating to the bath from home. In winter, you can maintain the optimum temperature in the building in this way. However, in this case, equipment of a separate circuit is still required to heat it in the summer.
Bath water heating can be carried out on different types of fuel:
- Gas … In this case, in order to warm up the boiler, it is necessary to connect to the general gas supply system and install the appropriate equipment. But many settlements in our time are not supplied with gas. And the use of liquefied fuel in cylinders is fire hazardous.
- Electricity … For heating in this way, it is important to correctly calculate the required boiler power. The main advantage is the possibility of installation without a chimney. The disadvantages include the high cost and the need for a three-phase network for a boiler with a capacity of 12 kW or more.
- Firewood … Such a stove is capable of warming up all rooms as efficiently as possible. Wood is a traditional steam room fuel. However, the process of preparing firewood and kindling the stove is quite laborious.
Liquid fuels are not economically viable and highly flammable. Requires special precautions. Not recommended for heating a bath. Having decided on the type of fuel, select the appropriate stove. The market offers a variety of production models of various qualities in a wide price range. However, if you wish, you can build it yourself.
The most efficient and high-quality heating of the bath can be done with a wood-burning stove. Traditionally, a steel or brick structure is installed. In the first case, due to the high heat transfer and the thickness of the walls, the rooms warm up faster. The furnace of a brick oven takes more time, but the heat is stored longer due to the ability of the brick to accumulate it.
Manufacturing a water boiler for heating a bath

For these purposes, you can use ordinary cast iron radiators M-140. We need 12 sections. Each of them has a capacity of 1.5 liters and an area of 0.254 m2… The total volume of the structure will be 18 liters, and the area is 3 m2.
To use, you need to re-equip the radiator according to the following instructions:
- We take out the cardboard spacers between the sections.
- We prepare a mixture of drying oil and graphite. We saturate the asbestos cord with it and lay it instead of gaskets. This will prevent burnout at high temperatures.
- We rinse each section with a 6% hydrochloric acid solution, and then with plenty of ordinary water. This is necessary to remove dirt and rust.
- We assemble the individual parts into one structure in the reverse order, using nipples with right and left threads on the sides to fix it. The sections will be attracted by scrolling the nipple.
- When the distance between them reaches two centimeters, we wind the impregnated cord and make the final tightening of the fasteners.
After assembling the structure and waiting for the drying oil to dry completely, you need to apply a liquid under pressure and check the tightness of the joints for the effective and durable operation of the structure.
Wood-burning stove for a bath with water heating

It is advisable to think over a place for installing the stove during the construction phase. Due to the large weight, an additional foundation is required for a stone structure. We carry out work on the construction of a wood-burning stove for a bath with water heating in the following sequence:
- We pull out a foundation pit about 0.7 meters deep. We fill up a sand pillow 15 cm thick, spill it with water and carefully ram it. On top we make a layer of broken brick or crushed stone.
- We install wooden formwork along the walls of the pit. We mount the reinforcement frame and insert it into the recess.
- Pour concrete, leaving 15 cm to the top.
- We dismantle the formwork and fill the resulting space with sand.
- We cover the upper part with a roll-on waterproofer in two layers. The best option is roofing material.
- We check the horizontality of the foundation. Small irregularities can be covered with intermediate dry masonry.
- We make a solution of clay and water, the consistency of thick sour cream. When fully dissolved, add sand in a ratio of one to one to clay.
- We moisten the bricks with water and lay the first row tightly, checking the corners and horizontality.
- On the third row, we fix the blower door with galvanized wire or steel strip.
- On the fourth, we equip an ash well.
- On the sixth, we finally fix the blower door.
- On the seventh, we install the grates. The size of the firebox must be calculated taking into account the installation of the boiler. On the first row of the firebox, we form a special side and mount a corner. In the side walls, we leave 2 openings for the output of pipes. Doors for the fuel compartment are best chosen from refractory durable cast iron.
- On the eighth row, we construct a partition to connect to the chimney and continue this installation until the fourteenth, on which it is required to install channels.
- We place at an angle the halves of the bricks from the fifteenth to the eighteenth rows. This will form the basis for the separation wall.
- On the next row, we make a door for the steam outlet and lay thin metal strips that connect the twentieth and twenty-first brick rows. After that, close the door frame.
- We begin to install the chimney from the 23rd row, forming channels for heat dissipation.
Please note that the wall inside the fuel compartment and chimney must be as flat and smooth as possible. Wipe the inner surface every five rows.
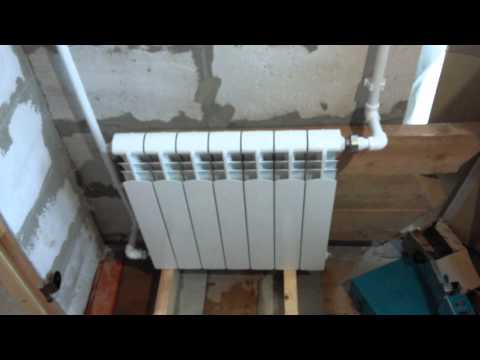
Installation of a boiler for water heating of a bath and piping

The cast iron structure must be placed behind the firebox chamber. It will not heat up from a flame, but from a gas. To correctly install the equipment, we adhere to the following procedure:
- We place the radiator on the pre-made corners, observing the distance to the walls of about 5-6 mm. The clearance will compensate for the thermal expansion of the structure.
- If the selected pipes for connection to the boiler have seams, then we additionally weld them before installation.
- We attach diagonally inch water supply and return pipes. In the place with the right-hand thread, we simply screw in the product. On the left - we use a coupling with a squeegee and a nipple for fixing.
- We install the water supply pipe perpendicular to the floor at the top point, and equip the return pipe in the underground space and connect it from below. This is necessary for improved circulation.
- We close the two extra holes of the product with a plug.
- When welding the pipes together, we remove the chamfer along the cut contour for high-quality filling with a weld seam of the entire thickness and reliable fixation of the parts. If the steam room does not often warm up in winter, then you can pour antifreeze into the system instead of water.
Installation of a water heated floor in a bath with water heating

Although this device will cost more, it is capable of heating the room as quickly and efficiently as possible. Heat goes around the entire perimeter of the room, and not from one source. In this case, the heated air rises.
You can equip underfloor heating in a bath with water heating yourself in the following order:
- We level the surface, carry out insulation work.
- We put aluminum foil on the rough coating, with a reflective coating upwards with an overlap of 15-20 cm. We glue the joints with reinforced tape.
- We install the manifold cabinet by cutting out a hole of 0, 6x0, 4x0, 12 meters at the surface of the flooring.
- We put the supply and return pipes into it, fix the metal shut-off valves to them with the help of compression fittings.
- We connect the circulation pump and the splitter. It is better to equip the latter with an automatic air vent system and a drain valve.
- Along the perimeter, we lay metal-plastic pipes with a diameter of 2 cm in a parallel or spiral way with a step of about 0.3 meters. For this purpose, we use clips and clamps. We observe the distance from the nearest wall - 7 cm.
- We connect one end of the pipe to the general heating system (supply manifold). We connect the second edge to the return device.
- We let in water at a pressure that exceeds the working pressure by one and a half times. If the system can withstand, and the temperature is uniform everywhere, then we proceed to pouring a cement-sand screed.
The manifold cabinet assembly can be purchased from your local retailer. Pipes must be selected of high quality from reputable manufacturers. Watch a video about water heating in a bath:
Water heating in a bath is one of the most effective methods of heat supply. It is popular in oversized steam rooms. You can equip it yourself, but the process is laborious and requires strict adherence to the rules. And the combination of such a system with the high heat transfer of a wood-burning stove will allow you to maintain the optimal temperature in the room for a long time.


