
How to make a flying saucer from a disc, disposable tableware, bake such a cake? Right now you will learn this and you can make an alien out of a cucumber and an apple, out of socks. For Cosmonautics Day or for a competition, children are asked to make crafts at home. Let it be a flying saucer. The child will be happy to do it together with his parents, to come up with interesting stories on the topic of UFOs.
How to make a flying saucer with your own hands
It can be made from unnecessary items that are available at home.
Option number 1

To create such a UFO you will need:
- CD disk;
- foam ball;
- decorative carnations;
- flat plastic stars;
- self-adhesive colored paper;
- sequins;
- 2 wooden skewers or 3 toothpicks;
- acrylic paint;
- beads;
- chenille wire of golden or silver color;
- glue.

- Put a disc on a sheet of self-adhesive paper, circle it, cut it out. Glue this circle to the front of the disc so that the back shiny remains uncovered.
- Cut the Styrofoam ball in half. If you have two hemispheres, use them.
- Paint one of these blanks, and the second needs to be decorated. To do this, take one sequin and pin it with a decorative carnation. In this way, attach the rest of the elements.
- Here's how to make a flying saucer next. You need to attach two antennas to the decorated hemisphere, which will be 2 pieces of chenille wire. To do this, it is enough to stick their edges into the foam.
- Now this decorated semicircle is glued to the shiny side of the disc, and the second is attached to the side of the disc with the self-adhesive tape.
- The legs for this device are made as follows: if from toothpicks, then beads are put on their ends, but so that the sharp edges do not stick out. To do this, you need to drop a little glue into the holes of the beads. If they are large, then cover them with pieces of plasticine.
- When using skewers, you need to cut each in half, take 3 parts, and also put a bead on their tips. The other edges of these supports are threaded into the lower foam part of the extraterrestrial flying object.
It remains to glue plastic stars on the upper side of the intergalactic ship, and if the child liked to create a UFO, show him how to make a flying saucer in a different way.
Option number 2

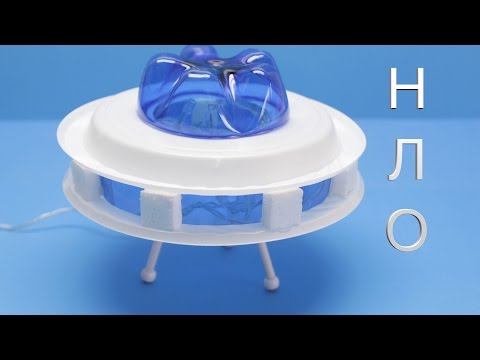
This is how shiny and sparkling it will turn out. And not everyone will guess what is hidden inside. To make this type of UFO, take:
- colored pushpins;
- foil;
- small plastic bottle;
- colored paper or cardboard;
- Scotch;
- scissors.
Follow the instructions below:
- Put the foil on the table, place the vegetable on it. Cover it with a shiny sheet so that the peel does not show through from any side. Use clear tape to secure the foil around the edges.
- Turn the buttons into the portholes of a flying object by driving them in a circle into the protruding part of the squash, after piercing the foil.
- To make a transparent cockpit of a flying saucer, cut the bottom of the bottle along with the edges. Attach this piece to the top of the spaceship with tape.
- You can decorate this work if you cut strips and stars from cardboard or colored paper.

Option number 3
The photo demonstrates what the next flying saucer looks like. To create it, take:
- disposable plastic plate;
- glue;
- 2 disposable cups;
- a small plastic salad bowl.

To make the legs more stable, use two pairs of glasses for each. Together the salad bowls, you can take another transparent plastic container of this shape. Turn the salad bowl upside down, glue it in this position on the plate using scotch tape. With the help of it, you will attach 2 legs to the bottom of the structure.
Option number 4
If you want to familiarize yourself with other ideas, then turn to the fourth. To recreate it take:
- a round object (for example, a plate);
- silver cardboard;
- artificial stones;
- glue Titanium transparent;
- stapler.
If you have regular cardboard, then have a child paint it with silver paint. Or he will cut 2 circles out of fabric of this color, glue them onto this paper base. On the top of the flying saucer, glue the cockpit made of the same material. It consists of a rectangle that wraps around a small circle. Using clear tape, attach the booth to the top plate. Decorate these two pieces with faux stones by gluing them.
Connect the 2 halves of the flying saucer with a stapler.

Option number 5
And here is another flying saucer toy that will help the development of children's creativity.

So that the child can make it, give him:
- 2 paper plates;
- paint with a brush;
- transparent convex lids for baby yogurt;
- glue.
Master Class:
- Having shown imagination, he will paint cardboard plates. When the coating stops sticking to your hands, glue these two blanks so that the convex midpoints are outside. And parents will help to attach the cabins of aliens. After all, for this you need to use a strong glue or "hot" gun.
- But first, you need to put an alien in the cockpit, which the child will make himself. If he wants to get it out sometimes, then attach a transparent lid to the center of the top plate, outline it. At this mark, make 4 small cuts with a knife, at the same distance from each other. The same gaps should be at the bottom of the cap.
- Cut it out here so that these 4 elements stick out. Then you will insert them into the slots in the plate, turn, and the cabin will lock. To open it and release the captain of the spaceship, turn the porthole to the other side and raise it.
The following craft plate is similar to this one, but made from slightly different materials. From:
- CD or DVD drive;
- colored paper;
- transparent convex lid from a milk dessert.

Let the child attach the disc to the paper folded in half, cut 2 round blanks at once. On the reverse side of one of them, it will draw identical circles according to the template. Cut them out.
As a template for drawing holes, you can use a 5-ruble coin, a large button. But these items should not be given to small children! Now you need to cut holes with small scissors. If you have a hole punch of this shape, use it. The paper circle formed in this way is glued to the shiny side of the disc, to the back - not cut.
The cockpit is attached to the top, and now you can refer the work to a competition or play with such a flying saucer.
How to make a frisbee with your own hands?
This is a kind of small flying saucer that you can use to play with your children. If you have dogs, they will be happy to catch this flying object and bring it to you.
To do it, prepare:
- disposable cardboard plates - 2 pcs.;
- glue;
- markers, felt-tip pens or pencils;
- Scotch.
Let your child get creative and color the plates as they see fit. But it can be difficult for him to cut in a small circle in the center of each plate, he will need the help of elders.
The container prepared in this way is folded on top of each other with the concave sides inward and firmly fastened along the edge with a stapler and / or tape or with glue.

You can make a frisbee so that in flight, ribbons of fabric or paper develop. They are preliminarily inserted between two containers and glued to their edges.

How to make an alien - master class
Such a character will certainly come in handy. The child will put him in the porthole of a flying saucer and play with pleasure.
From kinder eggs and socks
To create this character, give the child:
- container from kinder eggs;
- dry peas;
- socks;
- wire;
- threads;
- 2 buttons;
- scissors;
- cotton wool.
Manufacturing instruction:
- Have a child fill a plastic kinder egg container with dry peas. Then the head of the alien will rattle when shaken.
- This blank is inserted into the sock. To mark the neck, you need to tie a thread below it. Cut off the sock just below this location.
- Twist the body of the future character out of the wire together with the child, wrap it with cotton wool, sew over the rest of socks. Pass the top end of the wire where the neck is.
- Show your child how to create hair from threads, sew buttons instead of eyes and nose. The eyes should be large, so use the correct size buttons.
- You can sew clothes for the alien or leave the little man as if he is in a tight spacesuit.
You can wrap the body of a representative of another civilization with foil, dressing it in this way. If the child is carried away by this game, make a big Martian with him. How to make an alien using a different technology, tells the next master class.
From cardboard boxes
Prepare:
- two boxes;
- colored paper;
- clothesline;
- sponges;
- scissors;
- balloon;
- colored threads;
- PVA glue;
- buttons.
Follow this plan of action:
- Place the box on the box, glue them in this position. This is the body of a Martian. Paste it over with colored paper. His arms and legs will be ropes that need to be glued to the boxes. There can be as many of them as the child wants to make.
- He will make his palms and feet from a sponge.
- To make a head, let the child inflate a balloon, wrap it with colored threads, coat them with PVA. This design will dry for a day. After this time, pierce the ball, remove it.
- In place of eyes, nose, the child will attach buttons or pieces of colored paper, glue the ball-head in place. It remains to paint the alien and you can make a virtual trip, going with him into space.
Plasticine
The child will need:
- plasticine;
- matches - 3 pcs.;
- plastic knife;
- modeling board.
Let the child roll a "sausage" out of plasticine, make its lower part larger and give the blank the shape of a bell. Now you need to cut the lower part of the figure to get the hero's legs.

The child will roll his hands out of plasticine in the form of a sausage, cut on one side to indicate the fingers. Attaching his hands in place, he rolls 6 balls - 3 for the antenna and the same for the eyes. He will attach the latter to the face of the Martian, then stick 3 matches on the crown of his head, and attach a ball to the end of each.

Cucumber and apple
This edible option is good because you can first play with it, and then crunch with vitamin fruits and vegetables. To do this, we suggest taking:
- green apple;
- cucumber;
- knife;
- board;
- toothpicks;
- a plate;
- pumpkin.
To make an alien from fruits and vegetables, cut off the top of a cucumber and then a 7 cm piece. This will become the torso. From the remaining part, cut 2 arms and 2 legs, chopping it across.

From another piece of cucumber, you need to cut off 2 strips of the skin along with the pulp, which will become antennae. Cut out the triangular eyes, feet.

Stick one end of a toothpick into the apple, the other into the antennas, and attach them. Attach your arms and legs to your body in the same way. And attach it yourself to the apple using three toothpicks.

To make a flying saucer for this alien, cut the top off a pumpkin.

The work is completed, you can admire the result.
Cake "Chocolate flying saucer"
Surely, the child will also want to taste a sweet craft on this topic. Here the cake "Chocolate Flying Saucer" will come in handy.
Its surface is shiny, as if a distant planet or a particle of space is reflected in it.

Such a cake in a multicooker can be baked in the oven too. For the test you will need:
- 6 eggs;
- 1 glass - 180 g flour;
- 200 g granulated sugar;
- 4 tbsp. l. cocoa powder;
- salt - on the tip of a knife;
- 2 g vanillin.
For the cream:
- 3 tbsp. l. Sahara;
- 4 tbsp. l. cocoa;
- 2 tbsp. l. flour;
- 260 ml of milk;
- 2 g vanillin;
- 1 egg.
For impregnation:
- 3 tsp granulated sugar;
- 50 ml of squeaky water.
For glaze:
- 3 tbsp. l. Sahara;
- 60 ml of water;
- 1 tbsp. l. butter;
- 1 tbsp. l. cocoa.
For the layer - 1 can of boiled condensed milk.
- Separate the whites from the yolks. Put the squirrels in the refrigerator for now. Beat the yolks with sugar, vanilla. When they become lighter, add 2/3 of the flour, cocoa, stir.
- Add a little salt to the whites, beat until firm foam. Gently combine them with the egg mass, gradually adding the remaining flour.
- To make the biscuit rise well, do not grease the springform pan with oil, but cover it with baking paper.
- Place the dough in a mold, twirl gently to distribute it evenly over it and not rise in the center.
- Here's how to make a flying saucer delicious, chocolatey next. If you want to bake a cake in a slow cooker, then set the "Baking" mode to 50 minutes. If using an oven, bake at 180 degrees until tender - about 40 minutes. They check it with a wooden stick. Pierce the center of the cake with it, if it remains dry, then the biscuit is ready. But so that it does not fall off, you cannot immediately remove it from the oven. Cool it down gradually. At first, just slightly opening the door. In a few minutes, a little more. So, gradually opening it wider and wider, keep the biscuit in the turned off oven for 15 minutes.
- Then take it out, cover with a towel, and while it cools down to the end, prepare the cream. Mix all the ingredients for it. Put on fire. Cook, stirring frequently. When it begins to thicken, stir more intensely, remove from heat when boiling. Place the bowl of cream in a bowl of cold water. Stir it occasionally to prevent a film from appearing on the surface.
- To make the impregnation, mix sugar with boiling water, pour this mixture into a plastic bottle, close the lid, in which the holes are made with a needle.
- Cut the cake into 3 cakes and it's time to make the chocolate flying saucer further.
- Put the first cake on the dish, sprinkle it with impregnation, grease on top with the contents of half a can of condensed milk. Put the second cake on it, which is also moistened with impregnation, and then grease with cream.
- Place the third cake on top, sprinkle it with impregnation, brush with the remaining condensed milk and smooth the surface with a long knife.
- Melt the ingredients for the glaze, let it cool slightly, pour it over the condensed milk in a thin stream. After hardening, it will shine.
- Then the “Chocolate Flying Saucer” cake should be put in the refrigerator for at least 3 hours, or better at night, so that the cakes are soaked.
If you want to create another unusual craft on this topic, check out the next section.
How to make a DIY UFO toy?

You could see similar one in the passages, near shopping centers. Private sellers deftly manipulate such a toy, it either hangs or writes pirouettes in the air. Passers-by stop, look as if spellbound.
They do not know that this is not a miracle, but a line that is not visible, but it allows the toy to behave in such an unusual way. You can do it yourself, and then surprise your friends and acquaintances. To do this, take:
- Whatman or cardboard 5 mm thick;
- fishing line;
- scissors;
- glue;
- awl.
If you have a drawing paper, glue it in 5 layers. This is not done with cardboard. Cut 5 blanks from these paper materials. The templates are presented below.

Now you need to make a hole in the middle of the upper part of the body with an awl, skip the end of the line here. A pair of beads is put on it, and the edge of the line is tied in a knot.
After measuring the length of the line, cut off the excess. Attach it to the collar with a pin, toss it over your right ear, then lower it so that it is between the index and thumb of your right hand. Take the upper part of the UFO toy with your left hand, twist it like a top. It will begin to rotate, and you will learn to do various manipulations. After training, you can surprise your friends and family.
In continuation of this topic, we propose to see the process of creating a flying saucer with your own eyes. After all, it can even be made from a plastic bottle.
You can also make a UFO out of paper using the origami technique.


