
Despite the existing limitations imposed on stretch ceiling luminaires, there are many options for lighting system equipment. The installation of fiber optics, LED and fluorescent devices should be carried out strictly according to the instructions. When installing with a hook, we perform the work in the same sequence, but instead of the mounting plate, a hook from the reinforcement is fixed. This method can be used to perform several fixings of luminaires in stretch ceilings.
Fixation technology for spotlights in a stretch fabric

Before placing the luminaires in the stretch ceiling, we determine the power of the lamps used. It should not exceed 40 watts. Choosing a lamp with wide rims. During the installation process, we adhere to the following instructions:
- We determine the location of the luminaires in the stretch ceiling and draw up a diagram.
- After laying the wiring, we attach the adjustable posts to the base coat according to the drawing.
- We project a mark on the floor with a laser beam at the place of fixing the rack. You will need this to easily locate the racks after installing the ceiling.
- We stretch the canvas.
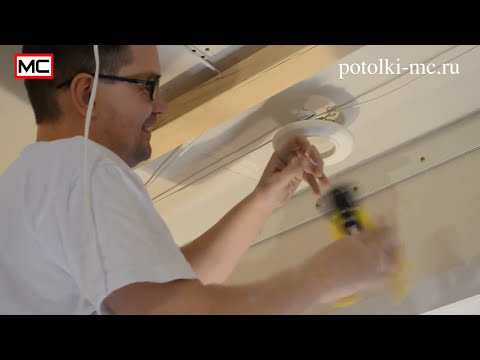
- A day after the installation of the ceiling at the locations of the racks, we glue several thermal rings on superglue.
- After secure fixation, cut a hole inside the rings.
- Insert the protector ring and place it on the ceiling from the inside.
- We fasten the outer fastener strip.
- We take out the cable and connect it to the terminals of the device.
- We install a decorative profile and adjust the position of the lamp along the height of the canvas.
- Press the spring mounts to the body and pull them into the hole.
Please note that incandescent lamps cannot be used for ceiling mounting due to strong heat dissipation. The only exception is closed-type spotlights. However, in this case, the distance from the base surface to the material should be from 10 cm. If halogen lamps are used, then it can be reduced to 6 centimeters.
Rules for attaching an LED strip in a stretch ceiling

The placement of lamps between the stretch fabric and the main ceiling is rare, but this method is often used by designers to create original stylistic effects. For indoor installation, an LED strip is optimal, but in this case, the canvas itself must be made of reflective film.
We carry out the work before stretching the canvas in the following order:
- We calculate the required tape length and power supply unit power. If it exceeds 10 meters, then it is more expedient to equip a parallel connection.
- We mount an RGB controller to control the color of the LEDs.
- We make marks at the attachment points.
- We remove the protective film and glue the tape according to the scheme to the main ceiling.
- We connect the diode tape and the power supply.
- We check the operation of the lighting system and proceed to stretching the canvas.
It is not recommended to use LED lighting as the main one due to insufficient brightness. However, in combination with other types of luminaires, it is used very often.
Do-it-yourself starry sky made of fiber on a stretch ceiling

Using optical fiber, you can recreate the effect of a burning flame or starry sky.
You can make such lighting yourself according to the following instructions:
- We attach the baguettes to fix the canvas at a distance of five centimeters from the base ceiling.
- On the surface we draw the location of the fiber optic threads.
- Carefully, so as not to break, we fix the bundles with special brackets.
- We fix the projectors and connect the threads to it.
- We stretch the canvas.
- We attach a thin wire to the tip of the soldering iron and make a hole in the place where the "star" is fixed.
- Pull the tip of the fiber through the hole made, cut it to the desired length and process it with glue.
Please note that fiber is only suitable for decorative lighting, but is not used as the main lighting for a room.
Installation technique for fluorescent lamps in a stretch ceiling

Bright and intense lighting can be organized using fluorescent lamps. They can be used as main light sources. Among the shortcomings, the unevenness of the light supply is distinguished due to the rupture of the connection.
Installation is carried out as follows:
- Before installing a luminaire with a fluorescent lamp in the stretch ceiling, draw a layout diagram.
- Before starting the installation of lighting devices, it is imperative to de-energize the room.
- We install the boxes according to the scheme on the base ceiling.
- Using a connecting cable, we connect the lamps to each other and mount them in the boxes.
- We connect to the power supply.
It is undesirable to install more than 12 devices of different power in one chain. How to install a luminaire in a stretch ceiling - watch the video:
Installing a luminaire in a stretch ceiling requires a serious and responsible approach. Only taking into account the features of each type of device, it is possible to recreate the lighting system according to all the rules. The durability of the web and the serviceability of the entire system depend on the literacy of the installation.


